Updated on 19-12-2021: Added the list of supported motherboards with BIOS flashback and also added the steps to BIOS flashback on ASRock motherboards.
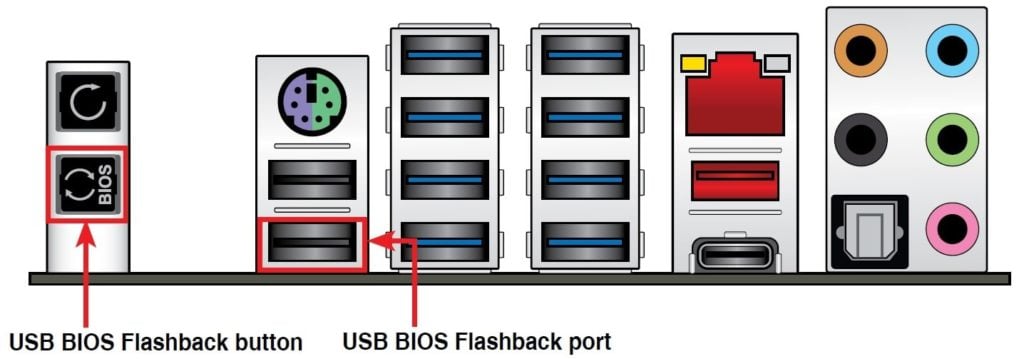
BIOS Flashback helps you to update to new or old motherboard UEFI BIOS versions even without a CPU or DRAM installed. This is used in conjunction with a USB drive and the flashback USB port on your rear I/O panel.
Do you have any doubts regarding BIOS Flashback? Then there is nothing to worry about, we have got your back. Follow the article till the end to clear every doubt regarding BIOS Flashback.
What is BIOS?
According to Wikipedia,
“BIOS is the firmware used to perform hardware initialization during the booting process and to provide runtime services for operating systems and programs. The BIOS firmware comes pre-installed on a personal computer’s system board, and it is the first software to run when powered on.“
What is BIOS Flashback?
The term ‘BIOS Flashback’ itself is explaining what it is. The English word Flashback means ‘set in a time earlier than the main story’, which simply means in tech is that go back to a specific version of any software.
There may be several reasons behind this, like faulty current software, so going back to a stable version, etc., etc.
But these days people use it to upgrade to a higher version of BIOS software when they don’t have access to the GUI BIOS update.
Like you bought a Ryzen 3000 series CPU and a B450 MoBo, and you come to know that the BIOS version of B450 doesn’t support Ryzen 3000 series.
So, you will have to update to the latest BIOS version but at the same time, you don’t have access to the BIOS GUI updater.
So, here comes the BIOS Flashback feature. You just have to download the latest version and you are good to go, just by connecting the Power Supply to the Motherboard.

How to use BIOS Flashback?
BIOS Flashback is very easy nowadays. Just a few steps and you are good to go. Go through the below blocks for your brand of motherboard.
Before starting anything, make sure to read the manual and search for the flashback port.
Pre-requisites
Note: Your USB device must be MBR. So, convert it from GPT to MBR.
GPT to MBR
- Back up or move all volumes on the basic GPT disk you want to convert into an MBR disk.
- Open an elevated command prompt by right-clicking Command Prompt and then choosing Run as Administrator.
- Type
diskpart. If the disk contains no partitions or volumes, skip stepping 6. - At the DISKPART prompt, type
list disk. Note the disk number that you want to delete. - At the DISKPART prompt, type
select disk <disknumber>. - At the DISKPART prompt, type
clean. - At the DISKPART prompt, type
convert mbr.
Format USB as FAT32
- On the USB flash drive, right-click and select Format
- File system format, select FAT32
- And then click start.
- Formatting is complete.
MSI Motherboards
- Download BIOS from the support page
- Format USB drive (fat 32)
- Put new BIOS on drive
- Rename BIOS too ” MSI.ROM ”
- Eject drive and turn off the system
- Connect the motherboard to the power supply
- Put the drive into the correct Flashback port
- And press the button give it 5 mins to do its thing regardless
Note:
- Locate the CMOS Battery, which is a button cell battery. Either short the two pins beside the battery labelled BAT1 for 5 to 10 seconds or remove the battery and wait at least 20 minutes before reinserting.
- If the LED flashes for less than 5 seconds, repeat the steps again, you might have done something wrong.
List of MSI Motherboards with BIOS Flashback
- MSI MAG B550M Bazooka (mATX)
- MSI MAG B550M Pro VDH WiFi (mATX)
- MSI MAG B550M Mortar (mATX)
- MSI MAG B550M Mortar WiFi (mATX)
- MSI MPG B550I Gaming Edge WiFi (mITX)
- MSI MPG B550I Gaming Edge MAX WiFi (mITX)
- MSI MEG B550 Unify (ATX)
- MSI MEG B550 Unify X (ATX)
- MSI MPG B550 Gaming Edge (ATX)
- MSI MPG B550 Gaming Plus (ATX)
- MSI MPG B550 Gaming Pro Carbon WiFi (ATX)
- MSI MPG B550 Tomahawk (ATX)
- MSI B550-A Pro (ATX)
- MSI B450M Bazooka Plus (mATX)
- MSI B450M Gaming Plus (mATX)
- MSI B450M Mortar (mATX)
- MSI B450M Mortar MAX (mATX)
- MSI B450M Mortar Titanium (mATX)
- MSI B450-A Pro (ATX)
- MSI B450-A Pro MAX (ATX)
- MSI B450 Gaming Plus (ATX)
- MSI B450 Gaming Plus MAX (ATX)
- MSI B450 Gaming Pro Carbon AC (ATX)
- MSI B450 Gaming Pro Carbon AC MAX (ATX)
- MSI B450 Tomahawk (ATX)
- MSI B450 Tomahawk MAX (ATX)
- MSI X470 Gaming M7 AC (ATX)
- MSI MEG Z490 Ace (ATX)
- MSI MEG Z490 Unify (ATX)
- MSI MEG Z490 Godlike (EATX)
Asus Motherboards
- Download the latest BIOS for your motherboard
- Format USB/SD drive (fat 32)
- And place the extracted BIOS file in the USB drive
- Rename BIOS filename according to the motherboard model. Eg. R4E.ROM for Rampage IV Extreme, P9X79.ROM for P9X79 and etc. You may find the filename for your motherboard in the user manual
- Plug the USB drive into the correct Flashback port
- Press and hold the BIOS flashback button down for 3~5 seconds
- Wait till the LED stops to blink, then the BIOS flash will be completed.
Note:
- The constant lid of this LED rather than flash indicates the BIOS image cannot be found on the USB pen drive used. Please try and repartition the pen drive into FAT32/FAT16, and format, re-download the image, extract, rename and copy again to see if that helps.
- The power button will not work until the completion of USB BIOS Flashback.
List of ASUS Motherboards with BIOS Flashback
- Asus ROG Crosshair VIII Formula (ATX)
- Asus ROG Crosshair VIII Hero (ATX)
- Asus ROG Crosshair VIII Hero WiFi (ATX)
- Asus ROG Crosshair VIII Hero Dark (ATX)
- Asus TUF Gaming X570-PRO WiFi (ATX)
- Asus ROG Strix X570-E (ATX)
- Asus ROG X570-F (ATX)
- Asus ROG Crosshair VIII Impact (mDTX)
- Asus TUF B550M-Plus WiFi (mATX)
- Asus ROG Strix B550-I (mITX)
- Asus ROG Strix B550-A (ATX)
- Asus ROG Strix B550-E (ATX)
- Asus ROG Strix B550-F (ATX)
- Asus ROG Strix B550-F WiFi (ATX)
- Asus ROG Strix B550-XE WiFi (ATX)
- Asus TUF Gaming B550-Plus (ATX)
- Asus TUF Gaming B550-Plus WiFi (ATX)
- Asus TUF Gaming B450M-Plus II (mATX)
- Asus TUF Gaming B450M-Pro S (mATX)
- Asus Prime B450M-A II (mATX)
- Asus ROG Strix B450-F Gaming II (ATX)
- ASUS Crosshair VII Hero (ATX)
- ASUS Crosshair VII Hero Wi-Fi (ATX)
- Asus ROG Maximus XII Extreme (EATX)
- Asus ROG Maximus XII Hero Wi-Fi (ATX)
- Asus ROG Strix Z490-E Gaming (ATX)
ASRock Motherboards
- Go to ASRock website and download the latest BIOS flash file.
- Format USB/SD drive (fat 32)
- Extract the BIOS flash zip file and copy the file to your USB/flash drive.
- Now, rename the file to ‘creative.rom’.
- Then, install the power connector (24 pin) to the motherboard.
- Now, turn the power switch of the power supply.
- Then, connect the USB/flash drive to the BIOS flashback port.
- Finally, press the BIOS Flashback button for at least three seconds. The LED will start blinking.
- Once completed, the LED will stop automatically.
Note: If the LED is not blinking and is solid green, then it means the BIOS flashback is not functioning properly.
List of ASRock Motherboards with BIOS Flashback
- ASRock X570 Aqua (ATX)
- ASRock X570 Creator (ATX)
- ASRock X570 Phantom Gaming X (ATX)
- ASRock X570 Taichi (ATX)
- ASRock B550 Taichi (ATX)
- ASRock Z490 Taichi (ATX)
- ASRock Z490 Aqua (EATX)
Gigabyte Motherboards
While writing this article, no Gigabyte MoBos support BIOS Flashback.
Conclusion
That was it, if you follow the instructions successfully, you will be able to flash the BIOS without CPU.
Need more information about BIOS Flashback or have any doubts about it? Then comment down below, we will try to clear those doubts.
FAQs
Does My MoBO Support BIOS Flashback?
Do you need BIOS Flashback?
As I mentioned earlier, if you want to roll back or update to any BIOS version but you don’t have access to the GUI updater, then BIOS Flashback comes in handy.
How long does a BIOS Flashback take?
The USB BIOS Flashback process usually takes 1-2 minutes and maximum 3-5 minutes. The light staying solid means the process has completed or failed.
What is the BIOS USB port?
The BIOS USB port is the port that is used for BIOS Flashback.
Can you flash a BIOS without a CPU?
Yes, that is the whole point of the BIOS Flashback. You can flash BIOS without a CPU by using the BIOS Flashback feature.
What is clear CMOS?
Clearing the CMOS on your motherboard will reset your BIOS settings to their factory defaults.
What is the “BIOS-FLBK” button for?
This enables you to update to new motherboard UEFI BIOS versions even without a CPU or DRAM installed. This is used in conjunction with a USB drive and the flashback USB port on your rear I/O panel.
Directly in Your Inbox


