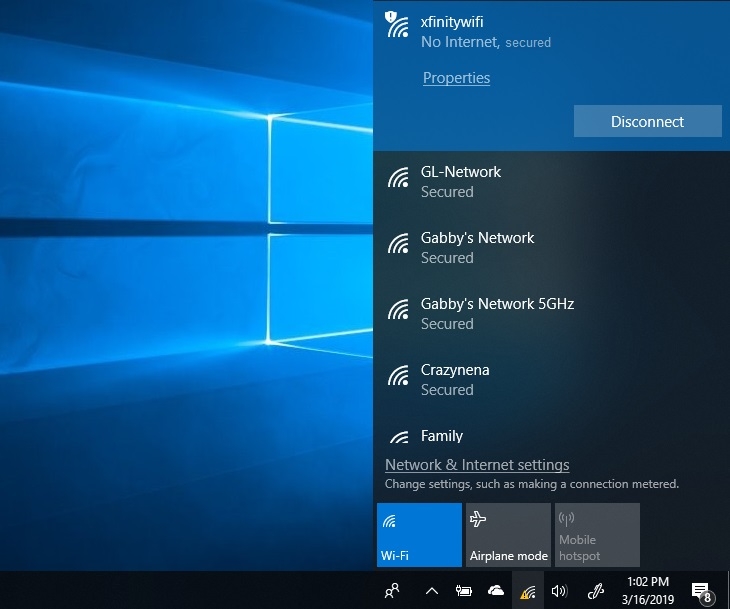
In technology, advancements, or even for recreational purposes, network connectivity is the base of the pillar. However, you might often encounter situations when connecting to the internet would seem a daunting task.
In such a scenario, you would get the error message, “Unidentified Network No Internet.” Though it might seem a complicated issue that would require the need of a technician, it is not. You can quickly fix it at home if you follow the instructions carefully.
Several reasons give the unidentified network error message. Some of these include inaccurate network settings, wrong IP configured, and similar ones.
Therefore, you would be unable to access the internet even if your internet connection is active and working. However, you need not worry as our “How to fix” guide has got you all covered with it.

How to Fix No Internet Access Unidentified Network?
Be it Windows 7,8,10, or 11; you can fix the no internet access unidentified network issue in the following ways:
Method 1: Disable Flight Mode
You get the benefit of using flight mode or airplane mode whenever you want to disconnect all the wireless networks on Windows 11/10. When you want to connect to the internet, it is evident that the Airplane mode is off. However, to tackle the issue, you need to turn it on. You can implement it using either two methods:
Using Windows Settings
- Press the Windows button.
- Go to Settings.
- Navigate to Network and Internet option.
- Select Flight Mode and toggle on the button.
- After 3 seconds, click to toggle off the button.
Using Wifi or Network Icon
- From the Windows taskbar, click on the WiFi or Network icon.
- Right-click on WiFi and tap on the icon to switch it on
- Afterward, it turns dark; tap on it to disable Flight mode
If the Flight Mode method does not work, follow the next method mentioned below!
Method 2: Update Network Card Drivers
Many times, the root cause lies within the Network Drivers. So, you can update it to check if it works or not. You have two methods to update your Network Drivers, and you can follow any of them to update Network drivers:
Sometimes the issue might be with the Network drivers. Update them and see if this helps. To Update the Network Card Drivers, there are two options:
Update Network Drivers from Windows
- Go to Windows Settings.
- Navigate to Update and Security.
- Select the View Additional Update link.
If the Network Driver update is available, then click to install it. Afterward, reboot your device to check if the problem persists or not.
Check out OEM Website
- Press the Win+K keys simultaneously to open OEM (Open Device Manager).
- Navigate to the Network adapter.
- Select the Properties option
- Go to the Drivers tab and view your driver version
- On the OEM website, navigate to the driver’s section
If a later version is available, restore it to your PC and install the latest network driver later.
Method 3: Disable Antivirus of Firewalls Software
If you use an antivirus or firewall, you must note that often it acts as an obstacle to your network connection. Though anti-virus is essential for your PC yet, you can disable it for some time to check if it resolves the issue or not. If it does, then probably the antivirus interfered with your network connectivity.
For Antivirus
Open your antivirus software and disable it. Afterward, check if the issue is resolved or not.
For Firewalls
If you use Windows Firewall, then Reset the Settings to default. Check if it works or not.
Additionally, if you use a VPN, then it often acts as a barrier to network connectivity. So, disable your VPN and check if the issue is resolved or not. However, if it does not solve your problem, then maybe there’s an issue with the DNS server. So, try the method given below!
Method 4: Change your DNS server
Internet Service Providers provide you with a custom DNS server. However, sometimes it could be too slow. In such a scenario, you can use the Google Public DNS or Cloudflare DNS to speed up your internet connection.
Follow the steps given below to change the DNS server:
- Press Windows+X keys simultaneously.
- Navigate to Network Connection.
- Go to Properties to check your Wifi or Ethernet properties. You may be prompted to input the administrator credentials.
- Double click on IPv4 (Internet Protocol Version 4)
- Click on the option. Use the following DNS server address and set
- But, edit your DNS server address to Google Public DNS with the following:
- Preferred DNS server: 8.8.8.8
- Alternate DNS server: 8.8.4.4
Method 5: Use 1Windows Troubleshoot
Windows 11/10 offers you an inbuilt troubleshooter. You can use it to diagnose your network and further troubleshoot. There are two ways of using it. You can follow either of them given below:
Troubleshoot Specific Network adapter
The method diagnoses your specific network adapter.
Follow the steps given below to do so:
- Right-click on the Start menu or use a combination of Win+X keys simultaneously.
- Navigate to Network Connections.
- Right-click on your particular network connection, be it Wifi or Ethernet.
- Click on the Diagnose option underneath.
The process will initiate the troubleshooting automatically.
Overall Network Assessment
The method assesses the whole network at once.
Follow the steps given below to do so:
- Go to Windows Settings.
- Navigate to Update and Security.
- Click on Troubleshoot.
- Choose Additional Troubleshooter.
- Navigate to Network Adapter and click to run it
After it runs, your issue will be resolved if there is an issue with Networks.
However, if there is an issue with your network adapter, you must follow the method mentioned below!
Method 6: Use External Network Adapter
If your network adapter has any issue that’s causing the problem, then use an external adapter whether the issue is resolved or not. Most laptops and desktop PCs have an external adapter so that if the internal adapter doesn’t work, then an external one could be used.
If any of these somehow don’t, then the below-mentioned method would surely fix the issue!
Method 7: Restart your Modem and Router
Rebooting your adapter fixes the issue. If your device’s network adapter does not work effectively, you must try this one.
Follow the steps given below to do the same:
- Turn off the modem and router but ensure that both are physically connected.
- Turn on the modem.
- Until the lights become green, then wait for another 30 seconds.
- Turn on the router.
Though many routers need more than usual time to function normally after restarting, consider it before checking whether the method worked or not.
Frequently Asked Questions
Why is my Internet unidentified network?
Many of the reasons account for an unidentified network. An outdated or corrupted network driver or incorrect network settings often account for the issue.
How do I change from an unidentified network to a home network?
You can run the inbuilt Windows Network troubleshooter. If you do not know how to do so, follow the method mentioned above to use the Windows troubleshooter.
The Final Verdict
The above methods must have fixed the Unidentified Network No Internet on Windows issue on Windows 11/10. However, if you have any queries, please let us know in the comments section below. Also, make mention which method helped you resolve the issue.
Directly in Your Inbox


