For your computer or any other device to connect to the internet, it needs a valid IP address. Sometimes users get an error reading Ethernet doesn’t have a valid IP configuration. Now if you do not resolve this issue, you will not be able to access the internet.
In this article, I am going to show you some steps and methods by which you can fix this Ethernet doesn’t have a valid IP configuration error in Windows 10.
Fix Ethernet Doesn’t Have A Valid IP Configuration Error
Restart Your Your Modem, Router, and PC
Well, if there is anything wrong with anything, the first thing you need to do is restart everything involved.
So here, you can try restarting your modem, router, and PC to fix this issue. If that doesn’t work out, you can move to the next method.
Update the Firmware for your Router and Modem
You see the firmware is very crucial for the router and modem to work. All you have to do is is keep them updated.
You can find the option to update the firmware in the settings menu for your router, modem. Just make sure you have the latest version.
Adjust the Network Adapter Settings
Step 1: Open Settings using the Windows Search Bar.
Step 2: Click on Network & Internet.

Step 3: Click on the Change adapter options.

Step 4: Here, right-click on Ethernet and then click on Properties.

Step 5: Double-click on Internet Protocol Version 4 (TCP/IPv4).

Step 6: Here, select “Obtain an IP address automatically” and “Obtain DNS server address automatically”.

Click on OK. Save these settings and this should fix the Ethernet doesn’t have a valid IP configuration error for you.
Use Google’s DNS
Step 1: Open Settings using the Windows Search Bar.
Step 2: Click on Network & Internet.
Step 3: Click on the Change adapter options.
Step 4: Here, right-click on Ethernet and then click on Properties.
Step 5: Double-click on Internet Protocol Version 4 (TCP/IPv4).
Step 6: Select the “Use the following IP address” and “Use the following DNS server addresses”. Now enter the following values for each space:
- IP address: 192.168.1.15
- Subnet mask: 255.255.255.0
- Default gateway 192.168.1.1
- Preferred DNS Server: 8.8.8.8
- Alternate DNS Server: 8.8.4.4
Save the changes and try using the internet. These are Public Google DNS Settings.
Reinstall Network Adapter Drivers
Step 1: Go to the Windows Search Bar, type “Device Manager” and hit enter.
Step 2: Expand Network adapters.
Step 3: Right-click on your network adapter and then click on Uninstall device.

Uncheck the option reading “Delete the driver software for this device” and uninstall the driver.
![[Solved] Ethernet Doesn’t Have A Valid IP Configuration in Windows 10 1](https://tech-latest.com/wp-content/uploads/2021/08/4.2.jpg)
Now restart your computer and try using the internet.
Update your Network Adapter
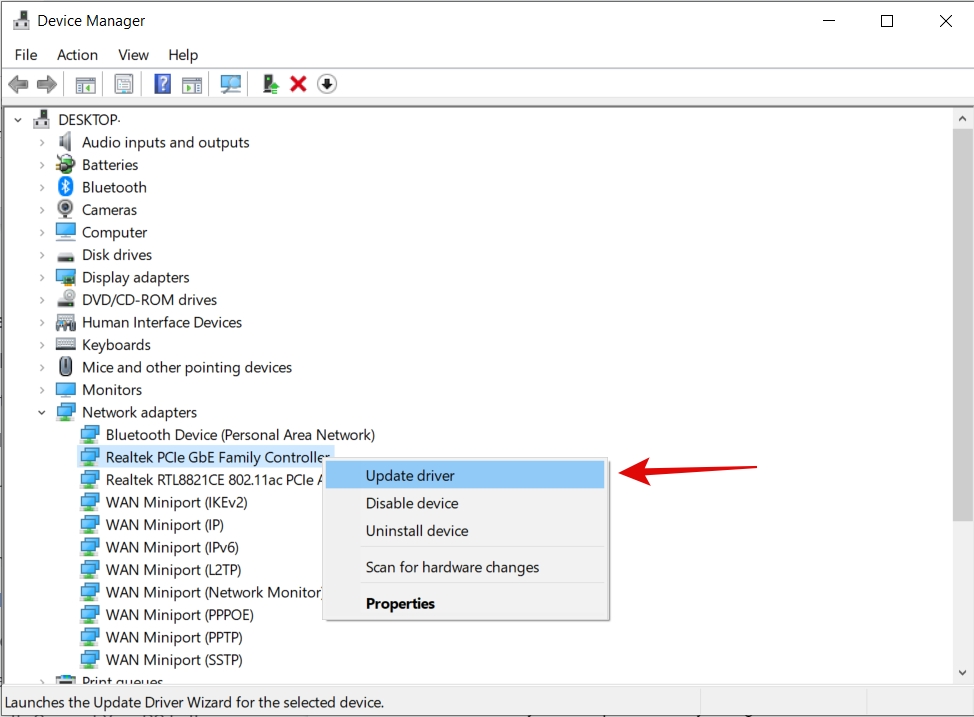
If the above method didn’t work for you, you can try to update the driver for your network adapter. Here is how:
Step 1: Go to the Windows Search Bar, type “Device Manager” and hit enter.
Step 2: Expand Network adapters.
Step 3: Right-click on your network adapter and then click on Update driver.

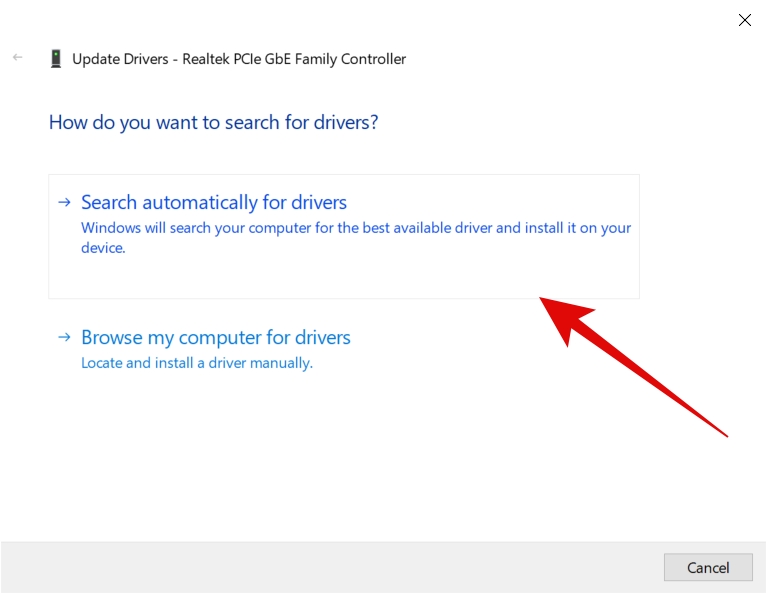
Step 4: In the next menu, click on “Search automatically for drivers”.

Now the computer will search for the drivers and update them for you. This should fix the Ethernet doesn’t have a valid IP configuration issue.
Disable TCP/IPv6
Step 1: Open Settings using the Windows Search Bar.
Step 2: Click on Network & Internet.
Step 3: Click on the Change adapter options.
Step 4: Here, right-click on Ethernet and then click on Properties.
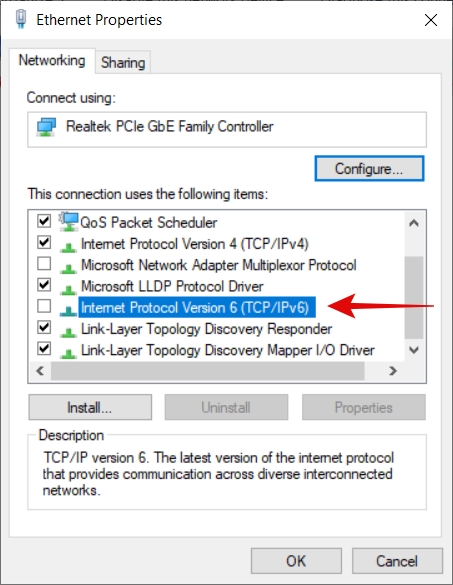
Step 5: Uncheck the box for Internet Protocol Version 6 (TCP/IPv6).

Click on OK to save the changes.
That’s it!
Reset Your TCP/IP
To reset the TCP/IP you will have to use the command prompt. Here is how you can do it:
Step 1: Go to the Windows Search Bar, type “CMD”, right-click to Run as administrator.
Step 2: Once the command prompt(admin) window opens, type the following command and hit enter:
netsh WinsockNow once this command is executed, you will be asked to restart your computer but you have to ignore it.
Step 3: Now enter the following command:
reset netsh int IP resetOnce you successfully execute the second command, you can restart the computer and the issue should be gone.
Clear Network Cache
Step 1: Go to the Windows Search Bar, type “CMD”, right-click to Run as administrator.
Step 2: Once the command prompt(admin) window opens, execute these three commands one by one:
ipconfig /release
ipconfig /flushdns
ipconfig /renew
Now restart your computer and see if the error is gone or not.
Directly Connect Your PC to the Modem
In many networks, the general configuration is Modem>Router>Computer.
In some cases, people also use switches, repeaters, etc. You can fix the Ethernet doesn’t have a valid IP configuration by directly connecting your computer to the source.
Disable the Antivirus
In many cases, users have shared that this issue is can be simply resolved if you just disable the antivirus.
Mainly it is the third-party antiviruses that cause this issue. So you can simply disable them while using the internet.
Now it is different for different antiviruses so you can search for it on the internet.
Update Your BIOS
At last, you can also try updating your BIOS. However, do note that updating the BIOS is a complex task and one that you should do very carefully.
If done incorrectly, it can brick your computer so be careful while doing it.
Conclusion – Ethernet Doesn’t Have A Valid IP Configuration
So that was all about how to fix the Ethernet doesn’t have a valid IP configuration issue on Windows 10. You can try all the methods and I hope you resolve this issue. In case you need help with any of the steps, feel free to reach out to us.
Also, Read: What is Vanish Mode on Instagram and Facebook Messenger?
Directly in Your Inbox


![[Solved] DNS Probe Finished No Internet Error Internet](https://media.tech-latest.com/wp-content/uploads/2020/06/24141125/Internet-Featured-300x169.png)


