
Did you get the “Radeon Settings and Drivers do not match” error when opening Radeon Settings? Don’t worry, you’re not alone.
When I tried to open the Radeon graphics card settings, I receive the following error message:
Don’t want to miss the best from TechLatest?
Set us as a preferred source in Google Search
and make sure you never miss our latest.
Most of the time, this error occurs if there is a mismatch between the Graphics settings and the AMD driver, for example when you install the latest AMD Radeon driver on an older AMD Radeon.

In this article, I’m going to explain how to fix Radeon Settings and Drivers Version Not Match error step by step.
So, let’s get started!
Also, Read: AMD Ryzen vs Intel CPUs: Which One is Better in 2021?
Methods to Fix Radeon Settings and Drivers do not Match Issue
Update Windows system
An outdated Windows system can also cause AMD Radeon Settings to not open. In this case, check for the available updates and install them on your Windows system.
To do so, follow these steps:
Step 1: Go to Settings > Update & Security > Windows Update (or type Windows Update Settings in the Windows search bar, then select the first result.)

Step 2: Press the Check for updates button.

Step 3: Verify if there are any updates available and install them.
Now, restart your computer after updating Windows and see if it fixed the issue or otherwise continue to the next solution.
Rollback To The Old Version Graphics Driver
Many users reported issues opening settings after a driver update or software update. By rolling back to the previous version of the graphics driver, you can fix the issue quickly.
To do so, follow these steps:
Step 1: Press Windows + R to open the Run Command dialog box.
Step 2: In the dialog box, type devmgmt.msc, and then click OK. This will open the Device Manager. (You can also use the Windows search box to find the device manager if you type Device Manager and click on the first result.)

Step 3: In Device Manager, search for Display adapters > Expand the adapters list by clicking on it.
Step 4: Right-click on the graphics driver > choose Uninstall Device.

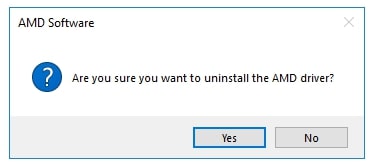
Step 5: A pop-up will appear; click Yes to confirm uninstall process.
Step 6: Now visit the AMD website. Enter the required information about your graphics card and operating system > then click Search.

Step 7: Select and download the graphics driver. After that, install the driver by following the on-screen instructions.
Step 8: Verify AMD Radeon Settings is working or not.
Mostly, users can fix AMD Radeon settings opening malfunctions by Rollback to the old version Graphics Driver. However, if this does not work, try the next method.
Edit Registry Settings
When AMD Radeon settings and driver versions are mismatched, this method can resolve the issue. It is necessary to modify a registry key to match both the AMD Radeon settings version and the AMD Radeon driver version.
To do so, follow these steps:
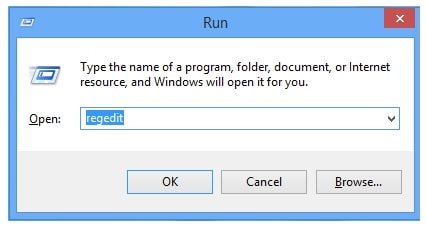
Step 1: Press Windows + R key > type regedit in the Run box > press the Enter key
Step 2: On the left, go to the following registry:
HKEY_LOCAL_MACHINE\SOFTWARE\AMD\CN

Step 3: Select this Key and search for entry name DriverVersion > Right-click on it and choose Modify from the context menu.
Step 4: A pop-up window named Edit string will appear > From the window, under Value data, modify the value to 0 and click OK. (If any security dialogs appear during the process, confirm them.)
Step 5: Open the task manager (Press the Ctrl + Shift + Esc to open the task manager)
Step 6: Kill all AMD-related processes by right-clicking the process and choosing End Task.
Check AMD Radeon settings to see if the issue exists. Follow the next solution if the issue persists.
Reinstall All AMD Radeon Graphics Card Driver
Neither of the above-given solutions will work for you to fix AMD Radeon Settings not opening. If this is the case, you will need to reinstall AMD Radeon Graphics Driver.
To do so, follow these steps:
Step 1: First, download and save the correct AMD driver from the AMD official site.
Step 2: Next, download and save the Display Driver Uninstaller.
Step 3: Also, make sure to disable the antivirus or any other security program installed on your system.
Step 4: And from the C:/AMD folder delete the contents from all previous drivers.
Step 5: Open Control Panel > uninstall a program > select AMD and uninstall everything
Step 6: Now, Boot your computer in safe mode (Follow Microsoft’s official guideline to Boot in Safe Mode).
Step 7: Run DDU and select Clean and Restart. This will delete all previous versions of graphics drivers.

I hope the AMD Radeon Settings issue is resolved.
Perform A Quick Restart
Restarting your computer can often resolve your issue. Hence, it’s best to do a quick restart before doing anything else. After restarting the system, check if AMD Radeon settings open or not.
In case it does not work, you can try other methods (as mentioned above) to fix it quickly instead.
Conclusion
Above, I described how to fix the “Radeon Settings and Drivers do not match” error. I hope this guide helped you resolve this issue.
It is easy to update graphics card drivers, but sometimes we install faulty drivers or incorrectly install them. AMD Radeon settings, not opening is a common issue and you can fix it quickly by following the above guide.
In case you have any questions or suggestions, feel free to leave a comment in the section below.
Thanks for reading!
Also, Read: How to Fix “The Driver Being Installed Is Not Validated For This Computer” Error in Windows 10
Enjoyed this article?
If TechLatest has helped you, consider supporting us with a one-time tip on Ko-fi. Every contribution keeps our work free and independent.
Support on Ko-fiDirectly in Your Inbox


