Highlights
- The Windows 11 Startup folder is a quick way to get apps, scripts, or shortcuts to run automatically each time your computer starts.
- If you’re someone who wants to keep their day more organized or needs to optimize the startup process by removing any unwanted startup programs.
- In this guide, we will walk you through how to open, add, and remove items from the Startup folder in Windows 11.
When looking to boost performance out of your Windows 11 PC, most users concentrate on debloating the system or turning off unused features.
But there’s one other excellent power trick that often goes overlooked: customizing your Startup folder.
Don’t want to miss the best from TechLatest?
Set us as a preferred source in Google Search
and make sure you never miss our latest.
This will let you choose which programs launch automatically every time your computer boots. Whether you’re attempting to speed up boot time or open up the apps you need faster, the Startup folder is a great place to start.
We will guide you through everything you need to know, from its location to how to take advantage of it, exploring everything there is to know about the Windows 11 Startup folder.
What is the Startup Folder in Windows?
The Startup folder is a special location in Windows that allows you to place shortcuts to programs that you want to launch automatically when you start up your computer.
It essentially provides you more control over your startup environment. In previous versions of Windows, such as XP or Windows 7, it was easy to find the programs folder using your Start Menu.
In Windows 11, the folder is still present, but Microsoft has tucked it away a little deeper into the file system.
Whatever you put in the Startup folder will start automatically when your system boots, which means you can use it to manage tools or productivity apps that you use frequently.
But if you install too many applications in it, it can slow down your startup time and occupy system resources — so use it wisely.
Navigating to the Startup Folder in Windows 11
Windows 11 actually has two startup folders:
- One for the current user.
- One for all users on the device.
1. Startup Folder for Current User
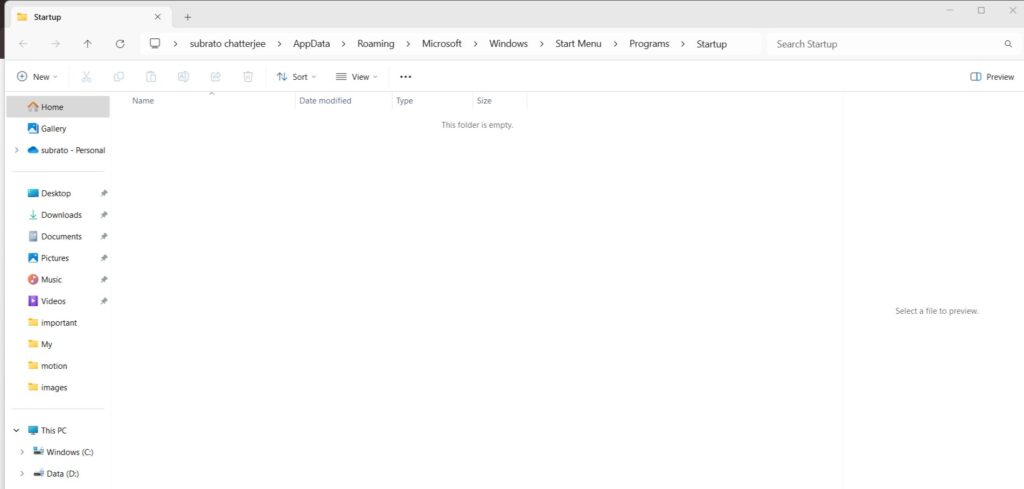
You can search for this folder using File Explorer. Here’s the path:
C:\Users\{username}\AppData\Roaming\Microsoft\Windows\Start Menu\Programs\StartupThat should be it for now! Just be sure to modify it with your Windows username. Moreover, you can copy and paste this path directly into File Explorer’s address bar to quickly access the folder.
2. Startup Folder for All Users
Some programs will need to start for everyone using the computer. These entries are kept in another place:
C:\ProgramData\Microsoft\Windows\Start Menu\Programs\StartUpYou can access this folder by going to the Run dialog and typing shell:common startup and pressing Enter.
3 Easy Ways to Open the Startup Folder
Here are a few easy ways to open the Startup folder in Windows 11:
Method 1: Using the Run Dialog
Using the Run Dialog to access the Startup folder is a perfectly safe and efficient method, and it is recommended if you want to:
- Firstly, press Windows + R to open the Run box.
- Type shell:startup for the current user or shell:common startup for all users.
- Hit Enter — the folder opens immediately.
Method 2: Via File Explorer
Using File Explorer to open the Startup folder is another way to be secure, transparent, and a favorite for those who cannot stand the idea of their computers listening to typed commands.
- Let’s begin by opening File Explorer (Windows + E).
- Then, click on Options.
- Now, tap on View and choose Show hidden files, folders, and drives found under Hidden files and folders.
- Then, click on Apply > OK.

- Finally, tap on the downward arrow beside “This PC” in the PC name or username section.
- Now, go to C:\Users\{username}\AppData\Roaming\Microsoft\Windows\Start Menu\Programs\Startup
- Here you will find shortcuts to all the programs.
Method 3: Create a Desktop Shortcut
If you’ll be visiting this folder often, consider adding a shortcut to your desktop:
- Right-click on your desktop > New > Shortcut.
- Paste the path to the Startup folder and give it a name like ”Startup Folder” for easy access.
How to Control Which Apps Launch at Startup
So many apps that run at startup can slow down your system. Here’s how to manage them:
Using Task Manager:
- Firstly, open the Task Manager with Ctrl + Shift + Esc.
- Then you would want to select the Startup apps tab.
- Check the list — right-click any app to enable or disable its startup behavior.
It is useful for those applications not located in the Startup folder, as most of them don’t register themselves with it.
Pro Tips for a Smoother Startup
- Limit auto-launch apps: Only allow necessary programs to load at boot.
- Audit frequently: Also, see if the new apps have added themselves to the startup after you install them.
- Use third-party tools: Autoruns or CCleaner give a little more control over ‘tweaking’ startup entries.
- Create scripts: More advanced users can script this process via batch/PowerShell scripts and put them in the Startup folder for automation.
Troubleshooting Startup Issues
Sometimes, programs in the Startup folder do not work properly. Here are common causes and what to do:
- Permission Issues: Make sure the app isn’t running with administrative rights. If it does, the Task Scheduler can be the solution. So, enable it with the required permissions.
- Incorrect Shortcut: Make sure the shortcut in your Startup folder links to the appropriate .exe file.
- Compatibility Problems: Not all older apps will work as intended on Windows 11. Look up the software application’s website for updates or patches.
If the problem continues, try visiting the app’s support resources or forums for advice on what to do.
Final Thoughts
Customizing the Startup folder is an easy way to optimize your Windows 11 experience.
Whether you’re looking to launch your favorite instant messaging client or are just trying to pare down the list of things your PC loads when you first log on, learning how to maneuver this folder will have you acting in the driver’s seat.
By following the tips and tricks that we show you here, you can speed up your system or improve its efficiency—either way, you’ll be customizing your new machine to do what you need even quicker, right from the moment you hit the power button.
Enjoyed this article?
If TechLatest has helped you, consider supporting us with a one-time tip on Ko-fi. Every contribution keeps our work free and independent.
Support on Ko-fiDirectly in Your Inbox


: Which BIOS Mode Should You Use?")


