Highlights
- It isn’t uncommon for Windows 11/10 to experience high Antimalware Service Executable disk usage.
- You will be glad to know that you can easily manage this problem if you’re using Windows Defender and have noticed high CPU usage for excessively long periods.
- This Antimalware Service Executable was reported to be fixed by performing some simple and easy steps. And guess what? We have mentioned all those fixes further in this article.
Microsoft’s Antimalware Service Executable (MsMpEng.exe) protects your computer against malicious threats in the realm of cybersecurity. It’s part of Windows Defender, built-in antivirus and antimalware software built into Windows.
Some users have reported a common problem – the Antimalware Service Executable consumes significant memory. It can result in a noticeable slowdown in performance, causing users to explore memory optimization solutions.
Don’t want to miss the best from TechLatest?
Set us as a preferred source in Google Search
and make sure you never miss our latest.
But you do not have to worry; we have some troubleshooting fixes to help you resolve the antimalware service executable high memory problem. Therefore, let’s check out the fixes.

What is Antimalware Service Executable?
With Windows operating systems, a pre-installed antivirus software called Windows Defender includes an Antimalware Service Executable.
It primarily protects your system from viruses, malware, and other malicious entities by scanning and detecting them.
Some users are concerned about memory usage, even though its presence is necessary for maintaining a secure computing environment.
Why is the antimalware service executable running so high?
Most of the time, the antimalware service executable runs so high because it scans all files on the computer, which can cause it to run so high.
This is also done in real-time. You see the antimalware service executable running high due to the Full scan consuming many CPU resources.
How to fix Antimalware Service Executable High CPU Usage
So, here are some troubleshooting fixes that will help you resolve antimalware service executable high memory problem:
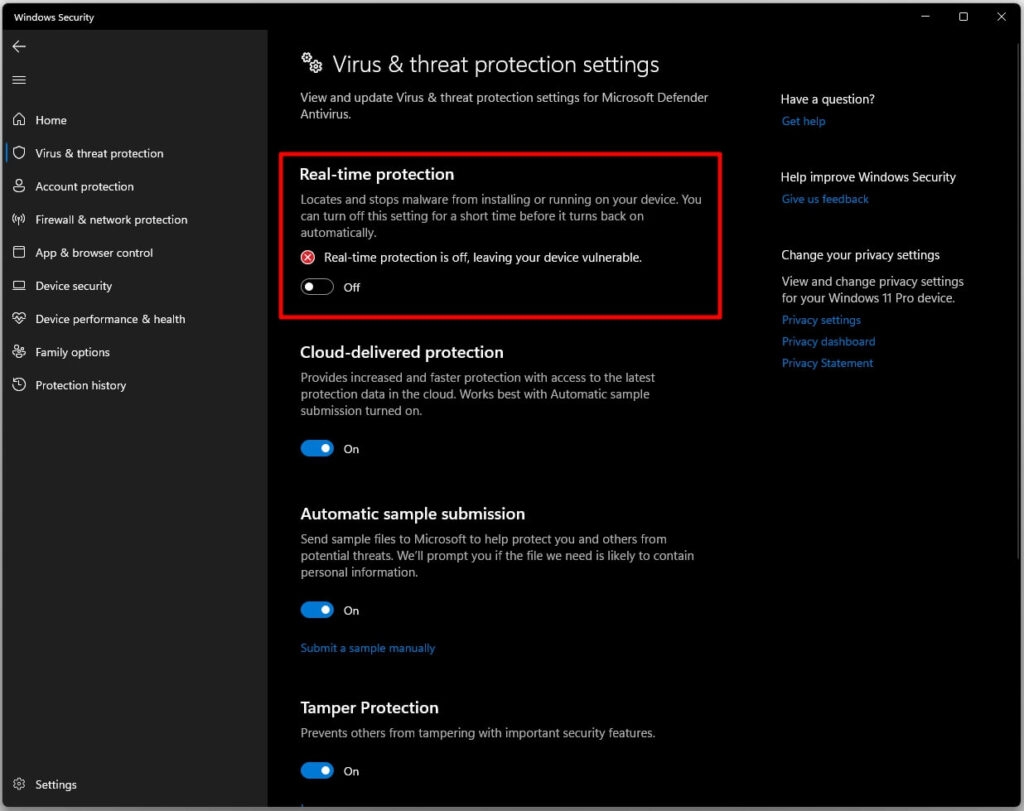
Fix 1: Turn Off/On Real-Time Protection
Users have found this simple tip to be helpful in resolving RAM and CPU problems caused by the Antimalware Service Executable process.
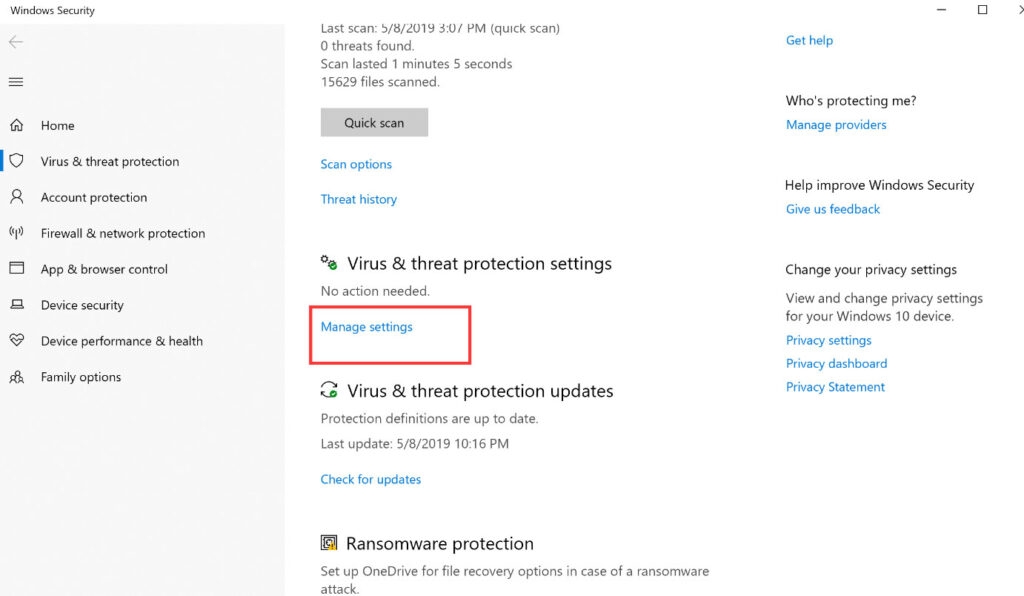
- There are a number of security components built into Windows Security. Real-time protection is one of them. It can be accessed from Windows Security > Virus & threat protection > Manage settings.
- Once you have turned off Real-time protection, scroll a little and turn it back on after a few moments.
Fix 2: Change Defender’s Schedule
It is possible to reschedule Windows Security’s periodic scan to reduce the CPU and RAM usage caused by Antimalware Service Executable.
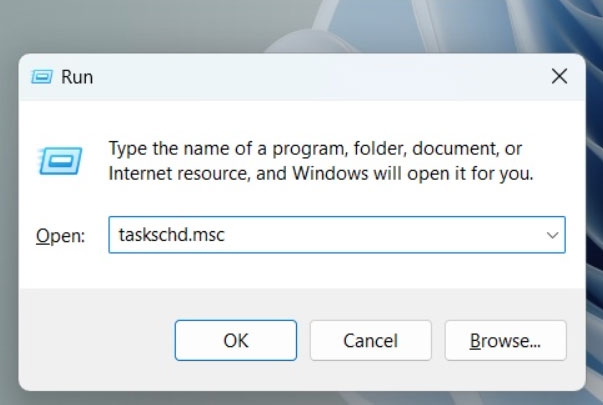
- The first step is to open the Run window, and press Windows+R. Enter taskschd.msc and press Enter. It will launch Task Scheduler.
- Navigate to the following folder structure in Task Scheduler in the left window pane: Task Scheduler Library > Microsoft > Windows > Windows Defender.
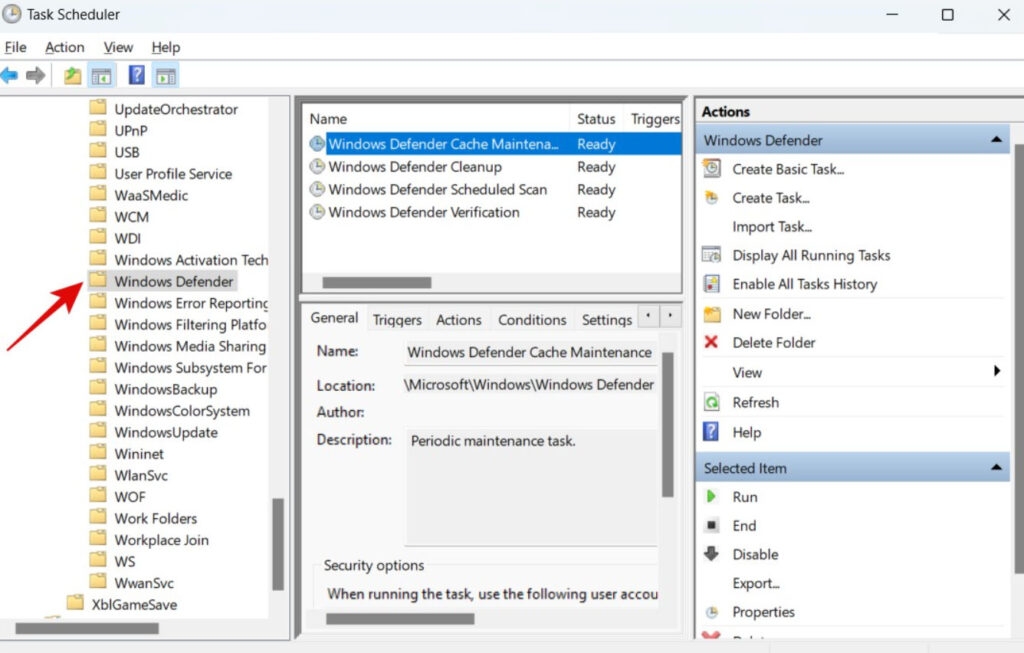
- Then, double-click the Windows Defender Scheduled Scan button under the Name column in the middle of the window pane.
- Under the General tab, uncheck Run with the highest privileges in the pop-up that follows.
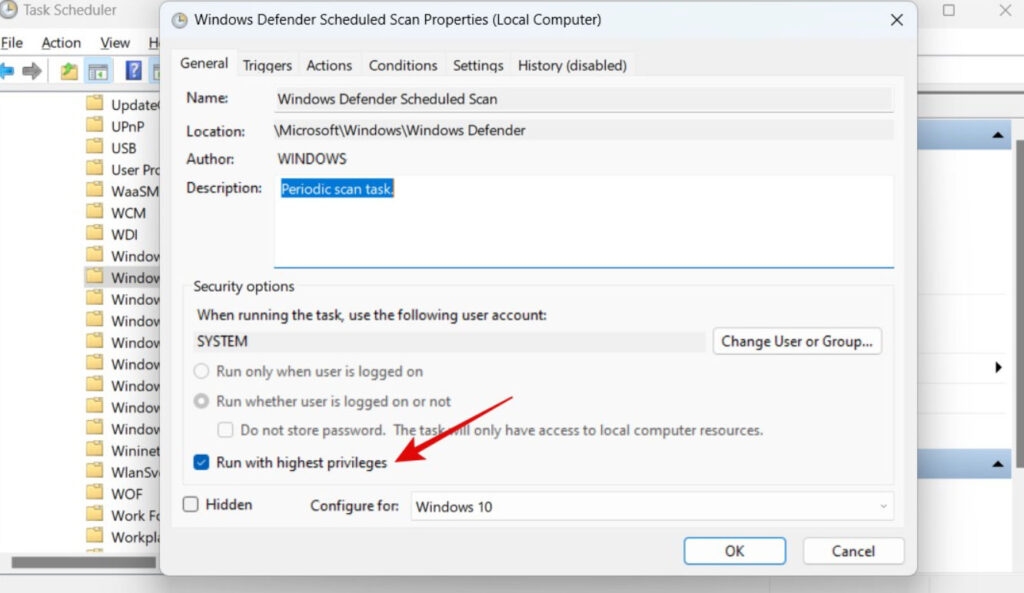
- Under the Conditions tab, uncheck everything.
- Then, click on OK to save all the settings and check again in the Task Manager if Antimalware Service Executable is using too many resources (hold down Ctrl+Shift+Esc to open Task Manager directly).
- Afterward, go to the Triggers tab and click New to create a new schedule. On the following pop-up, select Weekly and check Enabled.
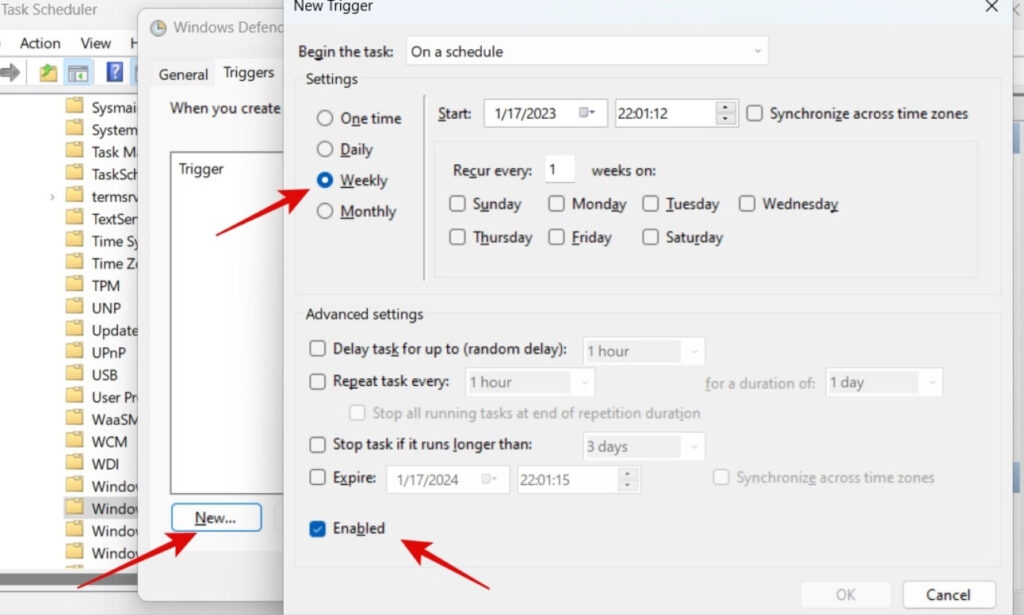
- For Windows Defender Cache Maintenance, Windows Defender Cleanup, and Windows Defender Verification, follow the same steps as above. Return to step 3.
It will be necessary to reschedule the Antimalware Service Executable component so that it runs weekly instead of daily. After the current scan is complete, see if any system resources have been released.
Fix 3: Limit CPU Usage
- Right-click the Start button and select Task Manager (or press Ctrl + Shift + ESC).
- Now click on the Details tab.
- Right-click msmpeng.exe, then select Set affinity.

- Select which cores you want to use for the particular process.
When you perform the steps above, you will limit the amount of processing power that is allocated to the process, so you won’t have to worry about high CPU usage.
Fix 4: Disable Sample Submission
Some users have experienced high memory and CPU usage problems when using msmpeng.exe as a result of the Sample Submission feature.
By using this feature, problematic files are sent to Microsoft for analysis. while this is a useful feature but can create problems as well.
By following the steps below, you can fix this problem:
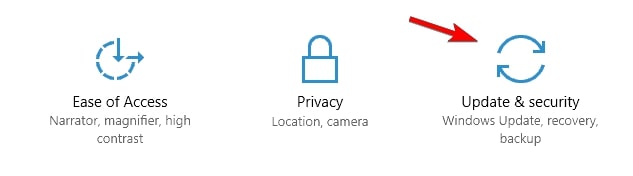
- Open Settings and select Updates and Security.
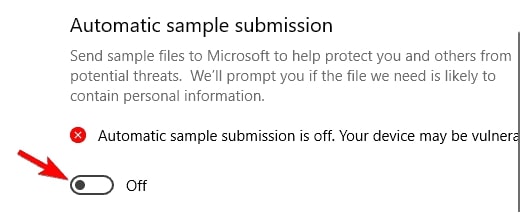
- Click on Open Windows Security in the Windows Security menu on the left.

- Next, click on Virus & threat protection.

- Then under Virus & Threat Protection settings, click Manage settings.

- Navigate Automatic sample submission and turn it off.
Once you’ve done that, check if the problem has been resolved. If not, try another solution.
Fix 5: Install Third Party Antivirus Program
If your computer is experiencing high CPU usage by an antimalware service, it is easiest to install a third-party antivirus program.
When Norton or another third-party antivirus program is installed on the computer, Windows Defender turns off automatically.
When Windows Defender is disabled, Antimalware Service no longer runs on your computer and consumes resources.
Fix 6: Disable Windows Defender
The problem may persist even after you apply these fixes, so you might be tempted to disable Windows Defender. If you remove Windows Defender, you will become vulnerable to a range of cyberattacks, so you should replace it with a reliable antimalware product before doing so.
- The first step is to open the Run dialog box, press Windows Key + R.
- Thereafter, to open the Registry Editor, type regedit and click OK.
- Select HKEY_LOCAL_MACHINE/SOFTWARE/Policies/Microsoft/Windows Defender from the navigation pane on the left.
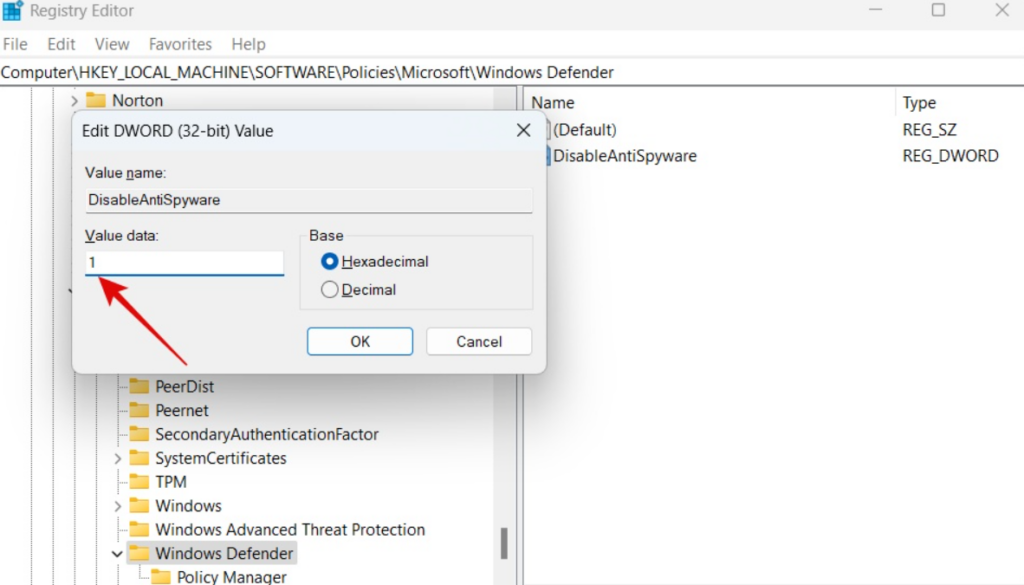
- You can set the value data of the registry entry named DisableAntiSpyware to 1 by double-clicking it.
- In the main Registry Editor pane, right-click and choose New > DWORD (32-bit) Value if you do not see the DisableAntiSpyware entry.
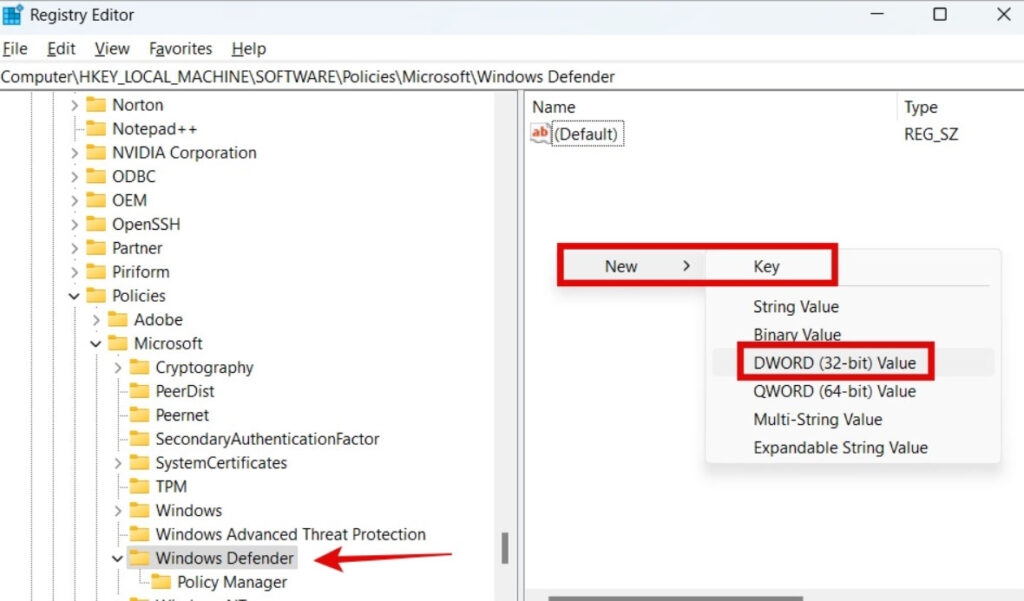
- It should be named DisableAntiSpyware. Click on it twice and set its value data to 1.
Fix 7: Turn Off Windows Defender Antivirus via Group Policy Editor
If you are experiencing a high memory problem with antimalware service executable, follow these steps to turn off Windows Defender Antivirus with Group Policy Editor:
- To launch Local Group Policy Editor, press Windows + R, type gpedit.msc, and click OK or Enter.

This feature is only available on Windows Pro and Enterprise versions. But here is a way to enable GPedit in Windows Home editions as well.
- Select Computer Configuration > Administrative Templates > Windows Components > Windows Defender Antivirus to disable Windows Defender.
- Go to the right panel. In the Extended menu, click Turn off Windows Defender Antivirus.
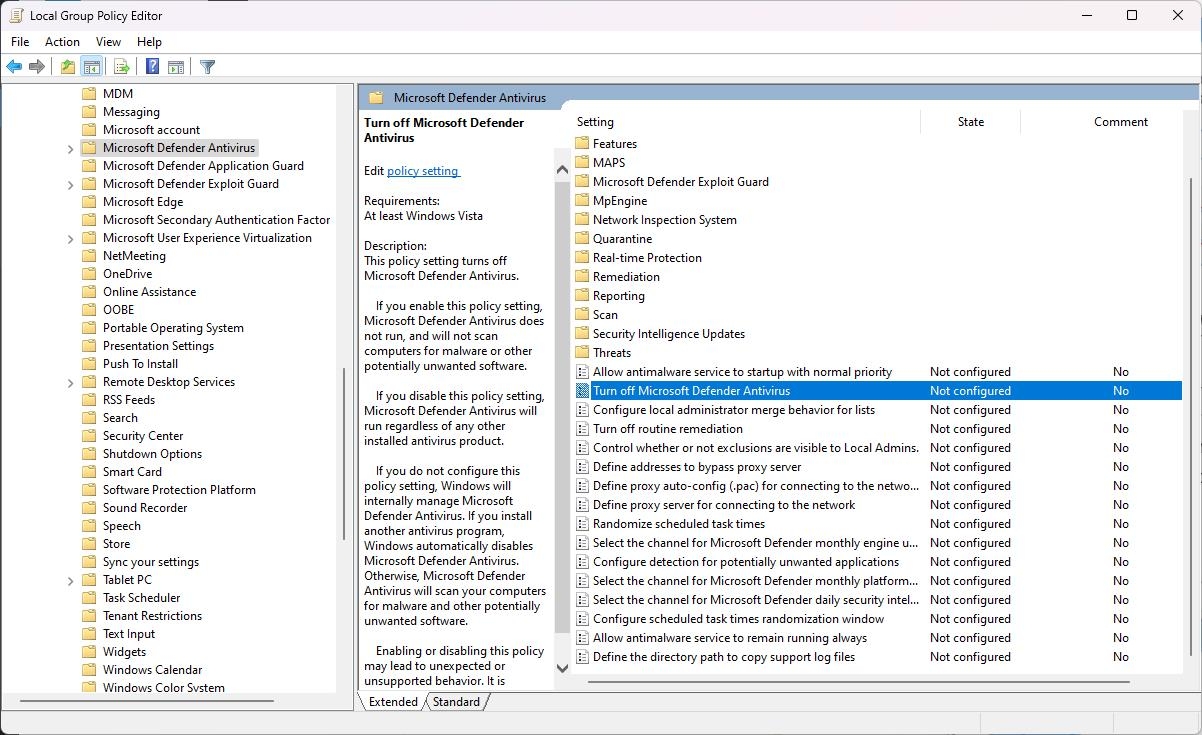
- Double-click it and select Enabled. Then click OK.
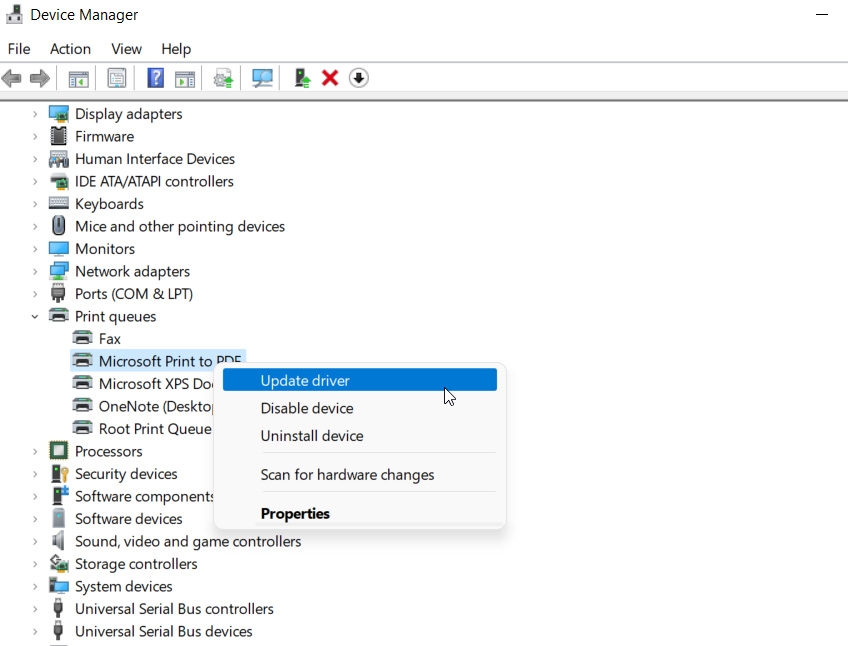
Fix 8: Update Drivers
In some cases, driver issues can cause the Antimalware Service Executable to be high. Therefore, you should update your hardware drivers. With Windows, you can use the built-in driver manager.
- To open the Run box, press the Windows logo key and R simultaneously.
- You can type devmgmt.msc and click OK.
- To see the devices, select the Category.
- Ensure that the necessary drivers are updated.
Fix 9: Disable Exploit Protection Service
When the Defender cannot close activities or disable services, it produces a false positive. However, the Antimalware Service Executable process runs continuously because the service runs in a loop. Due to this, the Process consumes a significant amount of CPU and RAM.
- Find PowerShell in the Windows menu and open it as an administrator.
- To execute the command below, copy-paste it and hit Enter.
powershell “ForEach($v in (Get-Command -Name \”Set-ProcessMitigation\”).Parameters[\”Disable\”].Attributes.ValidValues){Set-ProcessMitigation -System -Disable $v.ToString().Replace(\” \”, \”\”).Replace(\”`n\”, \”\”) -ErrorAction SilentlyContinue}”Fix 10: Add to Exclusion List
Windows will not automatically run the Antimalware Service Executable process once it has been closed if the Process is excluded from the exclusion list.
- On the left sidebar of Windows Security, select Virus & Threat Protection. Under Virus & Threat Protection settings, click on Manage Settings.
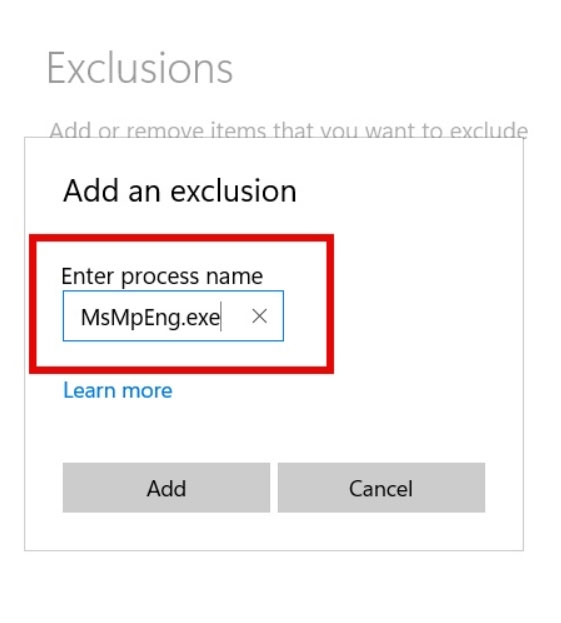
- Click on Add or Remove exclusions at the bottom.
- Click on the Add an Exclusion button. It may be necessary for you to give permission.

- Select Process in the drop-down menu since it’s what Antimalware Service Executable is. Under Processes, you can find it in Task Manager.
- In this step, enter the executable file name that runs the Process, i.e., MsMpEng.exe.
- To save changes, click Add and then OK. Once your computer has restarted, check to see if it is still consuming high CPU and RAM resources.
Fix 11: Uninstall The Most Recent Windows Updates
In some cases, Windows updates do not install properly, resulting in certain system functions malfunctioning, such as Antimalware Service. If this occurs, uninstall the most recent Windows updates, then update the system again:
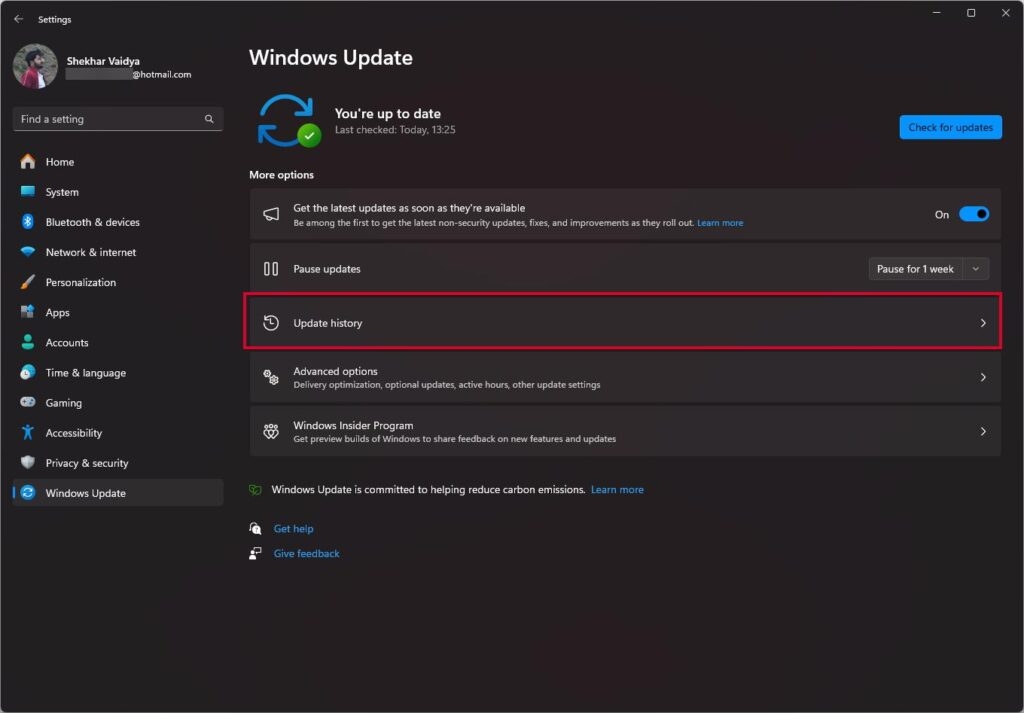
- Right-click on Start and select Settings.
- Go to Windows Update and then click on Update History (right menu)
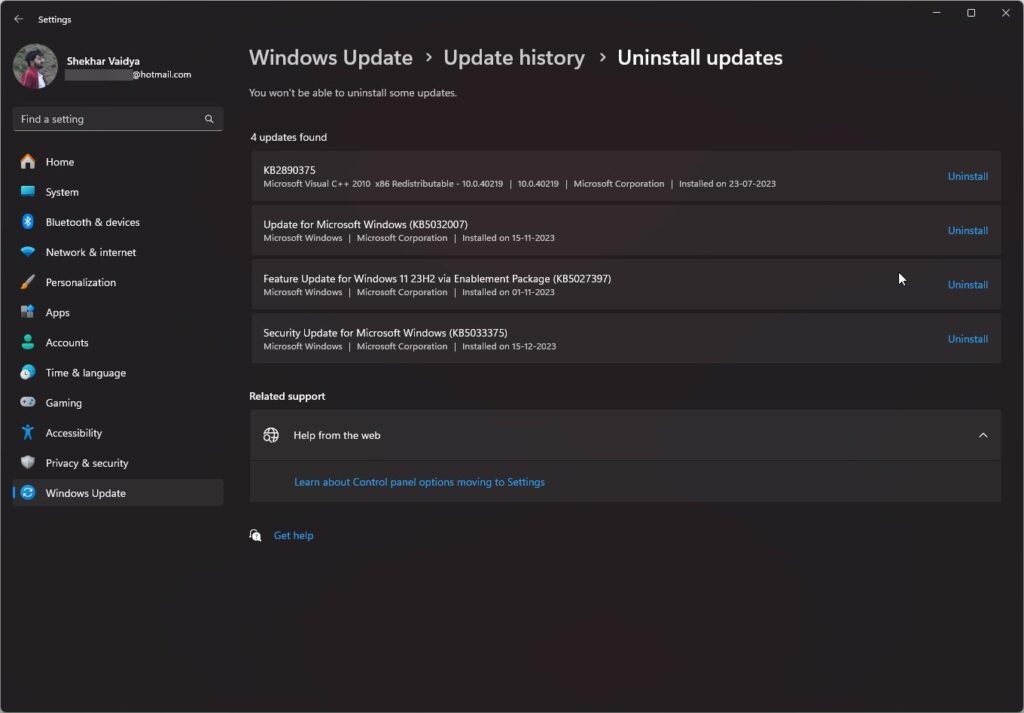
- Choose Uninstall updates.
- Ensure the updates are sorted by the installation date.
- Right-click on the most recent Windows updates and choose Uninstall.
- Reboot your computer and initiate Windows updates via Settings.
So, that’s all we have for you on how to fix the antimalware service executable high memory problem. It’s our hope that this guide has helped you. But don’t forget to comment below if you have any doubts or queries.
Further Reading:
- How to Fix Runtime Broker High Usage on Windows
- How To Fix System Thread Exception Not Handled Error?
- What is Taskhostw.Exe on Windows 10 and is it Safe?
Mannu Rathore also contributed to this article.
Enjoyed this article?
If TechLatest has helped you, consider supporting us with a one-time tip on Ko-fi. Every contribution keeps our work free and independent.
Support on Ko-fiDirectly in Your Inbox


