Microsoft provides its users with a lot of Windows updates. However, with every update, there might be some issues as well. Some users have reported that after updating their Windows, they have faced a ‘LogiLDA.dll is missing’ error.
In this article, we cover various solutions to fix the ‘LogiLDA.dll is missing’ error on your Windows 10 system.
What is the ‘LogiLDA.dll is missing’ error?
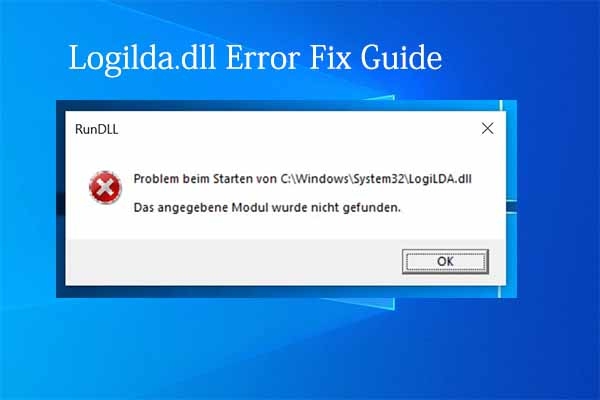
LogiLDA.dll is an error notification that appears on your Windows 10 system soon after it boots up from sleep mode or restarts.
In case several tasks are running in the background, you might see the ‘LogiLDA.dll is missing’ error on your system.
Usually, the common error format displays this: ‘c:\windows\system32\logilda.dll /.’
What Causes the LogiLDA.dll error?
Usually, when the users install the Logitech Download Assistant program, the LogiLDA.dll error might arise. This is noticed after installing the Logitech mouse or keyboard on your Windows 10 system.
Logitech Download Assistant looks for updates automatically, and whenever there is an issue with the latest file updates, you might see a LogiLDA.dll error on your system. Or, when a Windows update happens, the file might be migrated to the wrong location.
Solutions to Fix the ‘LogiLDA.dll is missing’ error
Solution 1: Disable LogiLDA from Startup with Windows Task Manager
- Firstly, use the hotkey ‘Windows + R’ to open the run command.
- Now, type taskmgr and hit the ‘Enter’ key to open the task manager. Alternatively, you can also right-click on the Windows icon and click on the ‘Task Manager’ option.
- Now, from the list of the actively running programs, select the LogiLDA and select ‘End Task’ to disable the program.
- If you find any other Logitech programs running in the background, try to kill those tasks.
Solution 2: Restore the LogiLDA file
Sometimes the LogiLDA.dll file goes missing or corrupted, and that causes the LogiLDA.dll error on your Windows system. You can download the LogiLDA.dll file from trusted sources to fix the error.
- Navigate to the official website for DLL files like dll-files.com.
- Keep scrolling down on the website until you find the LogiLDA.dll file. Also, check the version number and architecture of the DLL file before downloading it.
Solution 3: Make a Registry Edit
If the above two methods did not work in fixing the LogiLDA.dll error, you could try making a registry edit to fix the issue.
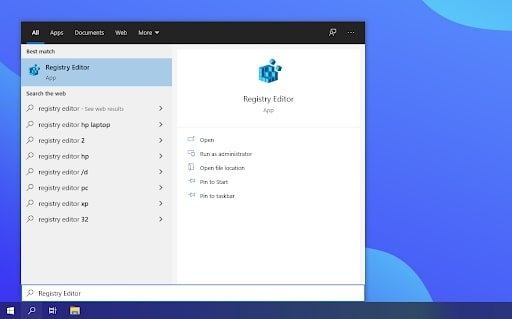
- Firstly, open the Windows search bar by pressing the ‘Windows + S’ hotkey or by manually placing your mousing near the search bar.
- Now, type ‘Registry Editor’ in the search window and open it.
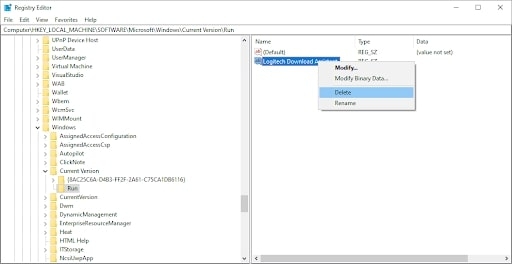
- In the address bar of the ‘Registry Editor,’ type the following command,
HKEY_LOCAL_MACHINE\Software\Microsoft\Windows\CurrentVersion\Run
- You can find the ‘Logitech Download Assistant on the right side of the panel.’ Select that and right-click on it. You will find the delete option. Delete the file.
- After deleting it, try to restart the Windows system for the changes to get applied.
Solution 4: Use a Third-Party App
If there are any errors with the manual approach, we recommend you try third-party apps to scan and fix the missing DLL files.
You can check for any reputable ‘DLL Fixer’ software and install it on your system. Once the installation is done, the software will scan your system and fix the missing .dll files. In case of any errors, it also repairs the files.
Solution 5: Uninstall the Logitech SetPoint from Windows
Though it is not sure if the error is caused 100% due to the Logitech software, you can try to uninstall the software and see if the system runs smoothly. To uninstall the Logitech SetPoint, you can follow the process as given below:
- Firstly, open the run command by pressing the ‘Win + R’ hotkey.
- Now, type ‘control’ in the run box, and hit the ‘Enter’ key. This command opens the ‘Control Panel.’
- Once you open the ‘Control Panel,’ select the ‘Uninstall Program’ option.
- Manually search for the ‘Logitech SetPoint’ software in the search box. Once you find it, right-click on the software and click on uninstall.

- After uninstalling the ‘Logitech SetPoint’ software, it is recommended to restart the system for the changes to get applied.
Solution 6: Reinstall the Logitech Mouse Drivers
In case it has been a long since you updated your Logitech mouse drivers, you can try reinstalling it to fix the LogiLDA.dll error. Follow the below-mentioned steps to reinstall the Logitech mouse drivers:
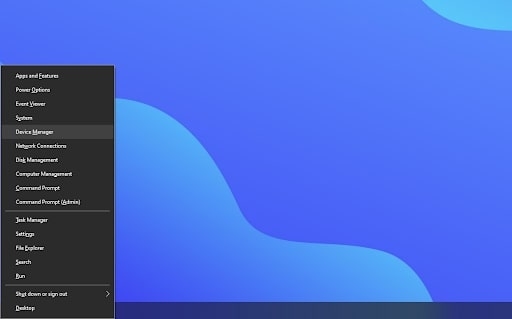
- Firstly, right-click on the Windows icon and select the ‘Device Manager’ option.
- Now, expand the list of the drivers and search for the option ‘Mice and other pointing devices.’ Select your Logitech mouse and right-click on it. You will get a popup to uninstall the driver. Click on it.
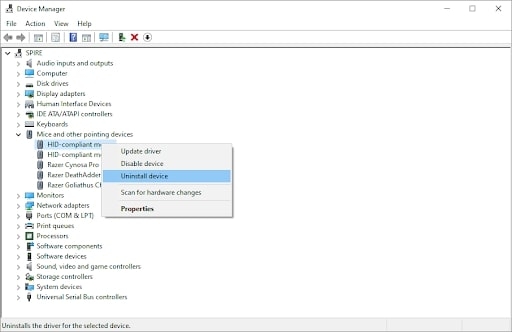
- Once the mouse drivers are uninstalled, it is recommended to restart the system.
Solution 7: Update Windows
Another best way to fix the LogiLDA error is by updating the Windows version. Sometimes, upgrading your system to the latest version clears the bugs in the current build. To update the Windows, follow the steps below:
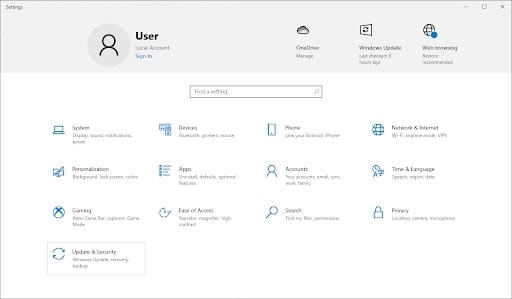
- Firstly, open the Windows search bar and type ‘Settings.’
- Now, click on the ‘Update and Security’ tab and select when to receive the Windows updates.
- Go to the Windows updates tab and see if there are any new Windows updates.
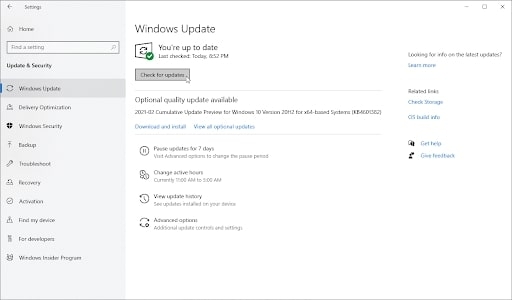
- If you see any updates displayed by Windows 10, click on the ‘Install’ button and upgrade it.
Conclusion
We hope this article has cleared your issues with the ‘LogiLDA.dll is missing’ error. Once you uninstall and reinstall the Logitech drivers, you can use the Logitech peripherals smoothly.
Directly in Your Inbox


