
When you are opening any website, are you facing any errors like “your DNS server might be unavailable?” Don’t worry. This is a common problem every internet user faces, and it can be fixed by following some of the best solutions provided in this article.
Most of the time, when you troubleshoot the browser, you might encounter DNS server problems. Here are some of the easy solutions you can try to fix this error.
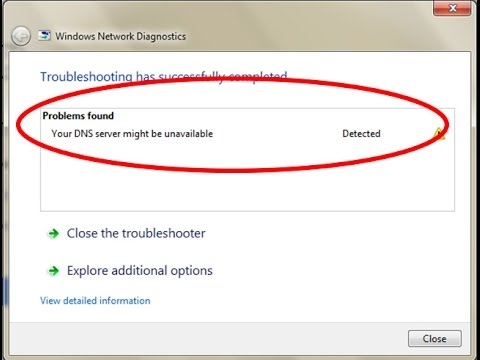
How to Fix the “your DNS server might be unavailable” error?
Solution 1: Switch the Browser
First, you need to test the DNS connections by switching your browser. For example. If your default browser is Google Chrome, you can switch to other browsers like Mozilla, Brave, Safari, Microsoft Edge, etc., and check whether the website is opening in those browsers.
If the website opens in other browsers, it means that the current browser you are using is either outdated or has cache issues. In this case, you can either uninstall and update to the latest version of the browser or make any other browser a default one.
Solution 2: Flush the DNS
Flushing the DNS by using the Command Prompt will ensure that the server issues are fixed. You can flush the DNS by following the steps mentioned below:
- Firstly, press the ‘Windows + R’ hotkey and open the run dialog box.
- Now, type ‘cmd’ and press the ‘Enter’ key.
- When the command prompt window opens, type ‘ipconfig /flushdns’ and press the ‘Enter’ key.
- After that, enter the command ‘ipconfig /release’ and hit the ‘Enter’ key.
- And finally, type the command ‘ipconfig /renew’ and press the ‘Enter’ key.
After performing the above steps, it is recommended to close the command prompt window and reboot the system.
Solution 3: Reset the Router
This is one of the troubleshooting solutions to try when dealing with DNS server errors. To reset the router, you need to unplug the router and the cables or press the reset button.
After the router is reset, connect the cables to it and try to connect your system to the internet, and check if the DNS issue is fixed or not.
Solution 4: Start the Computer in Safe Mode
If your system is not working properly, you might likely see the ‘your DNS server might be unavailable’ error. To fix this issue, it is recommended to start the computer in safe mode.
Starting the system in safe mode will reduce the OS’s resources and minimize the errors. To start the system in the Safe Mode, follow the steps given below:
- Firstly, click on the ‘Windows icon’ and hover over the ‘Power’ icon.

- Now, click on the ‘Shift’ key and the option ‘Restart.’
- Now, you will see a popup, click on Troubleshoot → Advanced, and then click on the ‘Startup Settings.’ After this, click on ‘Restart’.
- Press ‘Enable Safe Mode’, and the system will restart accordingly.
If you are using the system below Windows 10 version, it is recommended to restart the system normally and press the F8 key when the system is booting.
Solution 5: Disable Multiple Antiviruses
Having multiple antiviruses in a system can also lead to DNS issues. If you have more than one antivirus software installed on your system, try to uninstall one antivirus and see if the DNS issue is resolved.
In case you are using the default ‘Windows Defender’ antivirus, then it is recommended to disable it for a while to check if the DNS issue still pops up. You can disable the ‘Windows Defender’ antivirus by navigating to the Windows security > Virus and Threat Protection > and then, Manage settings.
Solution 6: Run the Internet Connection Troubleshooter
Troubleshoot your internet connection by following the steps given below:
- Open the ‘Start’ and click on the ‘Settings’ option.
- Now, go to the ‘Update and Security’ option.
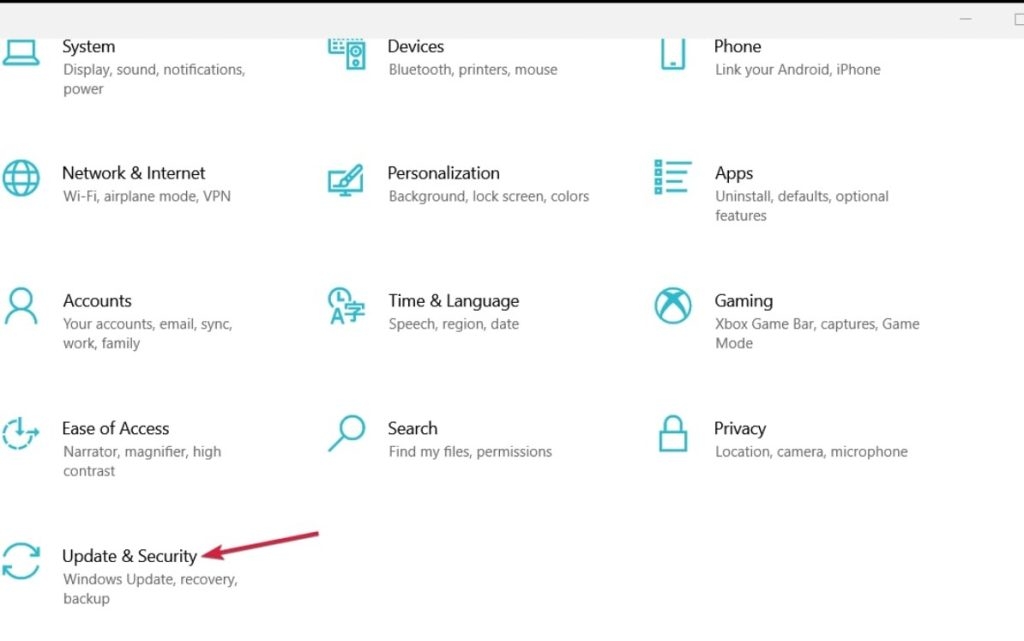
- Click on the ‘Troubleshoot’ option and then click on the ‘Additional Troubleshooters’ and navigate to the ‘Internet Connections’ option.
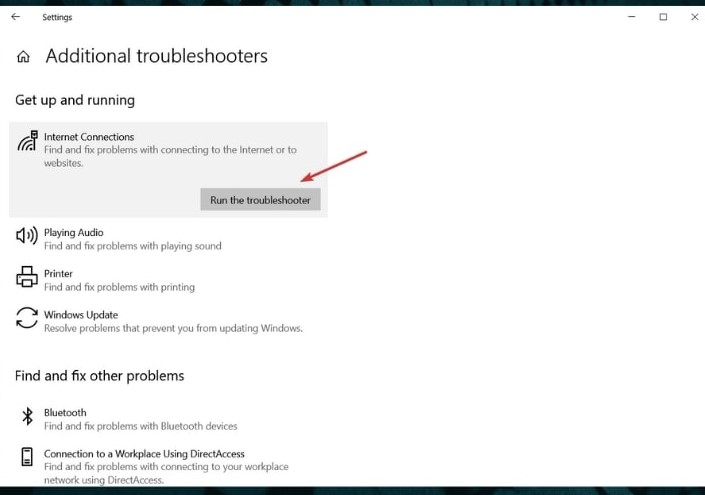
- Follow the steps as prompted over the screen and complete the process.
- In case the problem is not resolved, you can follow the above steps and select the ‘Network Troubleshooter’ instead of the ‘Additional Troubleshooters’ option.
Solution 7: Make the DNS changes via Windows OS
To make the DNS changes via the Windows OS, follow the process as given below:
- Firstly, open the run dialog box by pressing the ‘Windows + R’ hotkey.
- Now, type ncpa.cpl in the Run dialog box and press the ‘Enter’ key. Alternatively, Windows users can also right-click on the Windows icon and select ‘Network Connections’ from the popup.
- Once the ‘Network Connections’ opens, right-click on your ethernet connection and select the ‘Properties’ option.
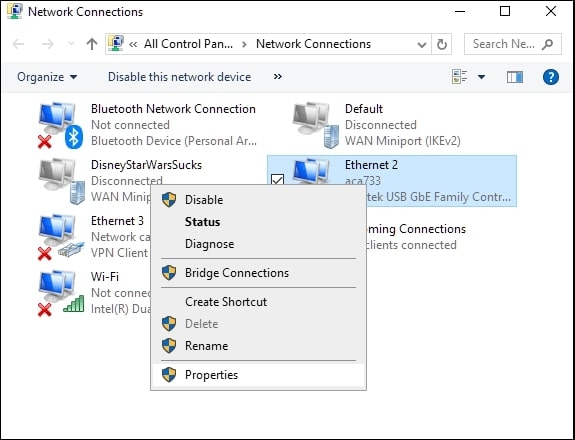
- Select the TCP/IPv4 option and click on properties.
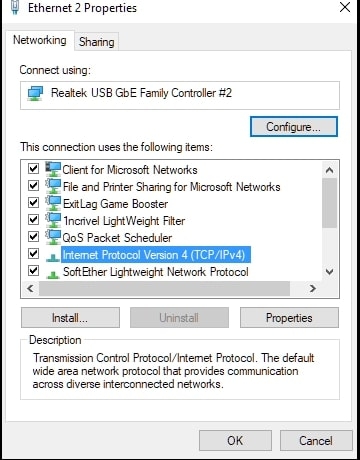
- In the DNS server addresses section, you can enter the details of the DNS IP you wish to use in the address bar and click on ‘OK.’
Solution 8: Disable the Peer-To-Peer Feature
The Peer-To-Peer feature reduces the device’s bandwidth by downloading the Windows update only once and then lets the users access the updated version across the other local systems.
However, this feature might cause DNS issues if it is not disabled. So, to disable the Peer-To-Peer feature, follow the steps given below:
- Firstly, click on the Windows icon and navigate to Settings > Update and Security.
- Now, on the left-hand side, you can find an option called ‘Delivery Optimization.’ Click on it.
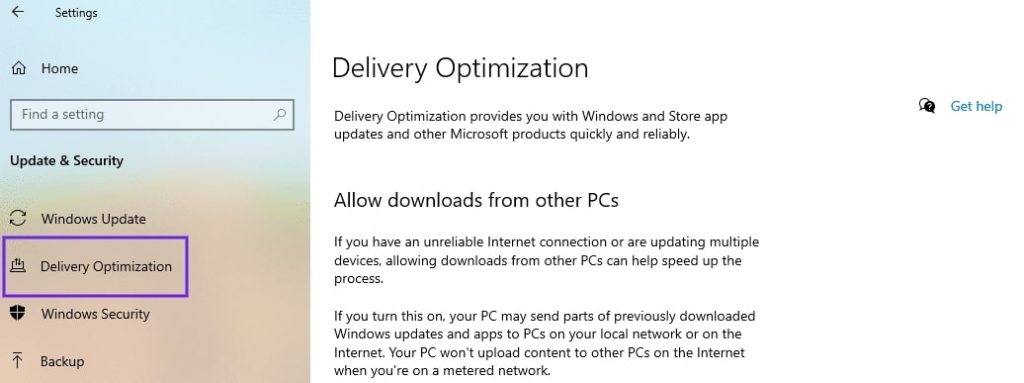
- Click on the option ‘Allow Downloads from other PCs.

Once done with the above changes, you can close the tabs and restart the system.
Conclusion
It can be very frustrating if you try to access any website that is throwing a ‘your DNS server might be unavailable’ error. While it can be due to many reasons, we have listed some solutions above. Try these solutions, and fix the DNS error on your system.
Directly in Your Inbox

![[Solved] DNS Probe Finished No Internet Error Internet](https://media.tech-latest.com/wp-content/uploads/2020/06/24141125/Internet-Featured-300x169.png)
