
Video-making has become common nowadays, and the videos we record often capture the most important media or happy moments of our lives. We record everything, from graduating from a university after four long years to any other significant event.
However, imagine you eagerly recording your graduation ceremony, only to find a black screen video when you hit play. That moment of excitement turns into heartbreak, which is completely frustrating.
Thankfully, we live in an advanced technology era where you can find solutions to any problem, even if you are looking for an easy way on how do I fix black screen on videos problems in your beloved recordings.
However, this blog will walk you through four powerful solutions to tackle those irritating black screen issues. Whether it’s a video of your graduation ceremony or any other important content, these methods will undoubtedly help you turn that black void into an endless source of entertainment.
So, keep reading to learn more.
Part 1. Common Causes of Black Video Screen Issues
Finding a lovely video with a problematic black screen issue, it’s something that dampens the thrill of recalling memorable moments or catching up on favorite content. However, understanding the underlying causes of this problem is the first step toward
an effective solution. Here are the most common causes of a black screen on videos:
1. Header Corruption
Header corruption in video files disrupts playback, resulting in issues such as a black screen. Damaged or missing header information makes it difficult for media players to interpret the file correctly. To restore proper playback functionality, repairing or recovering header data with specialized software may be necessary.
2. Changing File Formats and Video Damage
Converting file formats can damage videos, resulting in a black screen or visual distortions. Incompatible conversion processes can damage the file’s structure or codec. To maintain video integrity, using reputable conversion tools and ensuring format compatibility is important.
3. Recording Videos on Full Storage Media
You may corrupt or save video files incorrectly when you record on a full-storage device. This can cause videos to become corrupted or fail to save properly, resulting in playback issues that lead to a black screen.
To avoid such problems, it’s important to prioritize checking available storage before recording to ensure continuous saving.
4. Editing Video Files with Unauthorized Third-Party Tools
Using unauthorized editing tools can introduce incompatible changes, resulting in problems with playback that include a black screen.
These tools may not adhere to standard encoding protocols, resulting in defects in the video file. To maintain compatibility and video integrity while editing, it’s best to use authorized software.
5. Virus Infection or Bad Sectors on Storage Drives
Lastly, infected files or bad sectors on storage drives can corrupt video data, resulting in playback issues, including a black screen. To avoid such corruption and ensure video file integrity, scanning for viruses and maintaining drive health regularly is important.
Part 2. 4 Effective Methods to Fix Video With Black Screen Problem
In this section, explore the four effective yet quick methods to fix your video black screen problem easily, and the following are:
Method No: 1. Driver Uninstallation and Installation
If you are experiencing a black video screen issue, then give it a try; our first approach is to uninstall and reinstall drivers. Here are the steps to follow:
- Open the Device Manager on your system.
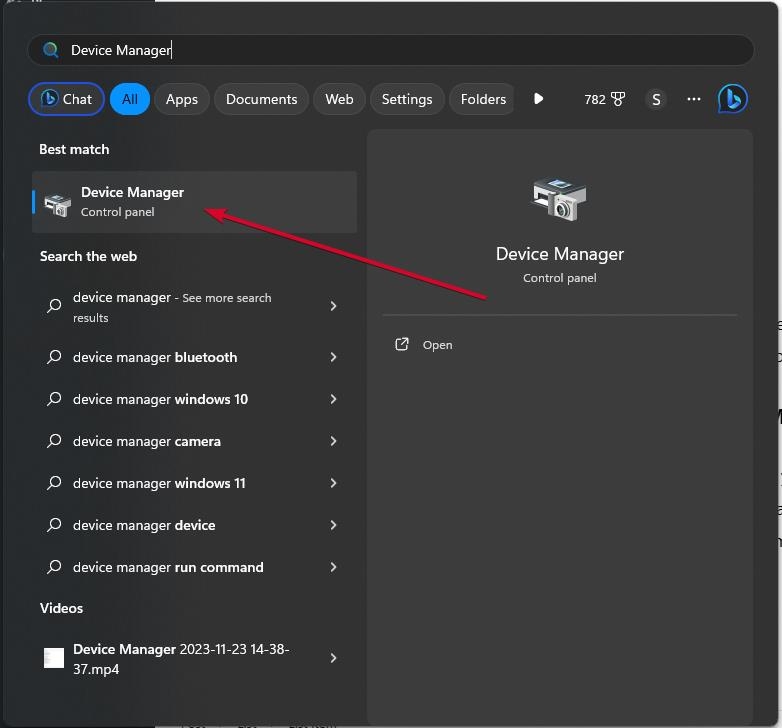
- Find the specific device related to the black screen issue and click on its node.
- Right-click on the device and select “Uninstall” from the menu that appears.
- A confirmation window will pop up. Click “OK” to confirm and proceed with the uninstallation.
- To reinstall the drivers, make sure you have downloaded the latest version from the manufacturer’s official website.
- Also, to prevent complete driver loss, create a system restore point before proceeding.
- After uninstalling the device, reinstall the drivers using the downloaded and updated version. And it’s done.
Reinstalling drivers with the most recent versions can frequently resolve underlying compatibility or corruption issues, restoring proper playback of video functionality.
Method No: 02. Try to Reduce Video Card Hardware Acceleration
If you’re struggling with a black screen while watching videos, it could be due to conflicts with your hardware acceleration settings. However, the steps to adjust these settings may fix the issue and allow for smooth video playback.
- Start by right-clicking on an empty desktop screen area to begin troubleshooting.
- From the context menu, choose “Personalize” to access your settings.
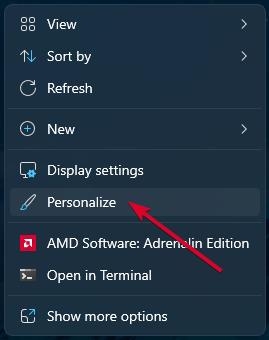
- Now navigate to “System“, and “Display Settings” and proceed to the “Advanced Settings” section.
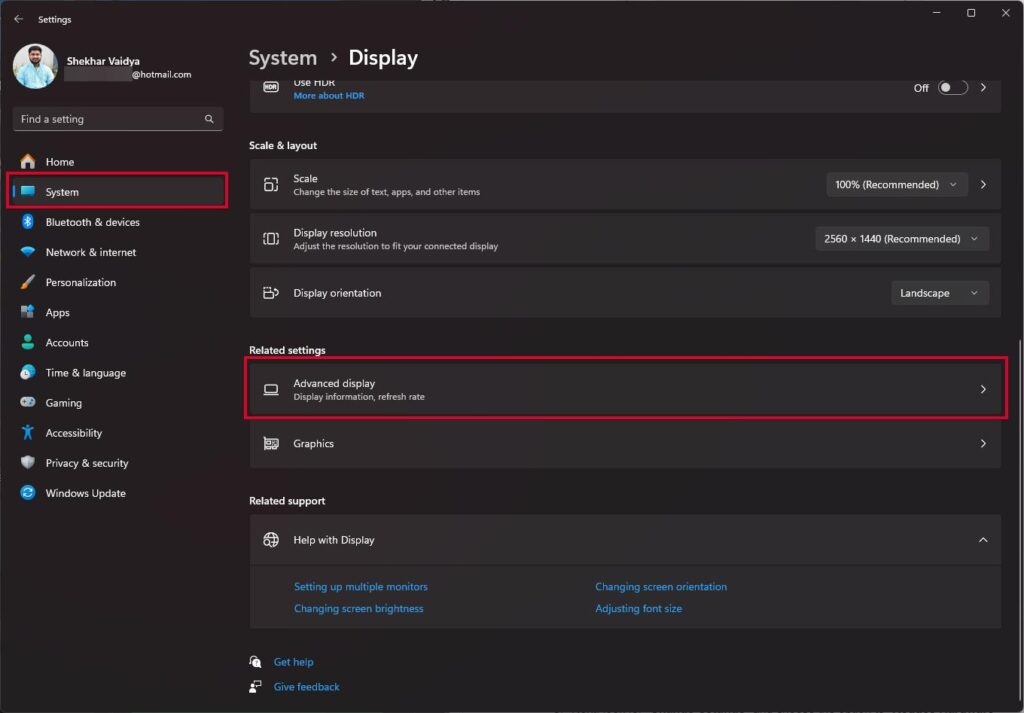
- Within the Advanced Settings tab, locate and switch to the “Troubleshoot” section.
- Next, look for “Change Settings” and choose “Reduce Hardware Acceleration.”
By following these steps, you can adjust the hardware acceleration settings to fix the black screen issue potentially. If it persists, Look into updating your drivers or returning to a previous version to ensure continuous video playback.
Method No: 03. Modify the Media Play Settings
A persistent black screen video while trying to play MKV files in VLC Media Player is a common source of frustration. Fortunately, changing the player’s settings, particularly the video output module, can frequently resolve this problem.
All you need to do is:
- Launch VLC Media Player on your computer.
- Click on the “Tools” menu at the top and select “Preferences.”
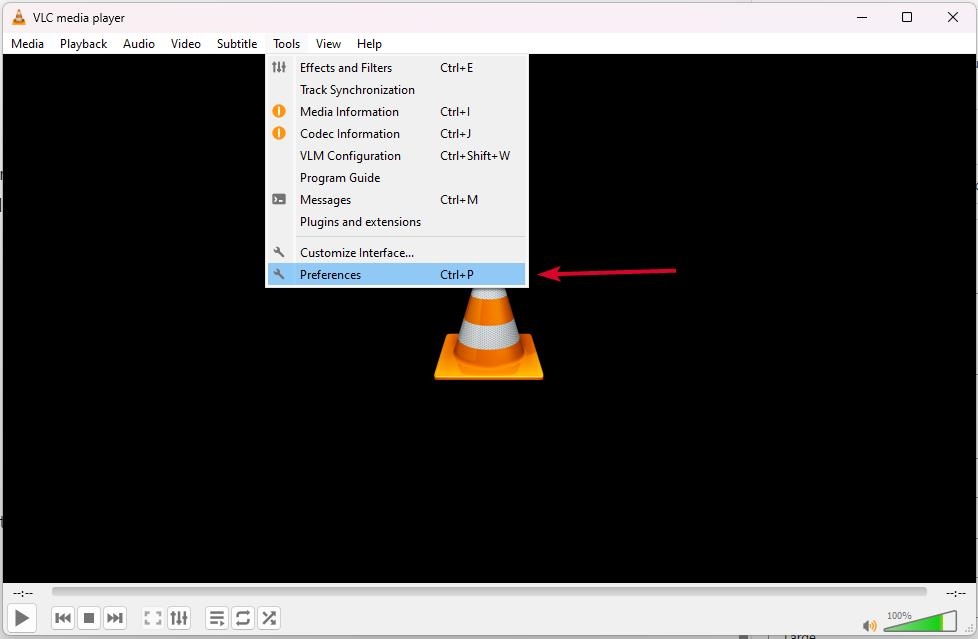
- Within the Preferences window, head to the “Video” tab.
- Look for the “All” option in the lower-left corner and click on it. This grants access to the full preferences view.
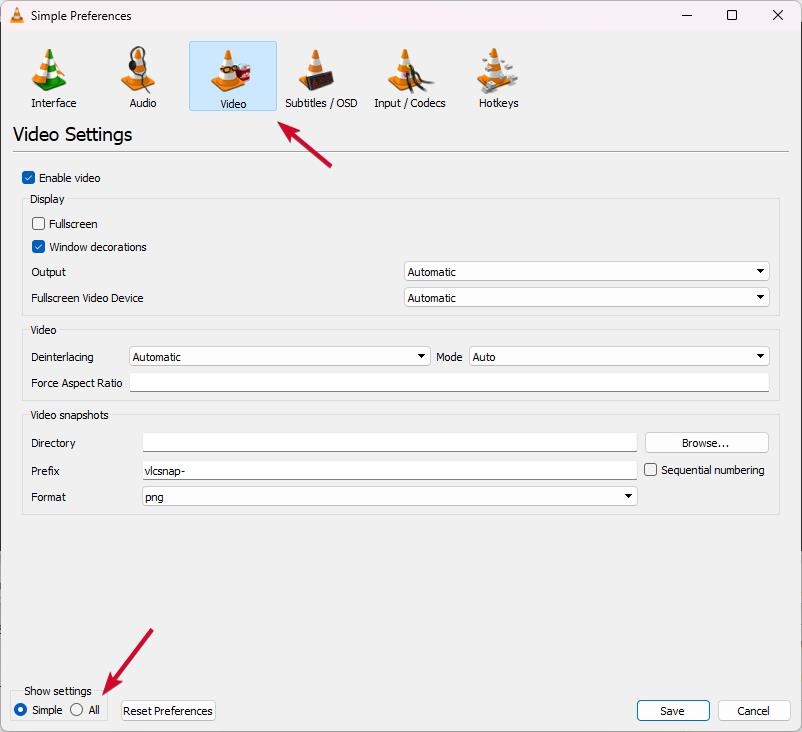
- Under the “Video” section, find the various output modules available.
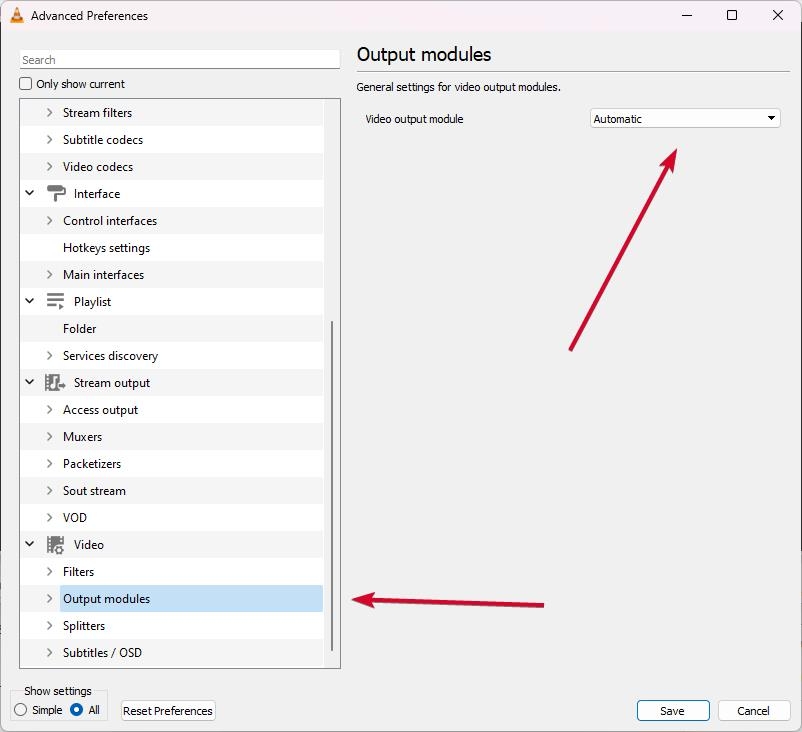
- Pick an alternative video output module that may resolve the black screen issue with MKV files.
However, modifying the VLC settings will fix MKV black screen issues, ensuring synchronized audio-video playback and a seamless viewing experience.
Method No: 04. Install the Media Player Again
If you are still facing ongoing black video screen issues while playing your videos, then reinstalling your media player can be a possible solution. Here are the steps that you need to follow:
- Start by pressing ‘X’ and the Windows key simultaneously to access the menu, then select “Programs and Features.” (or you can go to Control Panel – Programs – Programs and Features)
- Within the window that appears, find and click on “Turn Windows features on or off.”
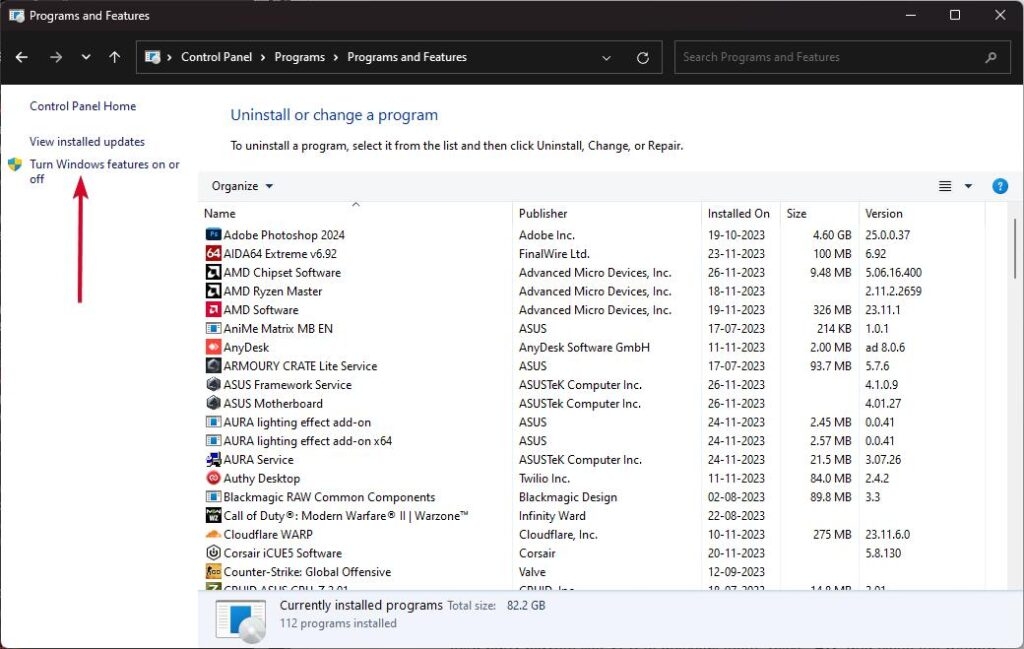
- Under “Media Features,” uncheck the checkbox for Windows Media Player or third-party players like VLC to uninstall them. Click “OK” and close the window.
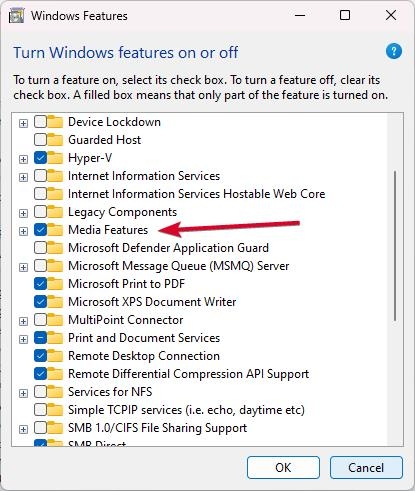
- To reinstall, repeat the above steps to checkmark Windows Media Player or your preferred media player like VLC.
This method lets you quickly uninstall and reinstall your media player, possibly fixing blackscreen video issues and recovering seamless playback.
Part 3: Recover Black Screen Video Issues Caused by the Damaged Video
If you encounter a black screen issue while watching a video, it could indicate that the file is damaged or corrupted. But worry not, because Wondershare Repairit Video Repair software is here to help you recover and restore all those videos that are plagued with glitches.
Aside from that, this software is a one-stop shop for repairing damaged, corrupted, or broken files from various devices or computer systems. It is easy to download and can instantly address common issues such as corruption, compression, format changes, and read/write errors.
However, Wondershare Repairit Video Repair is a leading tool in the market for repairing all types of video corruption issues, including black-screen videos. It is a reliable and professional solution for seamlessly restoring videos to their original playback state.
Key Features
- Repair corruptions in the video header, sound section, and frames for seamless playback.
- Fix damaged recorded video slider movement errors efficiently.
- Repair black screen videos across various formats like MOV, MP4, AVI, and more.
- Fix black screen problems caused by compression, system crashes, or format changes.
- Repair severely damaged videos from SD cards, phones, cameras, USB drives, etc.
- Utilize Wondershare Repairit’s quick or advanced scanning modes based on the video’s corruption level.
- Resolve ‘can’t play recorded videos’ issues on Windows and macOS systems seamlessly.
Step-By-Step Guide
Step 1: To begin by downloading the software from its official website.

Step 2: Now launch the software and click on the button that says “+Add.”
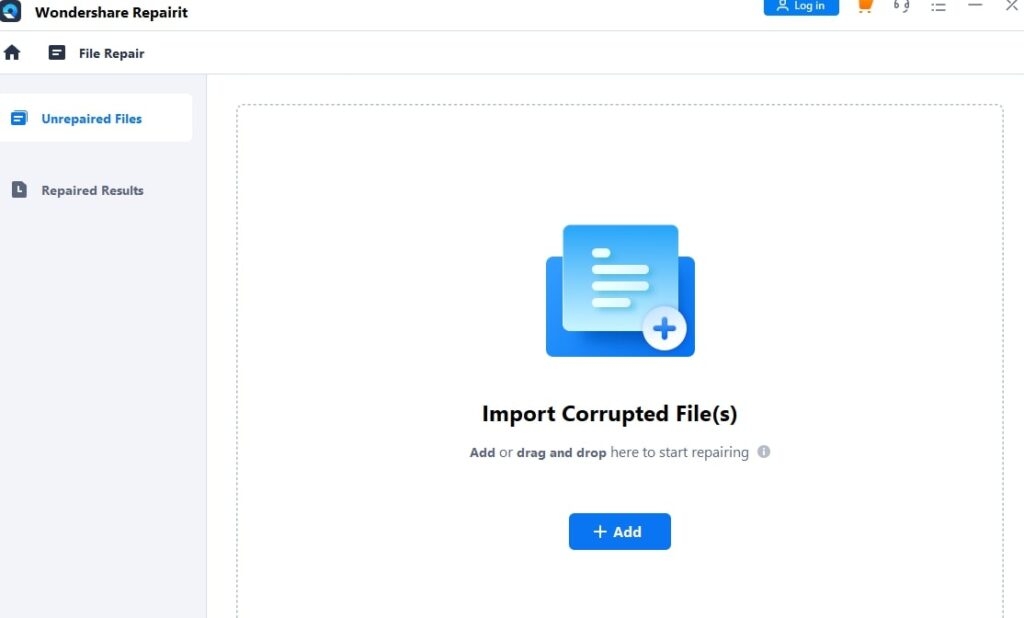
Step 3: Select all the damaged videos that you want to recover from your device and click on the “Repair” button.

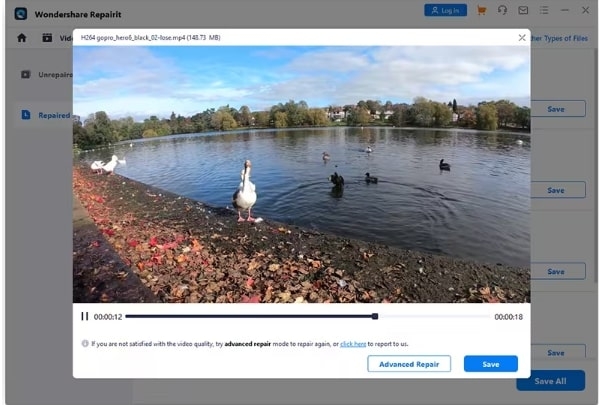
Step 4: Wait for a few minutes while the software repairs your videos. Once the process is complete, you can preview the repaired videos.
Step 5: If you are satisfied with the results, click on the “Save All” button to save the repaired video files to an accessible location on your device.
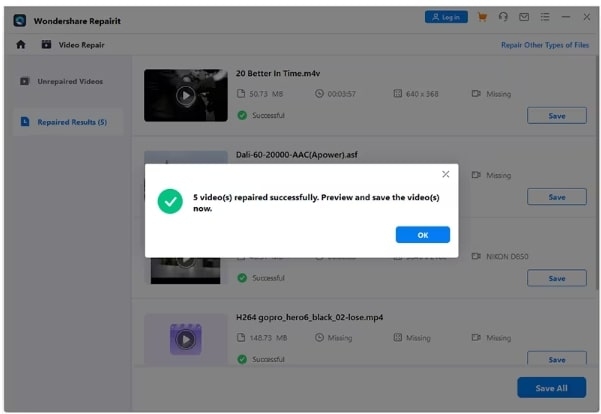
Also, If the results are not satisfactory, you can try the “Advanced Repair” option in Repairit for better results.
To Wrap Up
When it comes to videos that carry life’s most important moments, a video with a black screen can be disheartening.
But now don’t worry. Simply following our incredible methods listed below will instantly repair your black screen video problem, by updating drivers, adjusting settings, or using advanced tools such as Wondershare Repairit Video Repair.
However, these amazing solutions will help you enjoy your videos without any interruptions. So, try these quick fixes and enjoy your cherished moments hassle-free. Lastly, we hope this blog assists you in recovering your black-screen videos. Thank you for reading this entire blog.
Further Reading:
Directly in Your Inbox


