
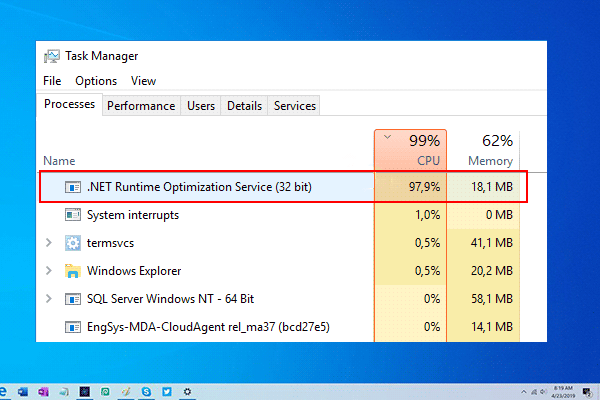
If you are a frequent visitor of the Windows Task Manager, chances are that you might have seen .NET Runtime Optimization Service Consuming High CPU and you might also notice it consuming high CPU usage. So, what does that mean?
Well, if .NET Runtime Optimization Service is consuming high CPU, that will definitely affect the performance of your computer which you definitely do not want.
Don’t want to miss the best from TechLatest?
Set us as a preferred source in Google Search
and make sure you never miss our latest.
.NET Runtime Optimization Service, also called Mscorsvw.exe optimizes the computer to launch apps and programs faster. Generally, it does not consume high CPU but if the service is corrupted or there is some malware on your PC, it might end up consuming more CPU.
In this article, we are going to show you some of the steps that you can take to fix .NET Runtime Optimization Service consuming high CPU in Windows 10.
How to Fix .NET Runtime Optimization Service Consuming High CPU in Windows 10
Scan Your PC Good
The very primary reason for this service to consume high CPU is presence of a malware that might be disguised as an app or a program. So whenever, the service tries to execute it, it ends up consuming more time. If you use a third-party antimalware software, use it and scan your computer thoroughly.
Using CMD
Step 1: Type ‘cmd’ in the Windows search bar and run the Command Prompt as administrator.
Step 2: Now if you use a 32-bit OS, type the following command, and hit enter.
C:\Windows\Microsoft.NET\Framework\v4.0.30319
If you use 64-bit OS, type the following command, and hit enter.
C:\Windows\Microsoft.Net\Framework64\v4.0.30319
You will see ngen.exe exectuequeueditems, that’s it and you are all set!
Restarting the Service
Step 1: Press “Windows key+R” to open Run.
Step 2: Type ‘services.msc’ and hit enter.
Step 3: Navigate to ‘NVIDIA Telemetry Container’, right-click on it and click ‘Restart’.
Step 4: Right-click on ‘NVIDIA Telemetry Container’ and click on ‘Properties’.
Step 5: Set the Startup Type as ‘Automatic’, apply and click on OK.
That’s it and you are all set!
By Running Script from Microsoft
Step 1: Go to the GitHub Page of the official script.
Step 2: Right-click on the ‘Raw’ button and select, ‘Save link as’.
Step 3: Save the file on your computer and make sure that it is a Windows Script file.
Step 4: Execute the file and it will run the script.
Step 5: Choose the ‘Windows Script Host’ program to run the file if you need to choose a program.
This shall probably fix your issue.
So, these were some of the ways by which you can Fix .NET Runtime Optimization Service Consuming High CPU in Windows 10. Try these methods and do let us know.
Are you facing any problems and issues with Windows 10? Then there is nothing to worry about, we have an article dedicated to Windows 10’s issues and guides, visit Windows 10 Troubleshooting Guide. I hope you would like this content if you have some more suggestions let us know in the comment section.
Enjoyed this article?
If TechLatest has helped you, consider supporting us with a one-time tip on Ko-fi. Every contribution keeps our work free and independent.
Support on Ko-fiDirectly in Your Inbox


")


