
From the very beginning, Apple often casts itself as a privacy-oriented brand. When the company rolled out its iOS 14.5 updates this past year, it empowered the users with the ability to stop apps from surveilling their activities over the internet.
To further add up to their privacy mythology, your Apple devices even uses different MAC address for varying networks. It mitigates the fact that using the same Wi-Fi MAC address across all network operators can make it easier to track your device by relating the address to its network activity.
Don’t want to miss the best from TechLatest?
Set us as a preferred source in Google Search
and make sure you never miss our latest.
With that said, if you’re using iOS 14 or higher, you may sometimes encounter a warning message stating “Privacy Warning” under the network name. If that’s something new to you, make sure you keep reading this blog post.
In this guide, we’re about to take a brief look at the WiFi privacy warning on an iPhone and attempt to fix it through multiple troubleshooting methods.
What is WiFi Privacy Warning on iPhone?

Wi-Fi Privacy Warning is one of the new features introduced by Apple in iOS 14. Whenever a device connects to a Wi-Fi network, it must identify itself using a MAC (Media Access Control) address. MAC address is a unique ID number used to identify your device on a network.
When your device uses the same MAC address to connect to all networks, then network operators and other observers (like advertisers) can track your activity and location. Due to this reason, Apple introduced Wi-Fi Privacy as a safety measure for its users.
With Wi-Fi Privacy, your device uses a private address to connect to each different network keeping your real MAC address hidden. On iPhone, there is a private address for every network you connect to and this private address is unique for that particular network only.
This reduces the Wi-Fi tracking of your device and the network displays a “Wi-Fi Privacy Warning” message when a private address isn’t enabled for it.
Ways to Fix WiFi Privacy Warning On iPhone
#1. Change Your Network SSID
The network name, or SSID, is how you can identify your particular network when it appears on your device’s list of available Wi-Fi networks. For this reason, you should not use the default names that come with your router.
Not applicable to all the routers. If this doesn’t work, you will have to manually change the router SSID and connect to your iPhone as a new WiFi connection.
It’s also important that both bands of your router have the same name, or else your devices may have difficulty connecting to all parts of your router. Here’s how you can set up a new SSID for iPhone:
- Open Settings and tap on Wi-Fi.
- Tap on the info button next to the Wi-Fi network you want to change its name (SSID).
- Tap on Name and enter a new Wi-Fi name (SSID).
- After entering a new one, tap on Done and then tap Save in the top right corner of your screen to save it.
- Your router will restart with a new SSID (network name) shortly after applying the changes from your iPhone’s Settings app.
Now you should no longer have the ‘Privacy Warning’ on your iPhone. However, in case the warning still persists, consider following the other methods given below.
#2. Enable Private Wi-Fi Address Feature
It’s important to note that this warning is not related to any specific Wi-Fi network. It’s just a precautionary measure taken by Apple to ensure your security and privacy. To get rid of it, you’ll need to enable Private Address on your iPhone. Here’s how:
- Open the Settings app.
- Tap on Wi-Fi.
- Tap on the info icon next to the network you’re connected to.
- Scroll down until you see “Private Wi-Fi Address,” and tap on the toggle next to it.
- Reconnect to the Wi-Fi network, and check if your message has gone away.

#3. Enable and Disable Airplane Mode
Airplane mode is a feature on your iPhone that turns off the cellular network and all wireless connections. In other words, it blocks you from accessing Wi-Fi, Bluetooth, GPS, and other network-related utilities on your iPhone.
It’s useful if you want to save battery life or if you’re in an area where cell service isn’t allowed. For example, airplanes use radio signals to communicate with the tower and ground crews, so they require you to turn on Airplane mode while in flight.
If you need to fix the WiFi privacy warning on your iPhone, you should try turning airplane mode on and off:
- Tap the Settings app on your home screen.
- At the top of the screen, toggle Airplane Mode on.
- Alternatively, you can swipe up from the bottom of your screen to access Control Centre and tap the airplane icon to enable this feature.
- Wait a few moments and then disable Airplane Mode by doing the same thing you did to enable it.

Since your device didn’t forget the previously connected Wi-Fi, it will automatically reconnect now that Airplane Mode has been disabled, and hopefully, this will resolve any privacy warnings that have been troubling you.
#4. Forget The Network and Reboot Your Device
If you’re still having trouble with your Wi-Fi network, try a simple reboot of your device. Before you do that, make sure to forget the current network by following the steps below:
- Open Settings on your iPhone and tap on Wi-Fi.
- Tap on the info icon next to the Wi-Fi you’re connected to.

- Once you enter the network settings, look for the Forget This Network option, then tap on it.
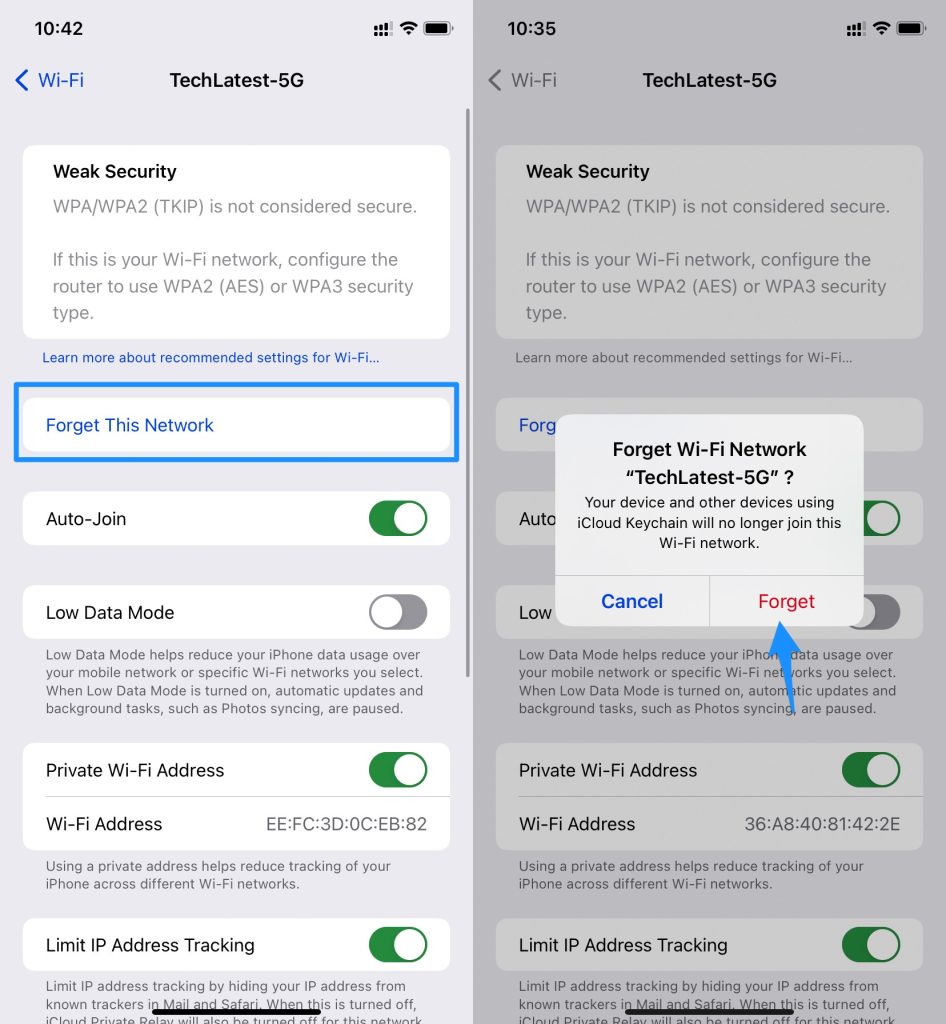
- Next, you need to reboot your iPhone. For that, long-press the side button.
- Release when the power slider appears on your screen. Drag the slider all the way to the right. Your device will then power off.
- After that, long-press the side button only until the Apple logo appears on your screen.
- When your iPhone turns back on, input your passcode to unlock it.
- Then, relaunch the Settings app.
- Go to Wi-Fi and reconnect to your Wi-Fi network. You will need the Wi-Fi security key for this purpose.

#5. Update Your Router’s Firmware
Your router’s firmware is essentially the operating system of your router. Like OS updates, your router’s firmware needs to be updated regularly to keep everything running smoothly. If you still cannot mitigate the privacy warning, you may consider updating your router’s firmware as follows:
- In a web browser, type in your router’s IP address (you can find it in the user manual.)
- Type in your username and password. You can find these too in the user manual or by contacting the manufacturer.
- Locate the firmware upgrade section and click “Check for Updates” or “Update Firmware.”
- If there’s an update, download it and click “Apply Update.” This will take a few minutes.
- Once your router restarts, you should be all set.
#6. Use Apple’s Recommended User Settings
It is true that the security offered by Apple devices is second to none. But to ensure that your iPhone enjoys and benefits from this security, you should set your router settings as per the guidelines issued by Apple.
Apple has listed some router settings that it recommends for optimum performance and best security. These settings are available for routers, access points, and base stations that you use with Apple products.
For optimum performance, it is advisable to set your router to WPA3 Personal or WPA2/WPA3 Transitional. You can also achieve similar compatibility by disabling the use of WPA3 Transitional Mode.
Final Words
We hope that one of the solutions in this article has worked for you.
Having trouble with your Wi-Fi and privacy settings can be a hassle, but we’re glad to have been able to help you get it all squared away.
If none of these solutions have worked for you, don’t worry! We’ll keep following up this article with new fixes as they come up, so check back often to see what’s new.
Thanks for reading!
Enjoyed this article?
If TechLatest has helped you, consider supporting us with a one-time tip on Ko-fi. Every contribution keeps our work free and independent.
Support on Ko-fiDirectly in Your Inbox
")
")


