
Over 45% of the personal computers have Windows 10 as their OS. It is one of the most popular OSs in the world. This is due to the hardware which powers the OS that makes a significant difference, even in the graphics hardware. If you don’t know which graphics card or GPU is installed on your computer, then follow these methods to Check Graphics Card Details in Windows 10.
Steps to Check Graphics Card Details in Windows 10
Method #1: Using Task Manager
- Right-click on the taskbar and click on ‘Task Manager’ or you can just press ‘Ctrl+Shift+Esc’ keys simultaneouly to open task manager.

Don’t want to miss the best from TechLatest?
Set us as a preferred source in Google Search
and make sure you never miss our latest.
- You will see the Windows 10 Task Manager now.
- Then, click on the ‘Performance’ Tab.

- On the Performance tab, select the ‘GPU 0’ tab. The graphic card’s or the GPU’s manufacturer and model name will be displayed at the top right corner. This is your integrated graphics card details.

- The GPU 1 tab is for your dedicated graphics card details.

That’s the first method on how to check you Graphics card model. In the second method you can use the Run command to check it.
Method #2: Using Run Command
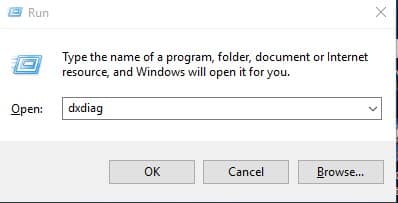
- Press Windows Key + R on the keyboard to open the Run Dialog box.

- On the Run Dialog box, enter dxdiag and hit Enter.
- Select the ‘Display’ tab in the DirectX Diagnostic Tool you see. On the Display tab, check the GPU information to find the integrated graphics card.

- The Render tab shows your Dedicated Graphics card details.

Conclusion
You can use any of the methods: Task manager and Run command, to check the details of the Graphics card in your hardware.
Read more:
Enjoyed this article?
If TechLatest has helped you, consider supporting us with a one-time tip on Ko-fi. Every contribution keeps our work free and independent.
Support on Ko-fiDirectly in Your Inbox


