
Windows 10 is the most widely used computer OS by now and many users have upgraded to Windows 10 from Windows 7 or Windows 8/8.1. And if you too have upgraded to Windows 10 then there are chances that you may or may not find the old classic Photo Viewer in Windows 10.
The problem comes when you install the Windows 10 from ISO or when you buy a new PC with Windows 10 in it, then you don’t get the photo viewer in Windows 10 on your PC.
Don’t want to miss the best from TechLatest?
Set us as a preferred source in Google Search
and make sure you never miss our latest.
The photo viewer is a good application that lets you make multiple changes in the images and has a lot of good features compared to the default photo viewer app for Windows 10.
So, there are some straightforward steps to enable the Photo Viewer in Windows 10.
How to Enable the Photo Viewer in Windows 10
So, to do this we have to complete the task in two stages, first to bring back the classic photo viewer in Windows 10 and then to make it the default photo viewer application on your computer.
Precaution: We suggest you make a manual restore point as in this process we will be editing the Registry. In case anything goes wrong, you have this restore point from where you can undo any problems created and make sure that your system performs well.
Step 1: Download “PhotoViewer.reg” file and place it on your desktop.
Step 2: Open the file and you will see a dialog box that seeks the permission to merge the file or you can right click and click on “Merge”.
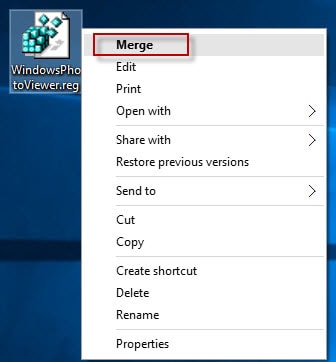
Step 3: Upon confirming to merge the file you will see a box that says the keys and values contained in the file were successfully added to the Registry. Just click OK and this process of adding the Photo viewer in Windows 10 is complete.
From here begins the other part of the complete process, which is to make the photo viewer as default in Windows 10.
Step 1: Open the Settings App or press Windows+I to open the settings.
Step 2: Upon opening the settings, go to “Apps” and then click on the Default Apps. Scroll down and you will see photo viewer option on the right side. Click on the default app for the photo viewer.
Step 3: Now select the Windows Photo Viewer from here and you are all set.
That is, it and now you have Photo Viewer in Windows 10 as your default photo viewing application.
Read More About
Enjoyed this article?
If TechLatest has helped you, consider supporting us with a one-time tip on Ko-fi. Every contribution keeps our work free and independent.
Support on Ko-fiDirectly in Your Inbox
")


