
Sometimes you feel like your iPhone speaker isn’t working right. If you are making a phone call or playing media, you may hear a crack or muffled sound.
But don’t worry! Dirt or dust may be blocking your iPhone’s speakers. The iPhone speaker is one of the more delicate parts of the phone. It’s essential to clean it regularly to keep it functioning correctly.
Don’t want to miss the best from TechLatest?
Set us as a preferred source in Google Search
and make sure you never miss our latest.
Cleaning your iPhone speaker can be daunting, but with the right tools and techniques, it’s a simple task. And note that it could never be a good idea to clean iPhones with liquids or compressed air.
Especially models older than the 7, which provide no water resistance and have 3.5 mm headphone jacks that have a huge chance of getting water inside. This can damage the phone. When you don’t know how to clean iPhone speakers, it can be a challenging question.
In this blog post, we’ll walk you through the steps necessary to clean your iPhone speaker and get it back to sounding new.
So, let’s get started!
What You Should Avoid When Cleaning An iPhone’s Speaker?
A speaker is one of the most fragile parts of an iPhone. As a result, you should handle them very carefully. Therefore, we do not recommend carrying out the following actions.
- Avoid cleaning your iPhone speaker with liquid or compressed air. These can cause moisture damage and may even force water into the speaker’s vulnerable parts.
- Avoid sticking anything sharp into your iPhone’s speaker to clean it, as this can damage the delicate components and lead to further issues.
- Avoid using harsh or abrasive cleaners on your iPhone’s speaker, as they can leave behind residues that can damage the speaker.
How Do You Clean Your iPhone Speakers To Enhance The Sound Quality?
Although there are several ways that you can use to clean your iPhone’s speakers. We recommend using a gentle soft brush tool to remove dust and dirt. Even so, you will need a few simple tools and supplies to clean your iPhone’s speaker safely. The following methods are also included:
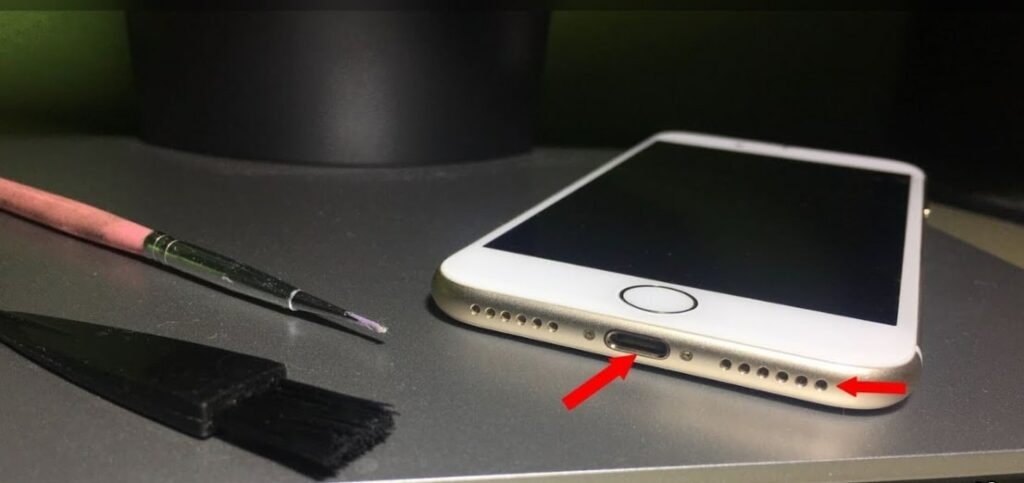
Clean iPhone Speakers With A Soft Brush
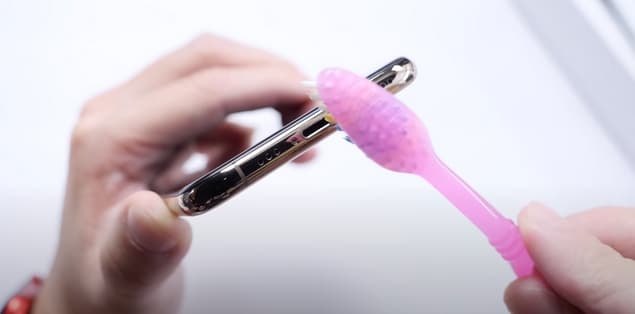
The best way to clean iPhone speakers is to use a soft brush. First of all Power off your iPhone and removes any headphones or cases that may be attached to it.
After that, you can use a small paintbrush or even a toothbrush. If you choose anything, make sure it’s super-soft. After choosing the right brush, you should dip its tip in rubbing alcohol. Keep the brush from getting completely soaked.
Gently brush away any dust or dirt from the speaker grille using your soft brush. Remove dirt and debris from the speakers by running the damp brush back and forth.
You should use rubbing alcohol instead of water. The rubbing alcohol evaporates rapidly. Avoid sticking anything sharp into your iPhone’s speaker to clean it. Using bristles that are too stiff could cause damage to your iPhone.
You should regularly clean and dust the speakers on your iPhone in order to keep them operating properly. You can also use a soft cloth to wipe down the speaker grille and clean it with a gentle cleaning solution as needed. With this simple process, you can enjoy the clear and crisp sound of your iPhone’s speakers.
Clean iPhone Speakers With Painter’s Tape
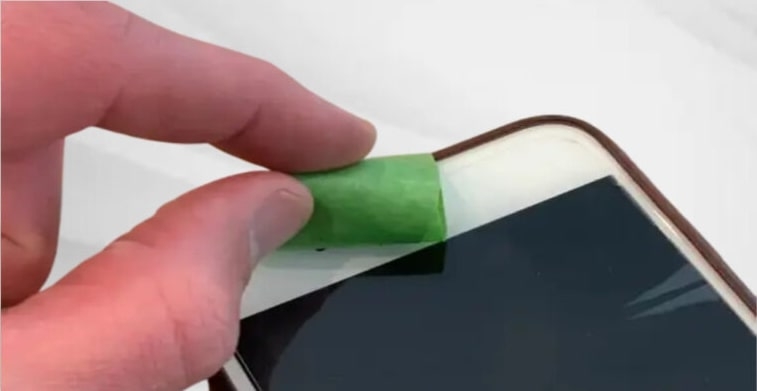
When you paint a wall, you probably use low-stick, blue painter’s tape to make sure you don’t paint edges and other things. Your iPhone’s speakers can also be cleaned with this tape. It picks up dirt without leaving behind a sticky residue because it isn’t too sticky. The easiest way to do this is to tear off a small strip of painter’s tape.
You can roll the tape so that it’s in a small loop by reversing the strip and turning the sticky side out (you can wrap the tape around a finger). To remove dirt and grime from the iPhone speaker, roll the sticky side of the tape back and forth.
Clean iPhone Speakers With A Toothpick
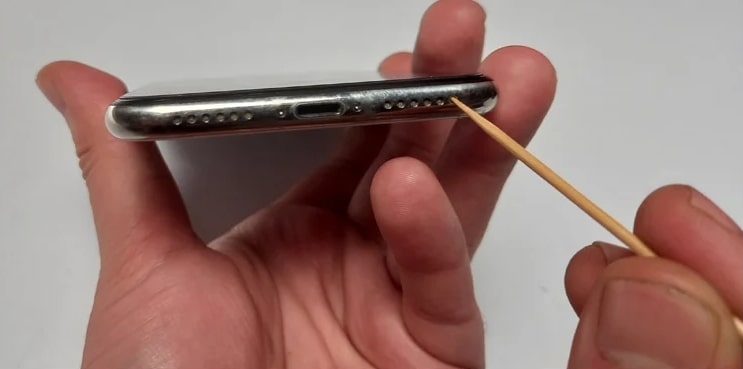
The third thing we need for cleaning the iPhone speakers is toothpicks. The pointy nature of toothpicks makes them dangerous to use, so be careful when you use them.
Make sure you have your flashlight ready to see better what you’re doing, and remove your phone case if necessary. Now, gently clean the holes of the speaker with the pointed side of the toothpick. keep it in mind, don’t exert too much pressure. To remove dust and avoid any damage, keep tilting the toothpick sideways and up.
Clean iPhone Speakers With An Air Blower
Some sites recommend cleaning iPhone speakers with compressed air, but this can damage them easily. You can much more safely use an air blower, such as the Soft Tip Silicone Super Air Blower ($7.99, Amazon). After using one of the above methods, you can use this to blow away any remaining dust.
To clear dust and debris from your speakers, hold your air blower a short distance from them and use several short bursts. You won’t get the same power as compressed air, but that’s ok. For greater effect, bring your air blower closer. You can check the progress using a flashlight and repeat if necessary.
It’s more likely that you have a problem with your iPhone’s software than blocked speakers if the sound quality looks distorted on your device. In this case, turning it off and on again may help. If the sound quality of your iPhone remains unchanged after trying any of these methods, your iPhone must be taken to an Apple Store in that case.
Conclusion
I hope this article helped you learn how to clean iPhone speakers. Dealing with a clogged or damaged iPhone speaker can be frustrating and difficult.
But with the right tools and techniques, you can easily clean your iPhone’s speakers and get back to enjoying the clear, crisp sound. To learn more about how to clean your iPhone’s speakers and keep them in good condition, read the above methods.
However, if the sound quality on your iPhone does not improve, it may be a sign that you need to repair or replace your device. If you need assistance with this, you may wish to consult with an Apple Store.
If you have any further questions or thoughts about this article, feel free to let us know in the comment section below.
Thanks for reading!
Enjoyed this article?
If TechLatest has helped you, consider supporting us with a one-time tip on Ko-fi. Every contribution keeps our work free and independent.
Support on Ko-fiDirectly in Your Inbox


")


