Highlights
- Boost performance with faster boot times, improved responsiveness, and extended hardware lifespan.
- Step-by-step process using Rufus and meeting system requirements for an easy Tiny11 installation.
- Access NTDEV forum for ongoing support, contribute to the project, and explore positive user testimonials showcasing Tiny11’s effectiveness.
Are you bored of your low-end PC’s slow performance? Do you want to revitalize your system without breaking the bank?
There is no need to look any further! We’ll walk you through the process of downloading and installing Tiny11, a lightweight and efficient operating system designed for low-end machines, in this complete tutorial.
Don’t want to miss the best from TechLatest?
Set us as a preferred source in Google Search
and make sure you never miss our latest.
Discover Tiny11’s primary advantages and how to optimize your system for increased speed and workflow in your computing experience. Don’t worry about the irritating lags; install an OS to your PC that is always responsive.
Let’s start by addressing some of the basic concerns about the OS.
Disclaimer: We don’t possess any of the files; instead, we utilize those accessible on the internet. This article is strictly intended for educational purposes. Please refrain from intruding on anyone’s privacy without obtaining their consent. TechLatest disclaims responsibility for any incurred losses.
Tiny11: Everything You Need to Know
Tiny11 isn’t your typical Windows 11 installer; it’s a painstakingly curated, stripped-down version that removes extraneous features and bloatware.
As a result, the operating system is sleek and efficient, running smoothly even on devices with as little as 1GB of RAM. This meticulously streamlined environment offers many advantages, guaranteeing a computing experience.
1. Faster Boot Time:
Say goodbye to extended periods of looking at the loading screen. Tiny11 has a lightning-fast boot-up process in the blink of an eye.
With this quick launch, you can get right into your duties without the additional lag that is prevalent with traditional operating systems.
2. Improved Responsiveness:
Tiny11 brings you to a whole new level of responsiveness. No more sluggish multitasking or laggy windows – Tiny11’s resource efficiency ensures that your commands are executed quickly.
Because of this increased responsiveness, your computing experience becomes a smooth and seamless trip through numerous programs and tasks.
3. Smaller Memory Footprint:
Tiny11 is designed to be resource-light, utilizing substantially less RAM than its full-fledged Windows 11 counterpart.
This decrease in memory footprint frees up valuable resources for your applications, ensuring that your system runs quickly and without putting undue strain on your hardware.
Bid farewell to memory-intensive processes and hello to a more simplified and efficient computer environment.
4. Improved Performance on Older Hardware:
Use Tiny11 to revitalize your old PC. This lightweight operating system is designed to function well on PCs that might struggle with the full Windows 11 experience.
Tiny11 extends the lifespan of your gadgets by breathing new life into outdated hardware, letting you make the most of your existing equipment without needing costly upgrades.
Overall, Tiny11 is, in essence, more than just a smaller Windows 11 installation; it’s a customized solution for users looking for a lean, mean operating system.
Tiny11 provides a computing experience that stresses efficiency without sacrificing functionality, whether you want faster boot times, increased responsiveness, lower memory utilization, or improved performance on older hardware.
Tiny11: System Requirements
Make sure your PC has the system requirements for peak performance. The following conditions must be met to provide a smooth and efficient experience with Tiny11.
Processor
A minimum of 1GHz processor is necessary; however, a 64-bit processor is recommended for improved and responsive performance. This will allow Tiny11 to perform to its greatest ability, handling jobs quickly and precisely.
RAM
A minimum of 1GB RAM is required to ensure smooth multitasking and responsiveness. However, for an even more flawless experience, we recommend 2GB of RAM. Tiny11 will be able to control numerous tasks more easily, improving overall system efficiency.
Storage
Tiny11 requires a minimum of 8GB of storage space to function properly. However, for individuals looking for a larger storage capacity that can easily handle data-intensive apps, at least 16GB of storage is advised.
Graphics Card
A DirectX 11-compliant graphics card is required for a visually engaging experience and compatibility with the latest features. Tiny11 will benefit from superior graphical capabilities, giving users a rich and entertaining experience.
Secure Boot and TPM 2.0
While not required, Secure Boot and TPM 2.0 are highly recommended for specific Tiny11 functionalities. These security features improve your system’s overall security and help to a safer computing environment.
Download Tiny 11
Where can I get Tiny11? You can obtain a Tiny11 ISO from the below given links. When you open the link, it will immediately start downloading the Windows 11 Tiny Edition ISO file.
Tiny11 23H2(64-bit)
- Build: 22631.2715
- Architecture: x64
- Language: en-US
- Size: 3.5 GB
- SHA256 Checksums: A028800A91ADDC35D8AE22DCE7459B67330F7D69D2F11C70F53C0FDFFA5B4280
- Downloads:
Last Updated: 2023-11-25
Tiny11 23H2(ARM64)
- Build: —-
- Architecture: ARM64
- Language: en-US
- Size: 3.1 GB
- SHA256 Checksums: 812DAE6B5BF5215DB63B61AE10D8F0FFD3AA8529A18D96E9CED53341E2C676EC
- Downloads:
Last Updated: 2023-12-29
Installation Process of Tiny11
Requirements
Before we begin, please ensure that you have the following:
- A USB flash disk with at least 8GB of storage space.
- Rufus is a free utility that allows you to create bootable USB devices.
- Any crucial data on your USB device will be wiped throughout the process.
Installation Procedure
1. Download Rufus: Begin by downloading Rufus, a trusted utility for making bootable USB sticks. The most recent version is available on their official website.
2. Prepare USB Flash Drive: Insert your USB flash drive into your computer to prepare it. Make sure it has at least 8GB of storage space and that any vital data is backed up. This procedure will delete all data on the USB disk.
3. Launch Rufus: Select your USB disk from the device list in Rufus.
4. Select Tiny11 ISO File: In Rufus, click “Select” and navigate to the directory where you obtained the Tiny11 ISO file. Select the file and press “Open.”
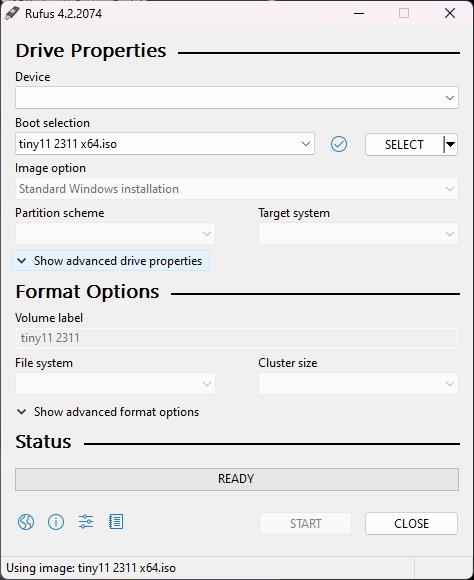
5. Start Rufus: When you press the “Start” button in Rufus, the tool will begin generating the bootable USB drive. Wait for the process to finish; this could take some time.
6. Restart your computer and go into BIOS/UEFI settings: Restart your computer and go into the BIOS/UEFI settings. Typically, this entails pressing a certain key (e.g., Del, F2) during boot. To prioritize your USB drive, change the boot order. Save your modifications and quit the BIOS/UEFI configuration.
7. Boot from the USB disk: Your computer will start up from the USB disk.
8. Language, Time – Currency, and Keyboard Layout: During installation, choose your preferred language, keyboard layout, and edition (Home or Pro).
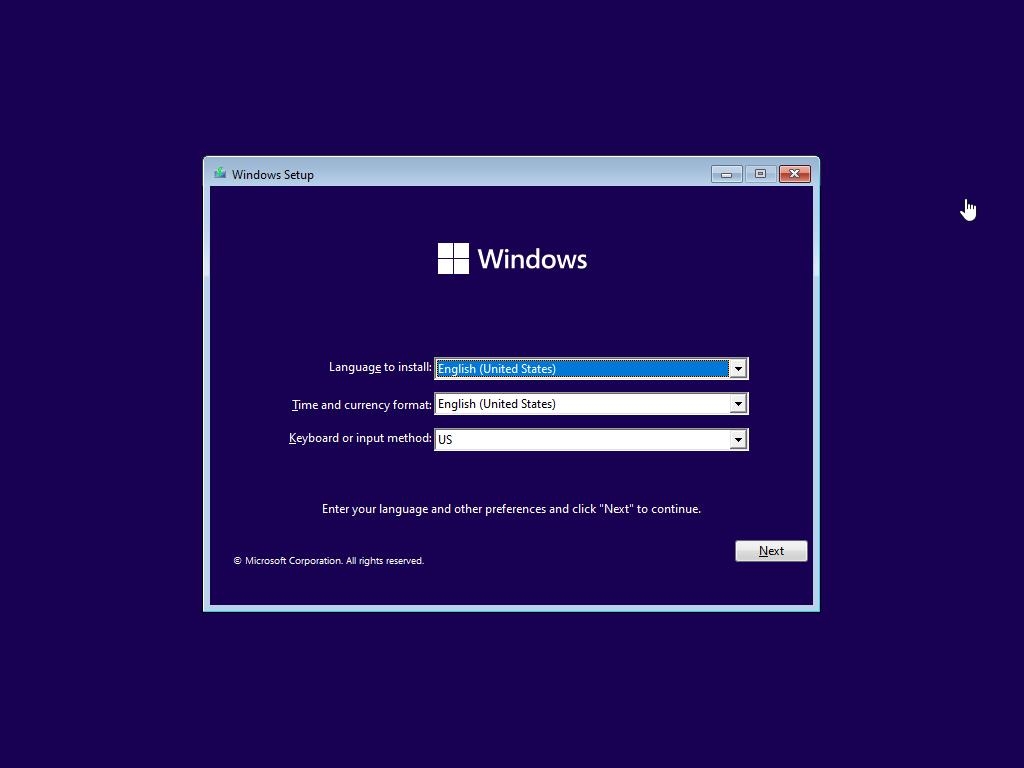
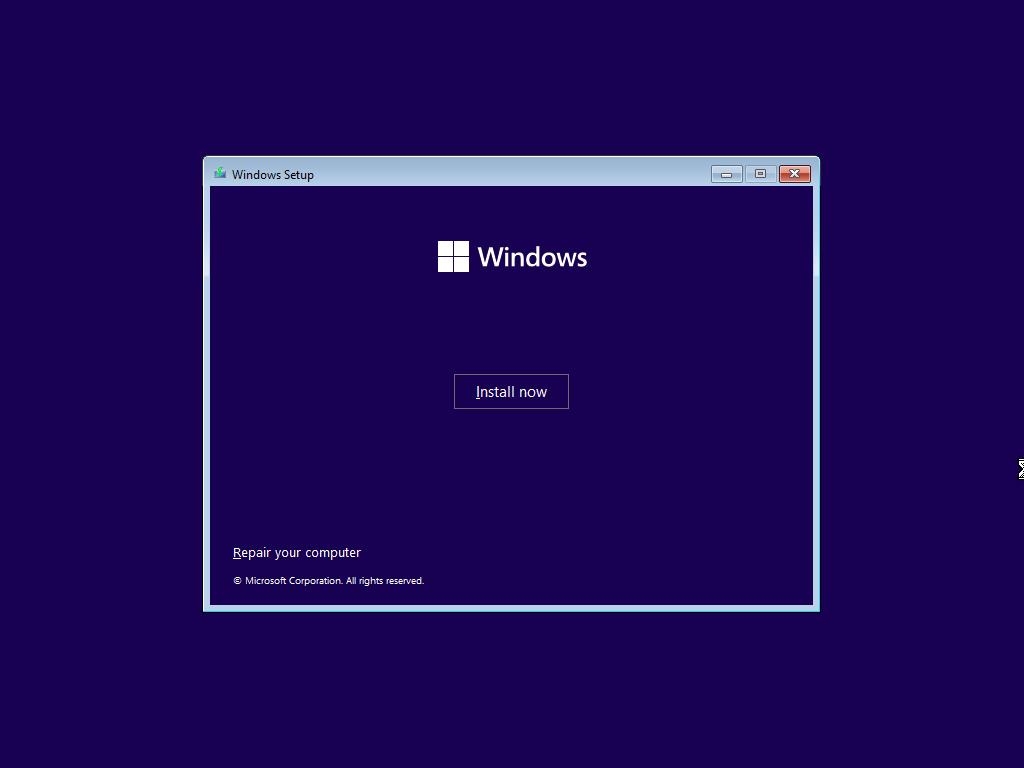
Select “Install Window 11” and follow the on-screen prompts.
9. (Advanced) Customization Installation: Select “Custom (advanced)” installation and specify the drive where Tiny11 should be installed.

If necessary, format the hard disk.
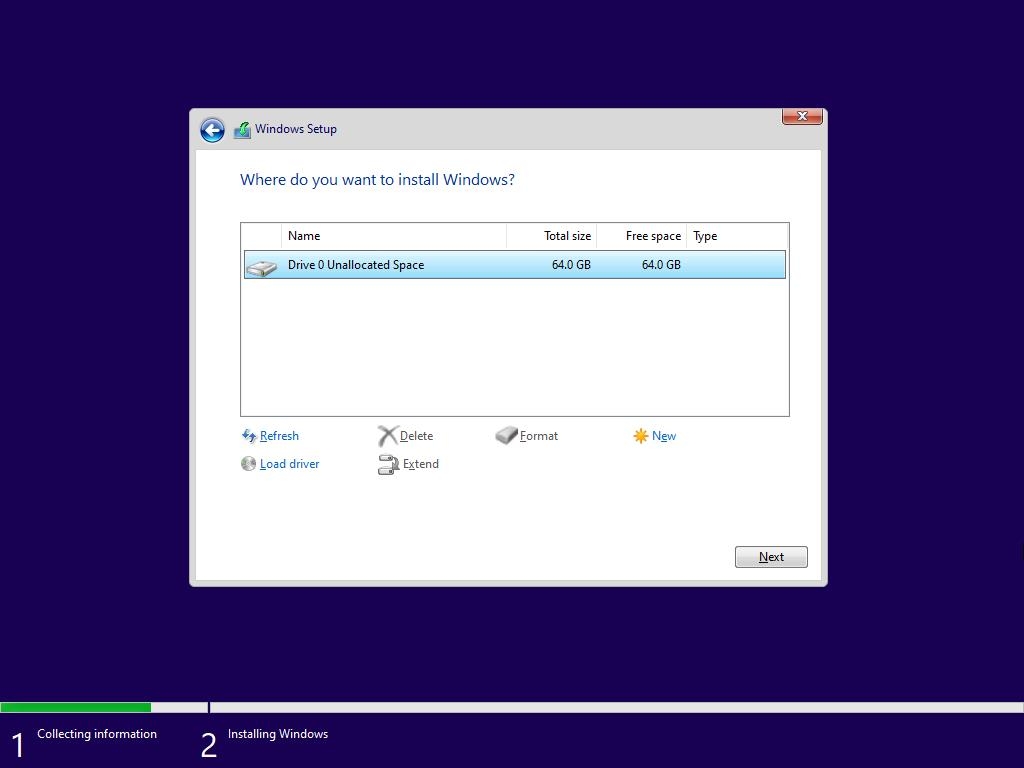
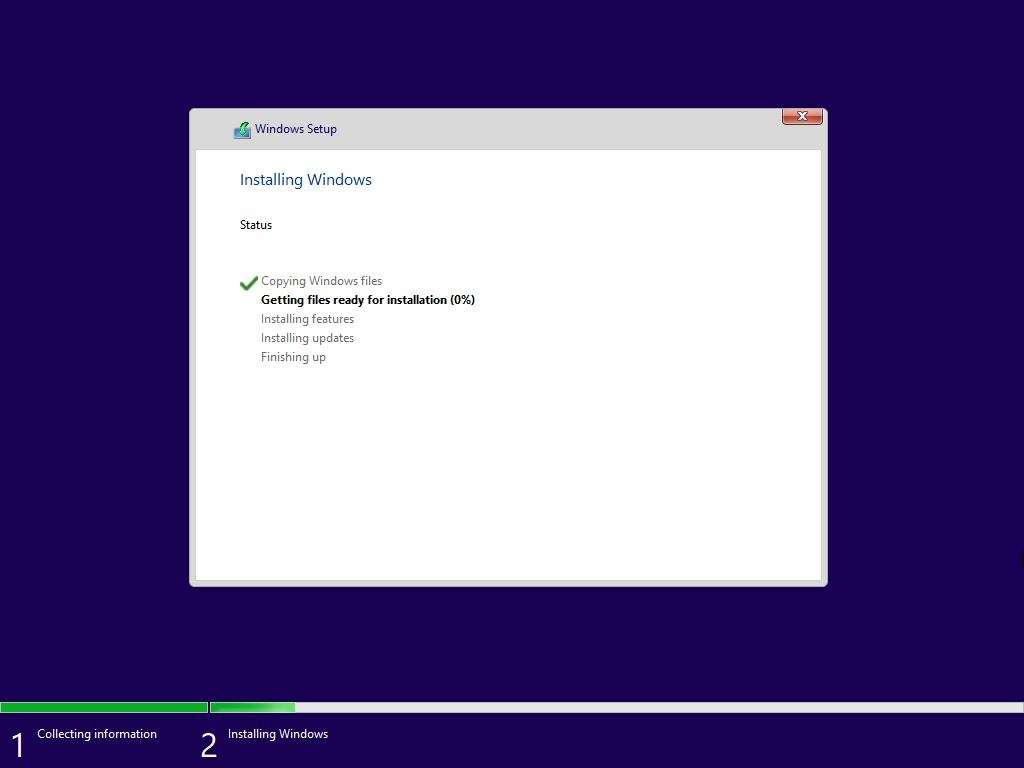
10. Complete Installation: Finish the remaining steps and wait for Tiny11 to finish.
11. Remove the USB drive and restart your computer: Once the installation is complete, remove the USB device and restart your computer.
That’s it Tiny11 has been installed successfully on your low-end PC. Now you can use this lightweight operating system’s improved performance and efficiency.

Other than the above method, you can also stick to reputed sources.
Archive.org
Archive.org is a trustworthy location for acquiring the Tiny11 23H2 build. Go to Archive.org and start a search for “tiny11-23h2.” This platform is well-known for its dedication to security, providing a validated download that reduces the danger of meeting viruses or unstable versions.
NTDEV Community Forums – Developer Hub
Visit the NTDEV Community Forums, the official site for Tiny11 developers, for the most recent builds and updates. Search the forum for “Tiny11 download” to find the latest and recommended versions. The community forums are trustworthy sources that ensure you receive a stable and safe copy of Tiny11.
It is critical to underline the necessity of avoiding untrustworthy downloading. This may expose your machine to malware or instability issues. Stick to the platforms specified above to protect your device and have a pleasant Tiny11 experience.
Customization Options
Tiny11 is pre-configured for best performance, but you can customize it further:
- Windows Settings: Access common options such as wallpaper, themes, and user accounts.
- Start Menu: Customize the tiles displayed in the Start Menu and pin your favorite programs.
- Taskbar: Select which icons to show or hide, as well as the size and behavior of the taskbar.
- Default Apps: Set your preferred browser, email client, and music player as default apps.
- Tweak Services and Startup Programs: To improve performance, disable superfluous background processes.
Performance Benefits
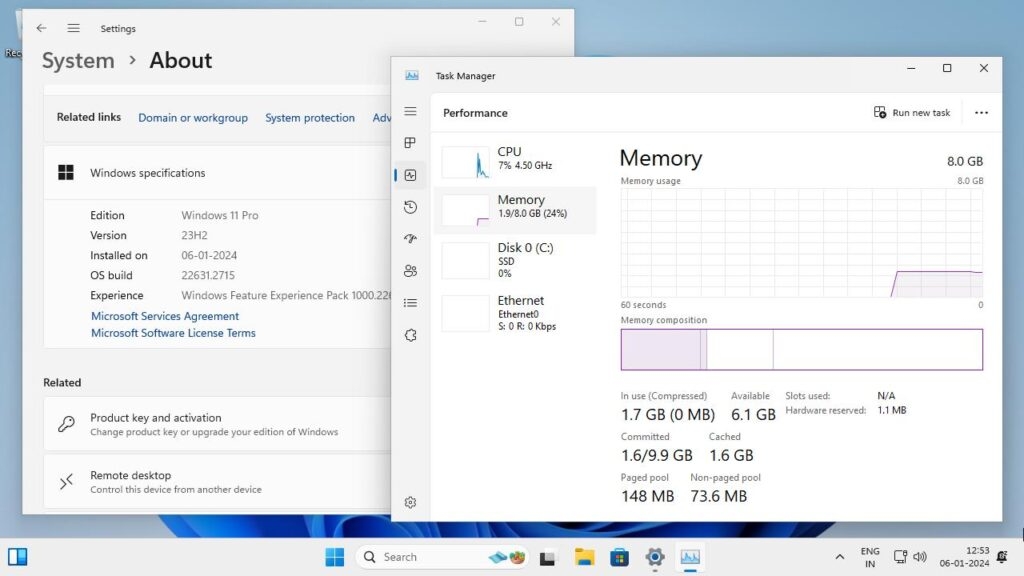
- Increased responsiveness: Say goodbye to delays! Even with aged hardware, applications start and run smoothly.
- Effortless multitasking: With reduced resource use, managing many apps becomes simple.
- Reduced CPU and memory usage: Tiny11 puts less burden on your system, keeping it cool and silent.
- Longer battery life: Laptops have lower power consumption, allowing for more disconnected time.
Compatibility and Limitations
Although Tiny11 performs well on less powerful PCs, there are a few things to keep in mind:
- Software Compatibility: Some apps built for the full Windows 11 experience may not run properly due to missing features or dependencies.
- Limited Driver Support: Older hardware may lack Tiny11 drivers, providing potential issues.
- Absence of Official Updates or Support: Because Tiny11 is a community-driven endeavor, updates and support may be slower or less consistent than through official Microsoft channels.
- Security Features: Some advanced security technologies, such as TPM 2.0, may not be accessible by default and may require a BIOS/UEFI setting.
Community Support and Resources
Tiny11 assistance and information can be found at the NTDEV community forum:
- Post your concerns and questions here: Help is provided by responsive community members and developers.
- Get the most recent builds and updates: Keep up with the newest advancements.
- Contribute to the project: Developers encourage community input and contributions.
Wrapping It All
Overall, Tiny11 is more than an operating system; it’s a game changer for old computers. Its lightweight design offers a fluid, responsive experience, even on devices that struggle to run full Windows 11.
While compatibility and support constraints exist, Tiny11 is an enticing solution for individuals wishing to revitalize their low-end computers due to the performance benefits and increased hardware lifespan.
If your PC is slow and outdated, give Tiny11 a shot—you might be amazed at how much life it can breathe into your old pal.
Advanced users can look into further optimization suggestions and changes discussed in the NTDEV community forum to improve their Tiny11 experience.
While this article gives a complete guide, installation procedures and settings may differ depending on your hardware and preferred configuration. You can search and access the world of Tiny11 by consulting the community forum and other resources. Thank you.
Further Reading:
- Ghost Spectre Windows 11 Superlite Version
- Download Latest Windows 11 ISO File (23H2- 2023 Update)
- [Download] Atlas OS, a Modified Gaming-Focused Windows 10
DMCA Disclaimer
TechLatest, which includes domains *.techlatest.in and *.tech-latest.com, abides by 17 U.S.C. * 512 and the Digital Millennium Copyright Act (DMCA). Our approach involves promptly addressing infringement notices and undertaking necessary actions. Please note that we do not possess ownership of any content published in this article. If you find that your copyrighted material has been shared on our site and you desire its removal, kindly reach out to us through the provided contact information.
Enjoyed this article?
If TechLatest has helped you, consider supporting us with a one-time tip on Ko-fi. Every contribution keeps our work free and independent.
Support on Ko-fiDirectly in Your Inbox


