Highlights
- With Windows 11, you can compress memory to store more data than your PC’s RAM was originally designed to hold.
- Besides the memory compression, there are other downsides as well. Compressing your data indeed uses a certain amount of resources on your computer, so not all of your data is compressed, which leads to an increase in computer load.
- Luckily, we have discussed the steps needed to enable and disable Memory Compression on Windows 11 computers.
In Windows 11, Microsoft has added several features aimed at improving system efficiency and performance. Memory Compression is one feature that optimizes RAM usage and improves system performance.
In this article, you will learn the details of Memory Compression, how it works, and how to enable or disable it based on your system’s needs.
Don’t want to miss the best from TechLatest?
Set us as a preferred source in Google Search
and make sure you never miss our latest.
Content Table
What is Memory Compression?
As the name implies, memory compression compresses your data memory so that the RAM can store more data than normal, ensuring that your computer runs faster.
Whenever you do not use memory compression, your PC stores additional data on your hard drive’s page file. Nevertheless, your computer can read data significantly slower from the hard drive than from RAM, which can cause it to run slower.
How Memory Compression Works?
To ensure quick access to data, your computer loads data into RAM when running multiple applications simultaneously.
A heavy load may overload RAM, resulting in slowdowns or even crashes when the system is under heavy load. This problem is solved by Memory Compression, which compresses data in RAM to reduce its physical size.
In Windows 11, algorithms are used for compressing and decompressing data. It is automatically managed by the operating system and transparent to the user.
With Windows 11, your applications are decompressed in real time whenever compressed data needs to be accessed.
What are the Advantages of Memory Compression?
- Improved Performance: Windows 11 can run more applications and processes without swapping data to slow storage drives since data is compressed in RAM. Thus, the system performs better overall and responds faster.
- Efficient RAM Utilization: RAM compression allows the system to handle more tasks simultaneously without losing responsiveness, enabling it to handle more tasks simultaneously.
- Reduced Disk I/O: Memory Compression reduces disk I/O by reducing data swapping between RAM and storage drives. Users with traditional hard drives will appreciate this, especially if it makes the user experience more smooth.
How to See the Current Status of Memory Compression?
It is suggested that you understand the current status of Memory Compression on your system before enabling or disabling it.
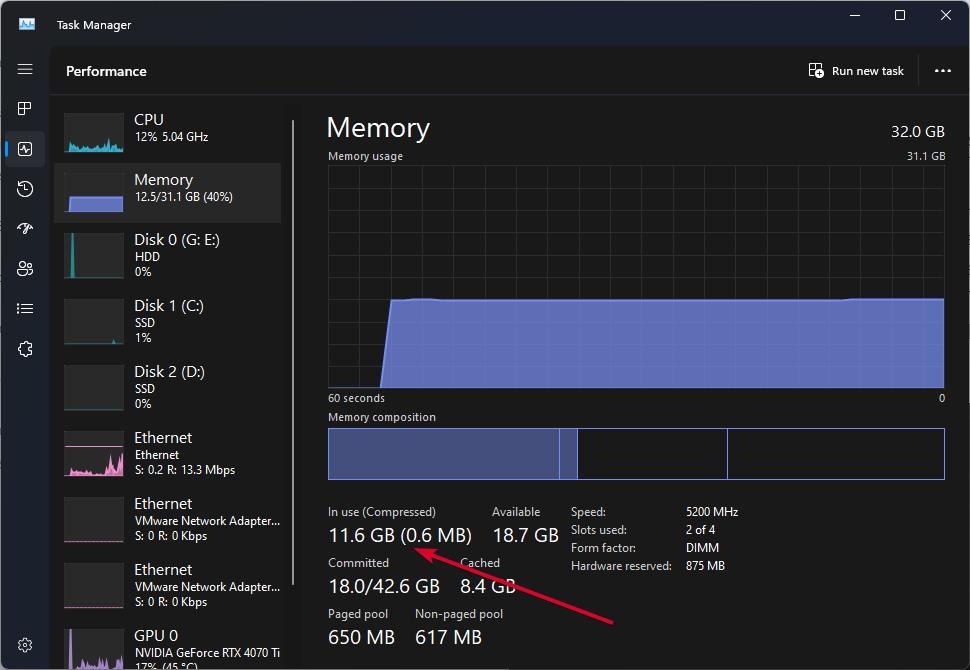
- At the beginning, open the Start Menu and type Task Manager. Then, from the search results, select the ‘Task Manager‘ tile. Alternatively, on your keyboard, press Ctrl+Shift+Esc together to open it.
- To begin, click on the ‘Performance‘ tab of the Task Manager window. On the left side, click on ‘Memory’. Once you have located the ‘In Use’ option, you can see the ‘Compressed‘ memory inside the parenthesis if it is enabled.
- On Windows, you can also check whether memory compression is enabled by using the Terminal app.
- In the Start Menu, type Terminal to check the status of memory compression. To open the ‘Terminal’ tile, right-click its tile and select ‘Run as administrator‘ from the context menu.
- To execute the below-mentioned command, type it in the Terminal window and hit Enter.
Get-MMAgent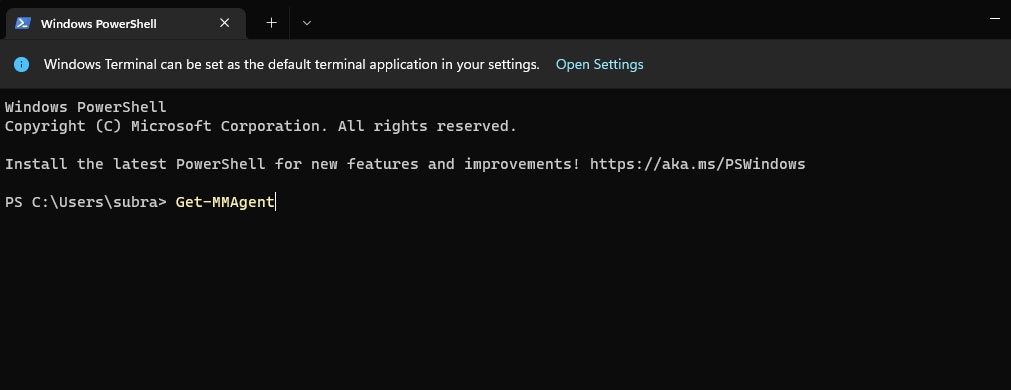
- On the Terminal window, locate the option named ‘Memory Compression‘; if the fields are set to ‘True‘, compression is enabled; if they are set to ‘False‘, it is not.
- It’s time to enable or disable Memory Compression now that you know its current status.
Can Memory Compression Lead To High Usage Of RAM?
If RAM is filled, Windows uses a page file to hold data that can’t fit in RAM. There is no comparison between compressing the data in memory and paging it out to the disk. The process is much faster this way.
It is important to remember, however, that encoding and decoding memory use some CPU resources. Every time Windows needs to save space, it compresses data automatically. Consequently, upgrading your RAM may be required if memory compression is affecting performance.
How do you enable memory compression on Windows 10/11?
Now that you know how to check Windows 11’s memory compression status, you can figure out if it is working. Therefore, this option needs to be enabled or disabled. So, let’s check out the steps you need to take:
- In the search bar, type Windows PowerShell. Ensure Windows PowerShell is running as an administrator by right-clicking it.
- Enter the following command in the command box.
Enable-MMAgent –mc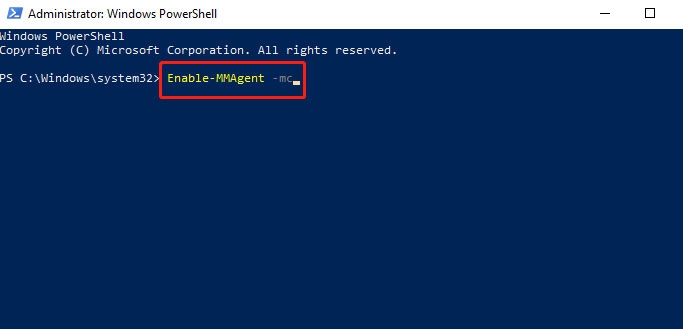
Wait till the process gets completed. Restart your PC to apply the changes. I hope you found this information helpful in enabling Memory Compression. Nevertheless, if memory usage is less than 60%, then the feature will be disabled automatically.
How do you disable memory compression on Windows 10/11?
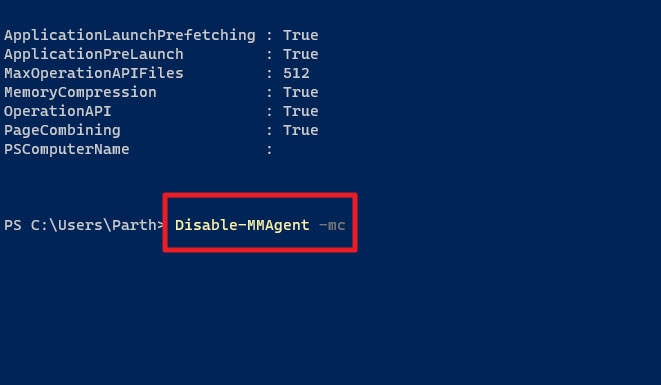
It is sometimes necessary to disable memory compression since it slows down PVC performance. With Windows 10 and 11, you can disable Memory Compression using the Disable-MMAgent -mc command.
Although I recommend keeping memory compression enabled, if you wish to turn it off, follow these steps:
- Ensure that PowerShell is running as an administrator.
- Thereafter, enter the following command in the command box.
Disable-MMAgent –mc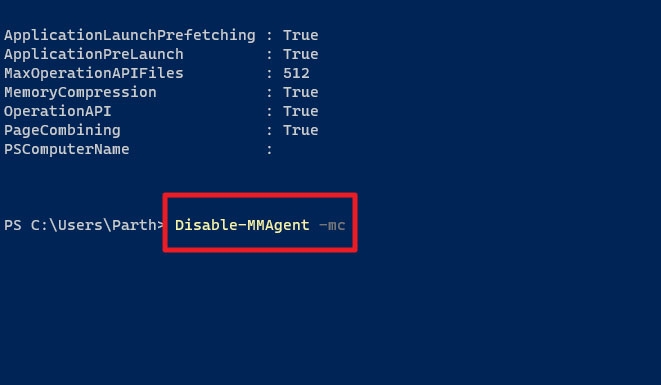
- Wait until the process is complete. In order for the changes to take effect, restart your computer.
Does Deleting Files Reduce RAM Usage?
You can find a lot of replies on Google asking if deleting personal files will reduce RAM usage. When you delete files, you only reduce the amount of storage you use, but not the amount of RAM you use.
In order to decrease RAM usage, you can restart your computer, quit running programs, and uninstall unwanted programs.
Troubleshooting Memory Compression Issues
You can troubleshoot performance or stability issues by enabling or disabling Memory Compression:
- Update Drivers: Make sure your device’s drivers are up-to-date, particularly graphics and chipset drivers.
- Check for Windows Updates: Microsoft frequently releases patches that address performance issues, so installing Windows updates whenever they are released is a good idea.
- Scan for Malware: Make sure you run a full scan of your system with your antivirus software to eliminate any possibility of malware being the cause of performance issues.
- Restore Default Settings: If you have changed Memory Compression settings and are experiencing problems, you can restore default settings and see if it improves.
So, that’s all on how you can enable/disable the Memory Compression feature on a Windows 11 PC. Thank you for reading this guide. We hope you found it helpful. In any case, feel free to leave a comment below if you have any questions.
Further Reading:
Enjoyed this article?
If TechLatest has helped you, consider supporting us with a one-time tip on Ko-fi. Every contribution keeps our work free and independent.
Support on Ko-fiDirectly in Your Inbox

")

")


