Highlights
- Custom ROMs give new life to old Android phones and tablets with better performance, longer battery life, and even the latest versions of Android (even relatively new devices).
- If you want to debloat your phone, experience stock-like, or else you want to play around, it’s always the custom ROMs.
- This guide will lead you to the unlocking process all the way from manipulating the bootloader to installing your first custom ROM.

Flashing a new ROM to your Android phone or tablet can be an effective way to resurrect an old device or just upgrade an old interface that just doesn’t feel like it’s worth what you paid for it.
If you’re interested in ditching your stock Android ROM and want to reap the many benefits of using a custom ROM, we want to help you out.
Don’t want to miss the best from TechLatest?
Set us as a preferred source in Google Search
and make sure you never miss our latest.
But while preparation must be careful. In this post, we’ll help you install a custom ROM on your Android device!
Warning Before You Begin: Flashing a custom ROM can void your device’s warranty and carries a risk of “bricking” (making the device unusable) if not done correctly. Proceed at your own risk, and always make sure to back up your data.
What is a Custom ROM?
Custom ROMs are the customized version of the base Android OS. Unlike iOS/iPadOS, Android is all about fun and customizations. You can modify each and every element/function of the OS.
Advantages of Android Custom ROM
There are many advantages of any Custom ROM, some of which are listed below:
- You will get regular updates
- They bring better performance
- You can have customizable UI
- They behave close to stock android
- They can easily be rooted and customized
- There’ll not be any bloatware
- Various battery optimizations
- and so on…
Is Every Custom ROM Compatible with Every Android Device?
The answer is both Yes and No.
Like most of the smartphones from Google, Xiaomi, Motorola, and OnePlus do support flashing custom ROMs.
On the other hand, a few smartphones from Samsung do support customization like unlocking the bootloader and flashing custom ROM and a few of the smartphones don’t.
And in the totally opposite, the smartphones from Realme strictly disallow any type of customisation to the software.
For your ease, let me list a few popular custom ROMs and their compatible devices, check those and decide yourself.
You may find the list of the compatible smartphones with a different and unique name than the normal smartphone name, those are called smartphone codename. For example, Poco F1 will be denoted as beryllium.
Smartphones codename are the early production/project unique name assigned to that product before the actual and official name of the smartphone.
Although, we have listed most of the Android smartphones’ codename in the following article, List of Android Device Codenames.
| ROM Name | Compatible Devices |
|---|---|
| LineageOS | Device List |
| BlissRoms | Device List |
| Xiaomi.eu | Device List |
| PixelOS | Device List |
| Project Elixir | Device List |
| crDroid | Device List |
| GrapheneOS | Device List |
| CalyxOS | Device List |
| Evolution X | Device List |
Pre-requisites of Flashing Custom ROM
OEM Unlock

The first and foremost step to get into Android Customisation is OEM Unlock.
OEM is the acronym for “Original Equipment Manufacturer”. It is also called “Jailbreaking” sometimes.
OEM unlocking is the process in which the unlock ability flag is set to 1 instead of 0, of your device. Generally, this is locked by the original manufacturing company, so the name given to it is OEM Unlocking.
The bootloader is locked by the manufacturer so that there shouldn’t be any unauthorized access to your device, which we will discuss next.
We have a dedicated article for OEM Unlock, read the whole article here, OEM Unlock: How to, Uses, Advantages, Disadvantages.
Bootloader Unlock

If you have stepped into the beginning world of technology then, you might be aware of the word “booting”.
Booting is nothing but a process of running iso images on your device and the program that runs it is called a “bootloader”.
The process of making a bootloader to run that image is called “booting”.
So, to get started, we will have to unlock the bootloader of that respective device in order to proceed further.
You will need a PC at this stage to proceed, get and PC, and set ADB and fastboot using the following article, How to Install ADB and Fastboot?
Now that you have successfully set up the ADB and Fastboot on your system, open the command prompt on the ADB directory and execute the following commands,
First, connect your smartphone to PC and execute the following to check the connectivity,
adb devicesIf the setup was done correctly, you should see the serial number of your device in the Terminal window output.
Note: On unlocking the bootloader, you will lose all your data personal as well as the system, so before proceeding, copy all your personal data to a safe place, i.e., PC or external storage.
Now, we are going to open fastboot mode using the following ADB command,
adb reboot fastbootNow, use the following command(s) to unlock the bootloader of your Android device,
fastboot flashing unlockIn case you are using an old device, then execute the following command,
fastboot oem unlockAfter successful execution of the command, the smartphone will automatically be booted into system as a new device.
Custom Recovery
A custom recovery may be a third-party recovery environment. Flashing this recovery environment onto your device replaces the default, stock recovery environment with a third-party, customized recovery environment.
This is often like flashing a custom ROM — but rather than replacing your device’s Android OS, it replaces the recovery environment.
And you should have a custom recovery to flash Custom ROM.
Follow the similar steps like in the above section to boot into fastboot mode.
Connect your smartphone to PC and then open command prompt on the ADB directory, check this article for reference, How to Install ADB and Fastboot?
Now, execute the following command one by one,
adb devicesadb reboot fastbootNow, download your favourite custom recovery img file and put it in the ADB directory/folder. (Best Custom Recovery for Android Phone)
Finally, use the following command to flash the custom recovery file (make sure to put the correct file name in place of custom_recovery):
fastboot flash recovery custom_recovery.imgNow you can verify the installation by booting into recovery mode by using the following command:
adb reboot recoveryFull-system Backup (NANDroid Backup)
This is a very important step, this will ensure that if you stuck at any type of errors while flashing the Custom ROM, you can go back to the original ROM.
The NANDroid backup includes the following files,
- System and system image of stock or custom ROM
- Boot partition
- All Data excluding storage.
- Recovery partitions
- All system settings
- All stored passwords, including Wi-Fi passwords
- Vendor and Vendor image
For the illustration purpose, we are going to use the TWRP or Teamwin Recovery Project.
The steps are similar for every Custom Recovery, so if you are using any other recovery than TWRP, then you also can follow similar steps,
- Tap on the Backup button on the TWRP homepage.
- Then, select the following,
- System
- System Image
- Data
- Boot
- Recovery
- Vendor
- Finally, swipe the bar that says ‘Swipe to Backup’
- Now, you are good to go.

If you are using TWRP, then you can even take the backup and save it directly into your PC. For doing so, follow the next article, How to Take TWRP Backup Directly On PC With ADB
Flash Custom ROM on Android Device
#1 Downloads
Details and Downloads
Here are a few things to download before getting into the whole flashing custom ROM process.
- Custom ROM: Download from the above section
- GApps: NikGapps, BiTGApps
- Magisk APK: Download from here
Also, Read: What is Magisk | Root Android Device using Magisk
#2 Boot into Custom Recovery
Save the downloaded file to a save place on your smartphone’s internal storage or SD card. And then connect the device to the PC, and then open the command prompt on the ADB directory, check this article for reference, How to Install ADB and Fastboot?
Now, execute the following command one by one,
adb devices
adb reboot recovery
Now, you are in the recovery mode, you can disconnect the phone from the PC, if you want.
#3 Wipe System, Data, Cache, Dalvik
The next step is to wipe the stock system, which will be followed by data, cache and dalvik.
- When you are on the custom recovery homepage, click on the Wipe button.
- Then, tap on the Advanced Wipe.
- Then select the following,
- System
- Data
- Cache
- Dalvik
- Finally, swipe the bar towards the right end, that says, ‘Swipe to Wipe’
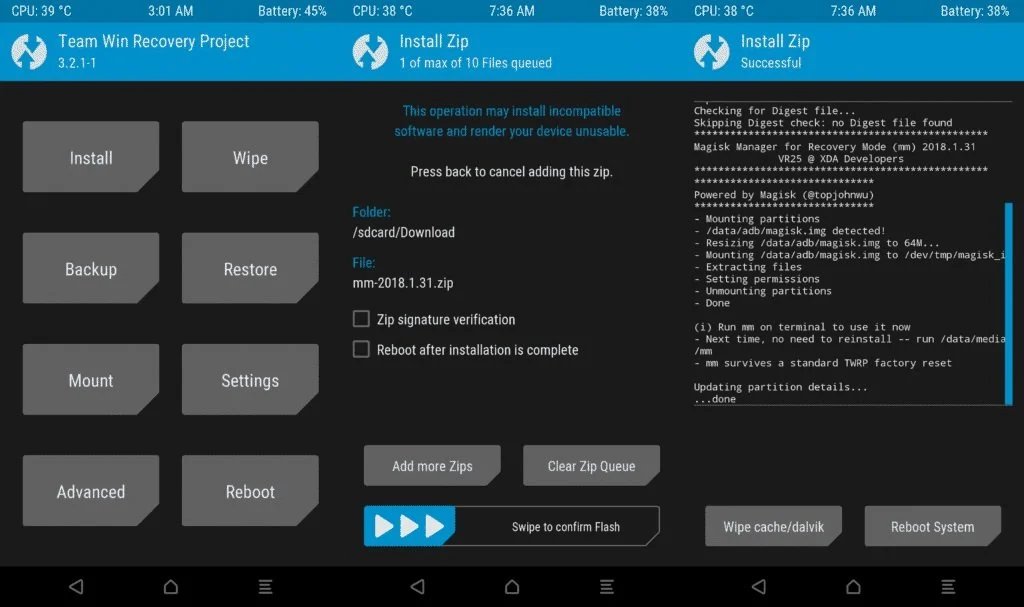
#4 Flash ROM File

- After wiping the mentioned partitions, go back to the recovery homepage by using the navigation keys.
- Now, you are on the homepage,
- Then, click on the Install button, it will open the file explorer.
- Navigate to the directory where you saved the ROM and other files.
- And select the ROM file.
- Finally, swipe the bar towards the right end, that says, ‘Swipe to Confirm Flash’
Flash GApps (Conditional)
As the name suggests, “GApps” stands for Google Applications. because the Android OS, GApps, or Google Apps and Services also are open-source in nature and may be used seamlessly on Android OS running devices.
Needless to mention that you simply can’t even use Google apps and services on your Android device if the GApps package isn’t installed. like Google Play Services, Play Store, Gmail, Google Drive, Docs, Google Keep, Forums, Calendar, Phone, Messages, YouTube, Photos, Maps, etc.
This step is conditional and varies with every other custom ROM. A few ROMs may include the GApps (aka Google Apps) with the ROM whereas a few ROMs don’t include and in that case, you will have to flash the GApps additionally.
For example, the Pixel Experience ROM includes the GApps with the ROM, whereas ROMs like ArrowOS or DotOS don’t provide the GApps with the ROM file.
So, before proceeding, cross-check with the ROM details, that whether the ROM has GApps or not.
- After flashing the ROM file, go back to the recovery homepage by using the navigation keys.
- Now, you are on the homepage,
- Then, click on the Install button, it will open the file explorer.
- Navigate to the directory where you saved the GApps and other files.
- And select the GApps file.
- Finally, swipe the bar towards the right end, that says, ‘Swipe to Confirm Flash’
Flash Magisk (Optional)
This step is optional, if you want root access to your smartphone, then only flash magisk file otherwise you can skip this process.
- After flashing the GApps file, go back to the recovery homepage by using the navigation keys.
- Now, you are on the homepage,
- Then, click on the Install button, it will open the file explorer.
- Navigate to the directory where you saved the Magisk Zip and other files.
- And select the Magisk Zip file.
- Finally, swipe the bar towards the right end, that says, ‘Swipe to Confirm Flash’
Safety Tips:
- Make sure to double-check that the ROM is compatible with your specific model number.
- Never flash what the ROM developer does not recommend.
- If your device is stuck in a bootloop, boot to the recovery and reflash or restore a backup.
General FAQs
Will it void my warranty?
Yes, for most smartphones, you will void the warranty. But in case you are using a Xiaomi device then you are safe here, your warranty will not be void.
Will I lose my personal data?
The data will be wiped in the bootloader unlocking process, so in case, your device’s bootloader is already unlock then you will not lose any of your personal data.
Is it safe to flash Custom ROM?
It is absolutely safe but the process of flashing custom ROM involves unlocking bootloader which can be an open door to malicious files.
Will I be able to use all payment applications?
At first you will not be able to use it if you have rooted the system, but by using Magisk Hide feature you can use those applications without any issues. For doing that you will have to install the Magisk Apk file.
Conclusion
Installing custom ROMs also gives you the ability to interface with fewer apps, which can help you save battery or get better performance. Although the procedure can appear technical, it can really be easy if you strictly follow the process to root your Android phone.
Questions or got bogged down along the way? Let us know in a comment, or find your device-specific forums at XDA Developers.
Enjoyed this article?
If TechLatest has helped you, consider supporting us with a one-time tip on Ko-fi. Every contribution keeps our work free and independent.
Support on Ko-fiDirectly in Your Inbox


