Knowing how to record your Mac’s screen isn’t just a neat trick; it’s a critical skill in our screen-centric world.
You could be crafting professional content, teaching a virtual class, or running a business meeting – whatever you are dealing with, screen recording on a Mac is a game changer.
Don’t want to miss the best from TechLatest?
Set us as a preferred source in Google Search
and make sure you never miss our latest.
It’s not about fancy software or tech wizardry; it’s about getting things done efficiently and effectively.
Whether you’re piecing together a step-by-step guide, holding on to key moments from a webinar, or capturing a snippet of your latest high-score game, your Mac is more than equipped for the task.
This guide is your straightforward playbook to mastering how to record screen on Mac, tailored for everyone, beginners and tech-savvy readers alike.
Mac’s Built-in Screen Capture Tool

Mac’s built-in screen capture tool, a part of the Screenshot utility, is a testament to Apple’s commitment to user-friendly design. This simple tool allows users to quickly access and use it without navigating through complex menus or settings.
It’s particularly useful for capturing on-the-fly moments, such as a sudden software bug or an impromptu video chat.
What’s more, the tool offers flexibility in recording options. Users can choose to record the entire screen, a selected window, or a custom portion, catering to various recording needs.
Additionally, the ability to record audio through a built-in or external microphone makes it a comprehensive tool for creating tutorials or presentations with voiceovers.
QuickTime Player’s Recording Capabilities
QuickTime Player, often overlooked as just a media player, is a hidden gem for screen recording on Mac. Its strength lies in its straightforward approach – you don’t need to be a tech expert to use it.
QuickTime is perfect for basic screen recording tasks such as capturing a software process, recording a digital painting session, or making a quick tutorial.
While it lacks advanced editing features unlike some of the best screen recording software, it compensates with its ease of use and reliability.
Furthermore, QuickTime allows users to save recordings in various file formats, providing flexibility in sharing and viewing the content. It’s a great starting point for those new to screen recording or anyone needing a quick, hassle-free solution.
Third-Party Applications for Advanced Users
For users who require more than just basic recording features, third-party screen recording applications for Mac offer various advanced functionalities. These software options cater to various needs – professional content creators, educators, and gamers.
Advanced features such as customizable recording settings, simultaneous recording from multiple sources, and integrated video editing tools are commonplace in these applications.
Some notable third-party software includes CleanShot X, known for its powerful features; Zight Screen Recorder, which offers an intuitive user interface; and OBS Studio, popular among gamers and live streamers for its versatility.
These applications enable users to create professional-grade videos with annotations, effects, and high-quality audio.
Online Screen Recording on Mac
Online screen recording tools offer a unique advantage – they require no software installation, making them ideal for users who frequently switch between different laptops and computers or those with limited storage space.
These web-based services are accessible directly from a browser and are generally user-friendly, making them a good option for quick, uncomplicated screen recording tasks.
However, they might have limitations regarding recording duration, feature availability, and sometimes depend on internet connectivity.
Despite these limitations, online tools are convenient for ad-hoc recording needs, especially for users who prioritize ease and accessibility over advanced features.
Using QuickTime Player for Screen Recording
Choosing the right software is only half of the deal. Although most tools are similar regarding steps you have to take for screen recording, they still vary in interfaces and features.
Let’s delve into more comprehensive steps on how to use Mac screen recorders, on an example of QuickTime Player.
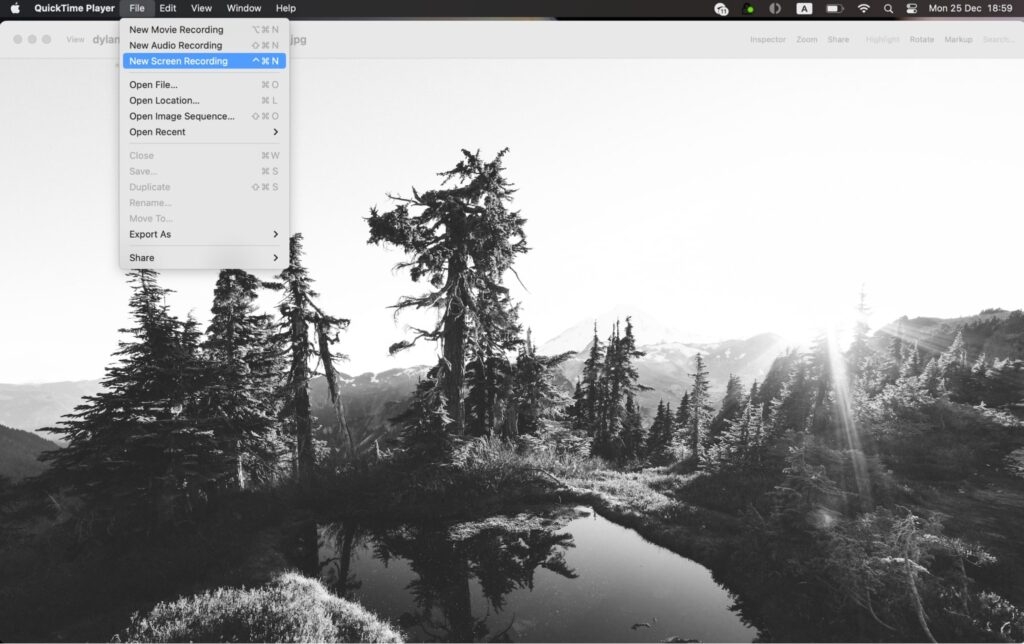
Step 1 – Launching QuickTime Player
Use Launchpad to find and open QuickTime Player, or do it from your Applications folder. This is a straightforward process, similar to opening any other application on your Mac. The software comes pre-installed; you don’t have to download the application.
Step 2 – Initiating a New Screen Recording
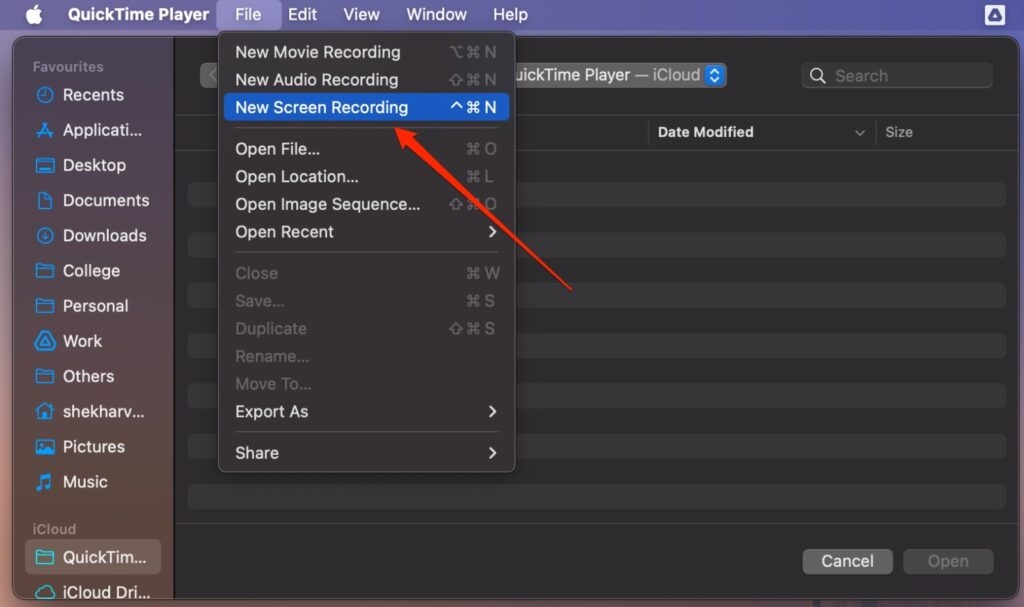
In QuickTime Player, go to the “File” menu in the menu bar at the top left corner of your screen and select “New Screen Recording.” This will open a small recording window with simple controls.
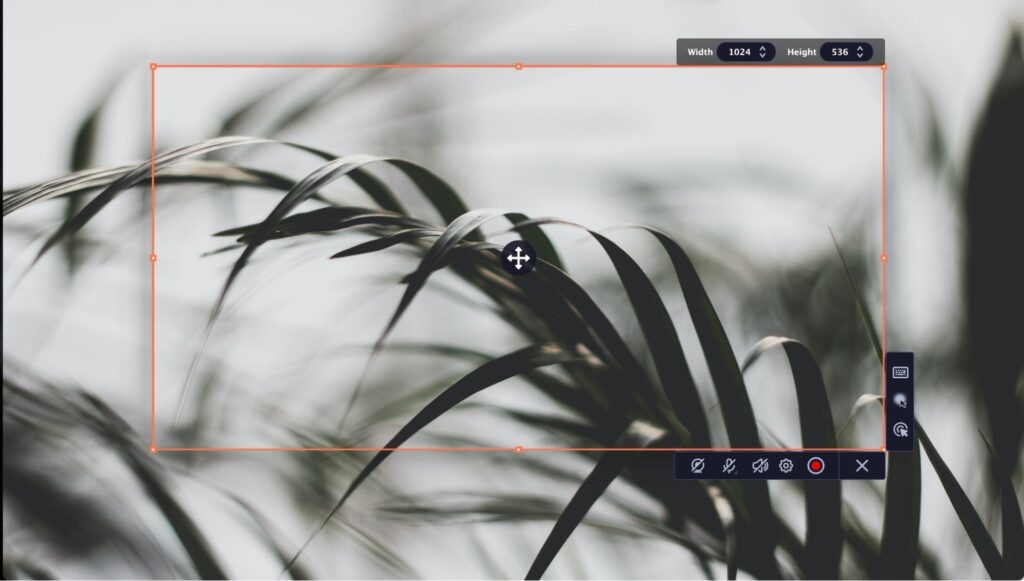
Step 3 – Setting Preferences
Before starting your recording, you can adjust settings such as the recording area by choosing full screen or just a portion.
In the same way, audio input can be configured if you want to record sound from a microphone. These settings are easily accessible and can be configured by clicking the “Options” button.
Step 4 – Recording the Screen
Once you’re ready, click the “Record” button. The recording will start immediately after your selection. To end the recording, click the stop button in the menu bar at the top of your screen – it’s as simple as that. QuickTime Player will then display the recorded video.
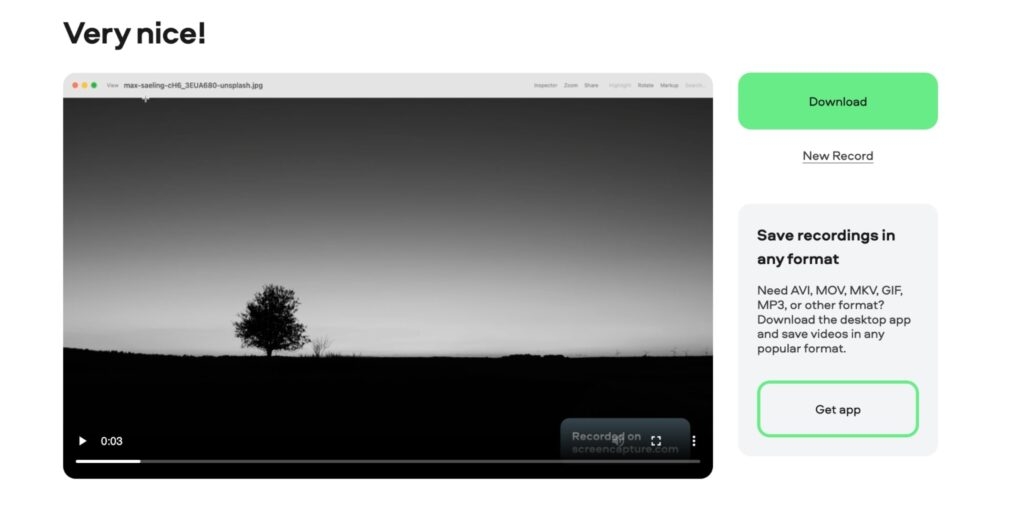
Step 5 – Basic Editing and Saving
QuickTime Player offers basic editing options like trimming the start and end of the video. Once satisfied, save the recording in your desired format, which can range from MOV to MP4, offering flexibility in how you use and share your content.
Conclusion
Understanding how to record video on a Mac or PC opens up a world of digital content creation and communication possibilities.
Whether you opt for the simplicity of the built-in screen capture tool, the straightforward functionality of QuickTime Player, the advanced features of third-party applications, or the convenience of online tools.
Mac offers a solution for every screen recording need. Remember, effective screen recording on Mac isn’t just about the software you use; it’s also about knowing and using all the features appropriately.
Enjoyed this article?
If TechLatest has helped you, consider supporting us with a one-time tip on Ko-fi. Every contribution keeps our work free and independent.
Support on Ko-fiDirectly in Your Inbox

")
")


