It is worth noting that Windows 11 has already arrived on a lot of computers worldwide and we know that people are loving this latest update from Microsoft as well.
However, there is a problem with Windows 11 that a lot of Windows users are concerned about and it is the implementation of Powershell in place of Command Prompt.
The CMD, as a lot of people like to call it, has been replaced by Windows Powershell for a long time and Windows 11 makes it even more obvious.
It is obvious that Microsoft is trying to make Powershell the go-to choice for Windows users but early users of Windows can’t get over Command Prompt.
Luckily, we still have Windows 10 running on one of our PCs and when we right-click on the Start Menu, a context menu pops up and you see Command Prompt listed in the menu.
However, when you do the same on Windows 11 then you will see that Command Prompt is replaced by Powershell.
In this article, we will tell you how you can replace Powershell with Command Prompt in Windows 11 on your PC:
How to replace Powershell with Command Prompt in Windows 11
It is quite easy to replace Powershell with Command Prompt in Windows 10 and you can do so by going to Settings > Personalization > Taskbar.
However, we are talking about Windows 11 and the problem is that there is no simple way to replace Powershell with Command Prompt even to this day.
We will have to rely on the Registry Editor tweaking method in order to change it. For that, you need to check the article:
Step 1: Adding CMD to Windows 11 Context Menu
- Press the Win + R shortcut key on your keyboard to bring up the Run dialog box.
- After that, type regedit and hit Enter to open the Registry Editor.

- Now, copy and paste the below address in your registry editor.
Computer\HKEY_CLASSES_ROOT\Directory\Background\shell\cmd
- Select the CMD folder from the left menu bar, right-click on it and go to Permissions.

- Click on the Advanced button and click on Change.

- Under the “Enter the object name to select” dialog box, type your username and click OK. Your username can be found by typing echo %username% and pressing Enter.
- Double click on Administrator and check mark the full control dialog box and click OK.
- Go back to the Registry Editor and select the CMD folder once again as we did earlier.

- See on the right side after clicking and you will see a file named HideBasedOnVelocityId. Right-click on it and select Rename and add _bac at the end of this file name.
- This will add the CMD to our context menu on Windows 11 and we have just edited the HideBasedOnVelocityId instead of deleting it because that would be too risky.
The first part of our process is now complete as we have just added Command Prompt to our Context Menu on Windows 11.
Now, we need to remove the Powershell option from our Windows 11 Context Menu but we must add that this is an optional step. If you are happy with just adding the Command Prompt to your Windows 11 Context Menu then your task is now complete.
Step 2: Remove Powershell from Windows 11 Context Menu
In order to remove Powershell from your Windows 11 Context Menu, you will have to do the following:
- Open Registry Editor as we did in the above guide and go to this address:
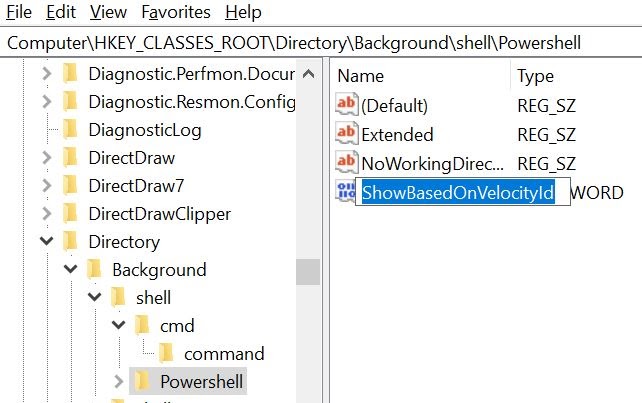
Computer\HKEY_CLASSES_ROOT\Directory\Background\shell\Powershell

- On this location, you will see a folder named Powershell on the left-side pane. Right-click on it and select Permissions.
- Click on the Advanced button and click on Change. Under the “Enter the Object Name to Select” dialog box, enter your username.
- Double-click on Administrator and checkmark Full Control dialog box and press OK.
- Again, go back to the Registry Editor and Powershell folder as we did in Step 1 and see the right-side pane this time.

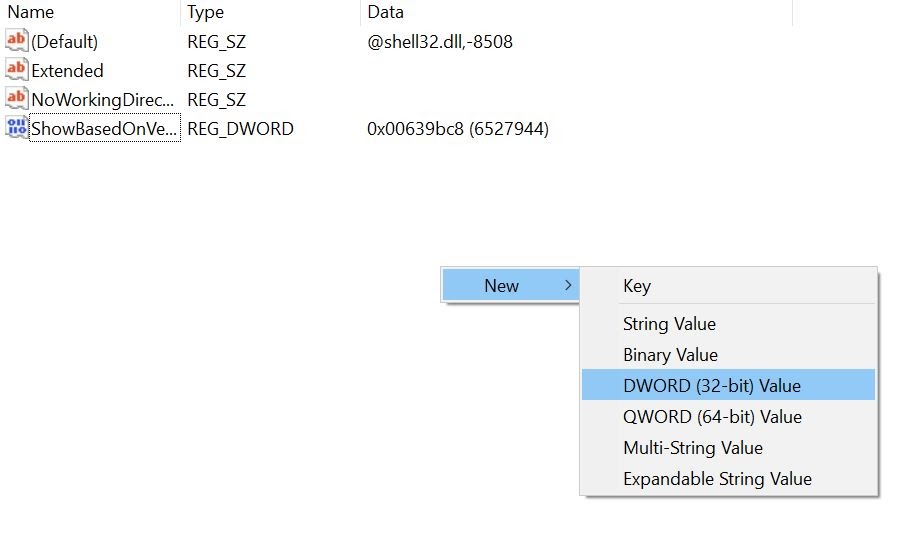
- You will see a ShowBasedOnVelocityId file, right-click on it and select Rename. Add _bac at the end.

- Right-click on any empty location on the right-side and go to New > DWord (32-bit) Value and name this file as HideBasedOnVelocityId.
- Double click on this newly created file to open it and type 639bc8 under Value Data. Leave the base as Hexadecimal and click OK.
- That’s it. The Powershell will be removed from your Windows 11 Context Menu and you will only see Command Prompt in its place.
Step 3: How to revert everything back to default (if you want)
While we know that you don’t want to revert back to default after you have replaced Powershell with Command Prompt in Windows 11, it is still our duty to tell you how you can get back to the default state after you have done these changes.
Follow these steps to revert back to default if needed:
- Go to the location mentioned below in Registry Editor:
Computer\HKEY_CLASSES_ROOT\Directory\Background\shell\cmd
- Rename the HideBasedOnVelocityId_bac file back to HideBasedOnVelocityId and this will remove CMD from your Windows 11 Context Menu.
- Now, go to the following location in order to bring back Powershell to Context Menu:
Computer\HKEY_CLASSES_ROOT\Directory\Background\shell\Powershell
- Rename the ShowBasedOnVelocityId_bac file back to ShowBasedOnVelocityId and you will see the Powershell reappear in your Windows 11 Context Menu.
In this way, we can revert back to the default state if you encounter any problems after the changes or for whatsoever reason.
Conclusion – Replace PowerShell with Command Prompt in Windows 11
In this article, we have mentioned how you can replace Powershell with Command Prompt in your Windows 11 Context Menu.
We have also gone the extra mile to show you how to revert back to the original state if needed so that you can act as if nothing happened.
We do hope that you found this article useful and if you did, feel free to share it with your friends or someone who wants to do the same on their PC.
Directly in Your Inbox


![[Solved] Windows Update Error Code 0xc1900223 Windows 10 Update Featured](https://tech-latest.com/wp-content/uploads/2021/12/Windows-10-Update-Featured-300x225.jpeg)


