Highlights
- The DRAM light on your motherboard indicates an issue with your computer’s memory. When the light is on, it means that your computer cannot detect or access the RAM.
- This issue can occur due to incompatible RAM, improper RAM or CPU placement, or incorrect BIOS settings.
- To resolve the issue, you can clean the RAM module and slots, update the BIOS, or reconnect the motherboard cables. Continue reading to find out how to fix the DRAM light problem on your motherboard!
Are you facing the DRAM light issue on your motherboard? If so, you’re feeling frustrated and wondering what went wrong. But fear not; we are here to help!
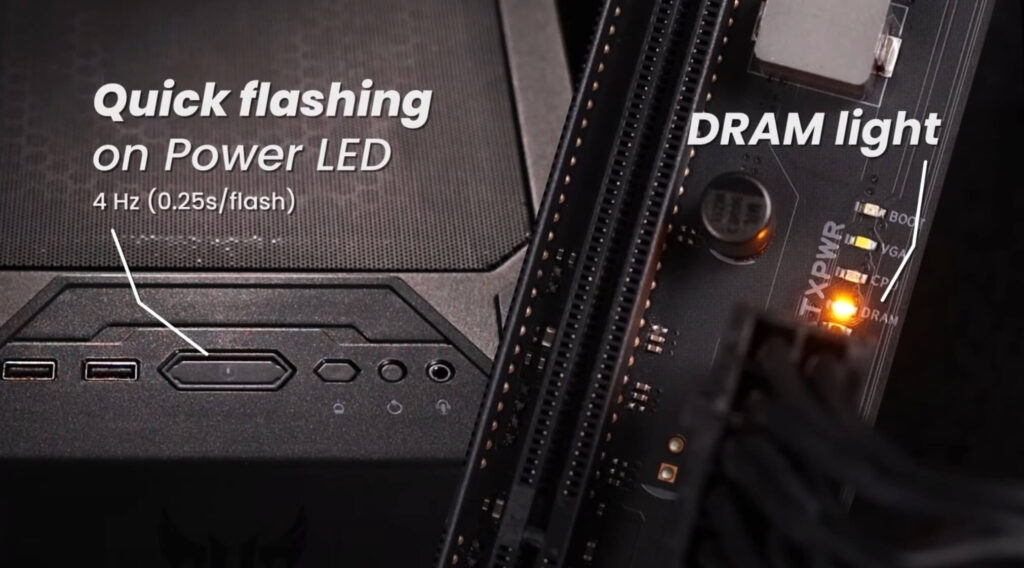
The DRAM light on your motherboard indicates that your computer is having trouble recognizing or initializing your RAM. On most motherboard brands, the light is orange or yellow.
Don’t want to miss the best from TechLatest?
Set us as a preferred source in Google Search
and make sure you never miss our latest.
This issue can occur due to several factors, such as incompatible RAM, incorrect placement of RAM or CPU, improper BIOS settings, or a faulty RAM module.
If you have issues with your DRAM light, don’t worry!
In this guide, we’ll provide step-by-step solutions to fix the DRAM light on your motherboard so that you can get your computer back up and running.
Let’s get started!
What is DRAM Light On Motherboard?
DRAM stands for Dynamic Random Access Memory (aka Dynamic RAM). The DRAM light on a motherboard is a diagnostic light that indicates a problem with the computer’s memory.
When the DRAM light is on, it means that the motherboard is unable to communicate with the memory modules installed in the computer.
What Causes the DRAM Light to Turn On?
When you start your computer, you may see a light labeled “DRAM” that stays on. This can be frustrating because it stops your computer from starting up properly. But why does this happen?
Here are some reasons why the DRAM light turns on:
- Loose or improperly seated memory modules: The most common cause of the DRAM light is that the memory modules are not properly seated in the motherboard. To fix this, simply remove the memory modules and reseat them firmly.
- Faulty memory modules: If the memory modules are properly seated, and the DRAM light is still on, it’s possible that one or more of the memory modules are faulty. To test this, remove all of the memory modules except for one and try to boot the computer. If the computer boots, then the problem is with one of the other memory modules.
- Overlocking: Another possible cause of the DRAM light is overclocking. Overclocking means pushing your hardware beyond its limits for better performance. Although some people are able to overclock their RAM successfully, it can also lead to errors and instability that trigger the DRAM light. To fix this, you can try resetting your BIOS settings to default.
- BIOS incompatibility: Sometimes, the computer’s BIOS settings may prevent the detection of the memory modules. If you recently updated your BIOS (Basic Input Output System), it may not be compatible with your memory modules. Double-check the BIOS settings to ensure the memory settings are correct.
- Motherboard problems: In rare cases, the DRAM light can be caused by a problem with the motherboard itself. If you’ve tried all of the other troubleshooting steps and the DRAM light is still on, then it’s possible that the motherboard is faulty and needs to be replaced.
- Damaged Hardware: Computers only boot up when all the essential hardware is working properly. If any of the essential components on your motherboard are misbehaving, you may notice an orange light.
In such cases, you have two options: either try to identify the troublesome hardware yourself or take it to a repair shop where a mechanic can help you determine and fix the issue.
How to Fix DRAM Light On Motherboard?
Now that we know why the DRAM light turns on, it’s time to try some potential solutions for fixing the DRAM light on the motherboard.
Here are the ten different ways to fix the DRAM light on the motherboard, from replacing the motherboard to correctly placing the RAM module.
1. Check Power Supply
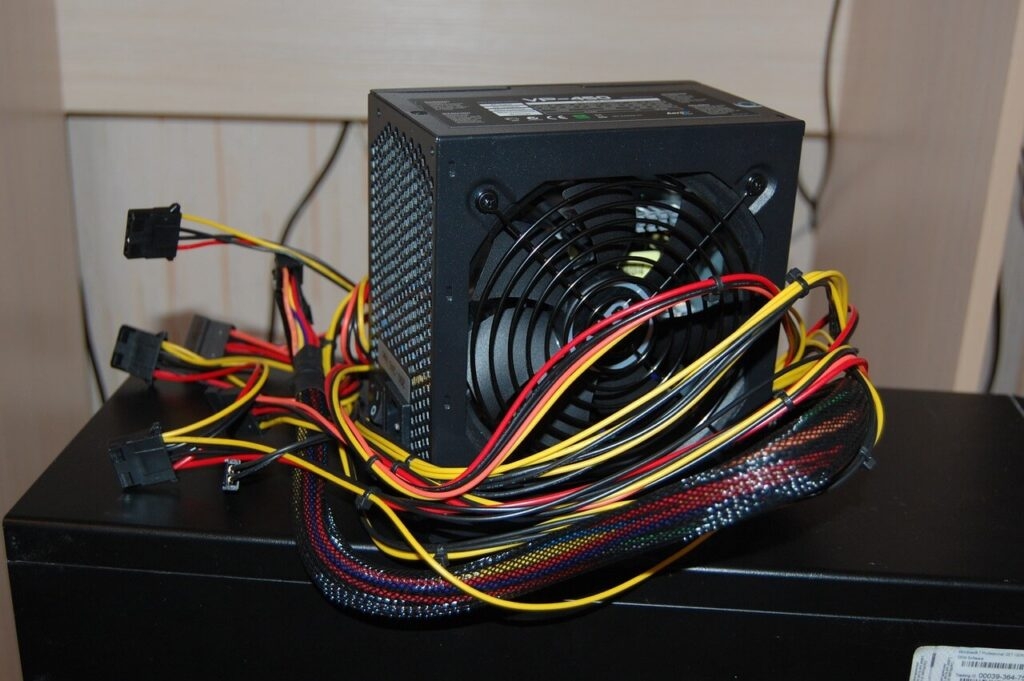
The first step in troubleshooting a DRAM light issue is to inspect your power supply. Sometimes, a loose connection or inadequate power supply to the motherboard can trigger the DRAM light.
Ensure that all power cables are securely connected to both the motherboard and the power source (PSU). Additionally, inspect the cords for damage or fraying.
If everything looks good, reset the CMOS. CMOS (Complementary metal-oxide-semiconductor) is a small amount of memory on your motherboard that stores your BIOS settings.
To reset the CMOS, you will need to disconnect the power supply from the computer and then remove the CMOS battery. Wait for a few minutes, then reinstall it back into place.
This step can help you resolve DRAM errors caused by incorrect configuration settings. Be patient and try other solutions until you find one that works for you.
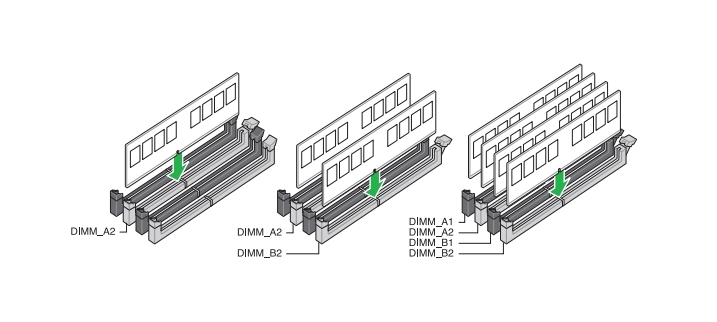
2. Ensure Correct Placement Of RAM Modules
Next, verify that you have correctly inserted the RAM module into its slot. To do this, remove the module, gently blow over it and the slot to remove any dust or dirt, and then place it back into the dedicated slot.
3. Verify RAM Compatibility
RAM compatibility is an often overlooked aspect that can lead to DRAM light issues. Ensure that the RAM modules you are using are compatible with your motherboard.
Check the motherboard’s specifications and compare them with the RAM modules’ specifications, such as speed, voltage, and capacity. Incompatible RAM can cause stability issues and trigger the DRAM light.
If necessary, consider replacing the RAM modules with ones that are officially supported by your motherboard.

4. Use Only One Ram Module At a Time
If you have multiple RAM modules installed, it’s worth testing them individually to identify any faulty modules. Remove all but one RAM module and power on your system.
If the DRAM light issue persists, then the other module is likely faulty. Try using each module separately in different RAM slots. This process can help pinpoint whether a specific RAM module or slot is causing the problem.
5. Reset the DRAM (CMOS)
Sometimes, resetting the DRAM can help resolve certain memory-related issues that trigger the DRAM light. To reset the DRAM, follow the below steps:
We strongly suggest you go through your motherboard’s manual, as different brands have different methods to reset/clear CMOS.
- Firstly, turn off your computer and unplug it from the power outlet.
- Then open the computer case so you can access the motherboard.
- Look for a small button on the motherboard labeled ‘CMOS’ or ‘Clear CMOS.’
- Press and hold the CMOS button for about five seconds, then release it.
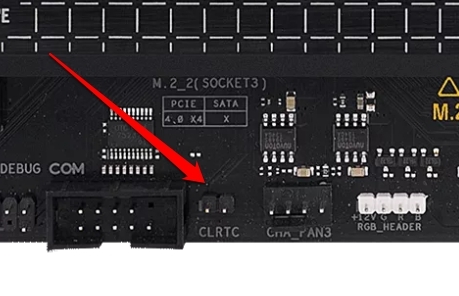
Note that steps 3 and 4 will be different for various motherboards; for example, in Asus Tuf Gaming B650-Plus Wifi, you will have to short-circuit the CLRTC pin 1-2 with a metal object or jumper cap for about 5-10 seconds to clear the CMOS header.
- Put everything back together, close the computer case, and plug in your PC. Now turn on your computer and check if the DRAM light is no longer lit.
- If the DRAM light persists, another issue with your RAM or motherboard may require further investigation.
Remember that resetting the CMOS will remove any customized settings in your BIOS, such as overclocking or memory timings.
- Once you’ve completed the DRAM reset, you must set up these configurations again.
This process should only take a few minutes, and it might help you fix the problem without having to replace any computer parts.
6. Clean the Motherboard
To keep your motherboard in good condition, it’s important to clean it regularly. Make sure you turn off your computer and unplug it before you begin.
You can use compressed air or an anti-static brush to remove dust and debris from the motherboard. Check for any loose components like screws or cables and secure them tightly.
Finally, give the motherboard a gentle wipe-down using a lint-free cloth to remove any remaining particles. When cleaning, remember don’t put too much pressure on it. Be gentle and thorough.
Once you’ve cleaned the motherboard, you can plug your computer back in and turn it on.
By regularly cleaning your motherboard, you’ll help maintain its performance and prevent potential hardware problems in the future.
7. Update the BIOS
BIOS is the software that controls the basic input/output functions of a computer. It is stored on a chip on the motherboard and is the first thing that runs when the computer is turned on.
An outdated or incompatible BIOS firmware can sometimes cause memory-related issues. Updating the BIOS can fix problems with RAM. A BIOS update can often introduce improvements, bug fixes, and better compatibility with various hardware components, including RAM modules.
To update the BIOS, you will need to download the latest BIOS update from the manufacturer’s website. So visit the manufacturer’s website and check for any available BIOS updates for your motherboard model.
If the BIOS firmware is not updated, follow the instructions provided by the manufacturer to update the BIOS firmware.
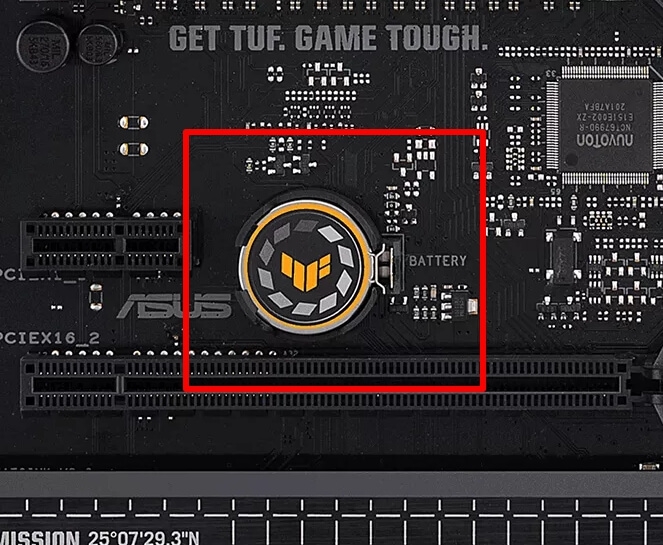
8. Replace Your CMOS Battery
After trying the above steps, if you’re still seeing the pesky light, it’s time to replace the CMOS battery. This small battery is essential for storing BIOS settings and clock tracking. If it is died or becomes weak, it can cause various system problems.
Here’s how to replace the CMOS battery on your motherboard:
- First of all, turn off your computer and unplug all cables.
- After that, look for the CMOS battery on your motherboard (it looks like a small silver coin).
- Use a flathead screwdriver to remove the old battery gently.
- Now, insert the new battery correctly into the socket.
After you’ve replaced the CMOS battery, reconnect your cables and turn your computer on. Check to see if the DRAM light has turned off. If not, there might be another issue with your system. Nevertheless, replacing the CMOS battery is an easy and cost-effective fix that could solve your problem.
Remember to handle and dispose of the CMOS battery properly according to local regulations. With some patience and knowledge, you’ll become proficient at PC maintenance and repair.
9. Replace the Motherboard
If you have tried all of the above methods and the DRAM light is still on, then your motherboard may be faulty. In this case, you will need to replace the motherboard with a new one.
But before replacing your motherboard, ensure that it is compatible with other components, such as your CPU, RAM, and GPU. Be careful not to buy something that won’t work well with your current computer components.
10. Seek Professional Assistance
Lastly, if none of the above solutions work, you need to get help from a professional computer technician. You can also contact the motherboard manufacturer’s support(ASUS, Gigabyte, MSI, ASRock) for further guidance. They can provide specialized troubleshooting steps or arrange for repairs or replacements if needed.
Final Words – DRAM Light On Motherboard
I hope this guide has helped you troubleshoot the DRAM light on your motherboard. You can diagnose and resolve the problem by checking RAM modules, updating the BIOS, resetting the DRAM, cleaning your motherboard, and testing individual components.
If you’ve tried all of the troubleshooting steps mentioned in the article and you’re still receiving the light, your RAM or motherboard might be the problem. In this case, you may need to take your computer to a technician and let him fix the issue.
Have you ever encountered a DRAM light issue on your motherboard? Was it easy to fix? We’d love to hear about your experiences in the comments!
Further Reading:
Enjoyed this article?
If TechLatest has helped you, consider supporting us with a one-time tip on Ko-fi. Every contribution keeps our work free and independent.
Support on Ko-fiDirectly in Your Inbox


: Which BIOS Mode Should You Use?")


