Highlights
- One of the many errors that can come in the way of listening to some music, watching a video, or attending an online meeting is an Audio service not responding error in Windows 10 or 11.
- In most cases, this issue arises when the Windows Audio service does not start or has some problem.
- Luckily, we have some fixes to this problem, so don’t worry about this. You just need to follow them.

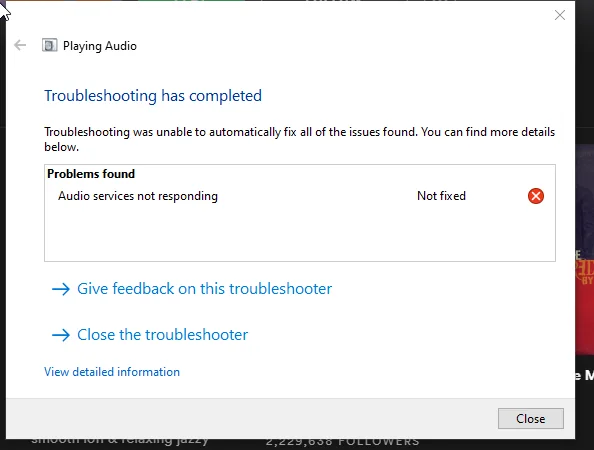
When your sound system refuses to work properly on your Windows 10 or 11 PC, it typically means you are experiencing the “Audio Services Not Responding” error.
This can be caused by various drivers and old drivers, faulty settings, or system glitches. However, in the meantime, let’s explore a few solutions in detail for bringing back that audio functionality.
Don’t want to miss the best from TechLatest?
Set us as a preferred source in Google Search
and make sure you never miss our latest.
Content Table
What Causes the Audio Services Issue?
The “Audio services not responding” error appears when Windows determines that the audio service is not operating properly. This could be due to:
- Corrupt or outdated audio drivers.
- Windows updates affect sound settings.
- Conflicting third-party applications.
- The audio service is not running or set to manual start.
- System file corruption.
Methods to Fix ‘Audio Services Not Responding’ on Windows 10/11
Here are some fixes that will help you resolve the audio service issue on your Windows PC:
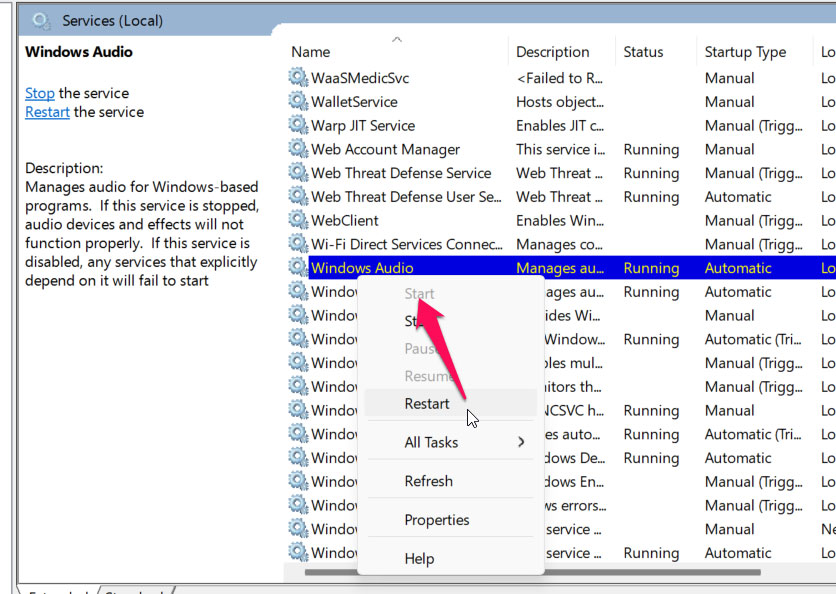
Fix 1: Start the Windows Audio Service
The Windows Audio service is usually set to start automatically when you start your computer. But if it has problems during boot, it may be unusable.
In many situations, restarting the Windows Audio service works to fix temporary glitches, so make this the first step in your journey to troubleshooting. To restart the Windows Audio service:
- At first, press Win + S to open the search menu.
- In the text box, type services, then hit Enter.
- Open the Services window, scroll down, and find the Windows Audio service on the list. Next, choose Start from the right-click context menu.
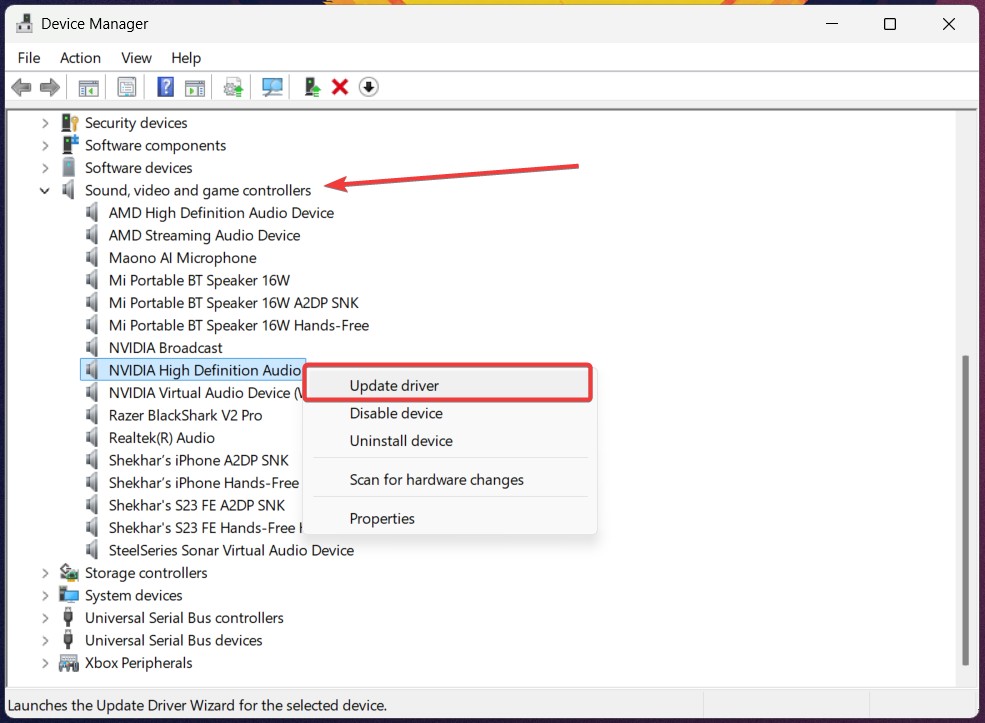
Fix 2: Update or Reinstall Audio Drivers
Old or corrupt drivers might stop Windows from utilizing your sound card as it should.
How to Update Audio Drivers:
- Press Win + X and click Device Manager.
- Click on the [+] sign next to the Sound, video, and game controllers.
- You can do this by right-clicking on your audio device (for example, Realtek High Definition Audio) and clicking Update driver.
- Select Search automatically for drivers and allow Windows to discover the latest version.
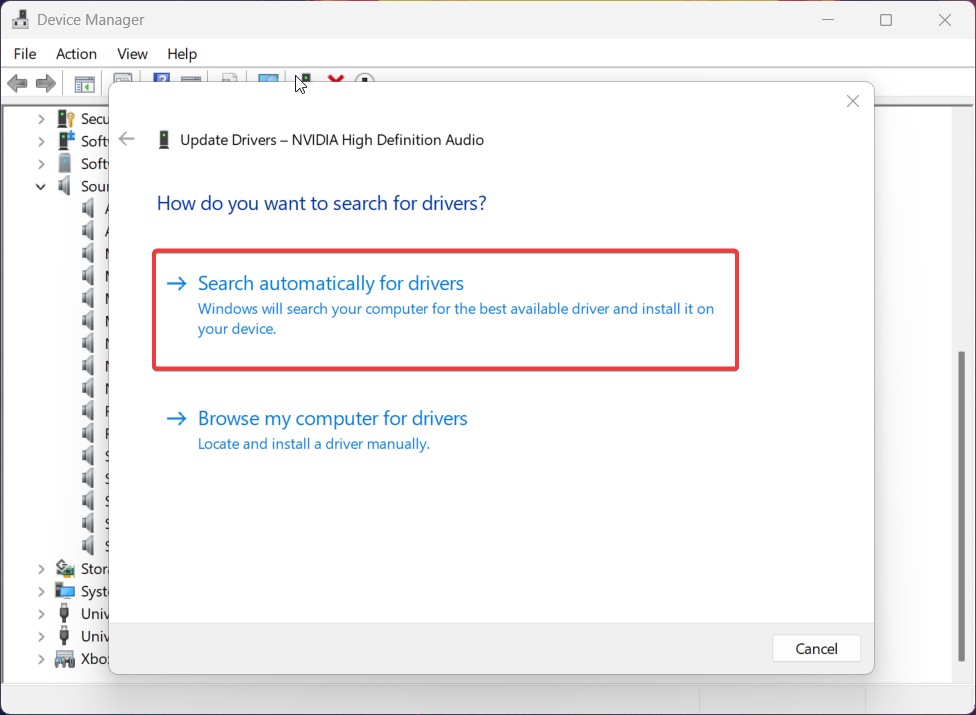
- Once done, restart your PC and check the audio.
Reinstall Audio Drivers:
- At first, open the Device Manager and expand Sound, video, and game controllers.
- Afterward, right-click on your audio device and select Uninstall device.
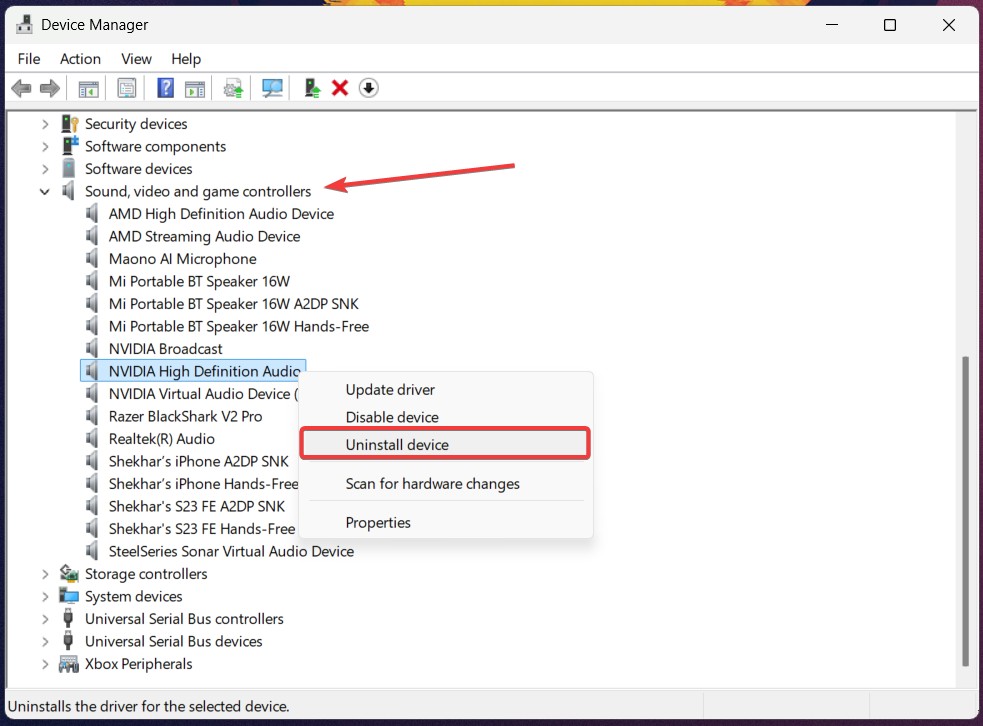
- Then, uncheck Attempt to remove the driver for this device and hit Uninstall.
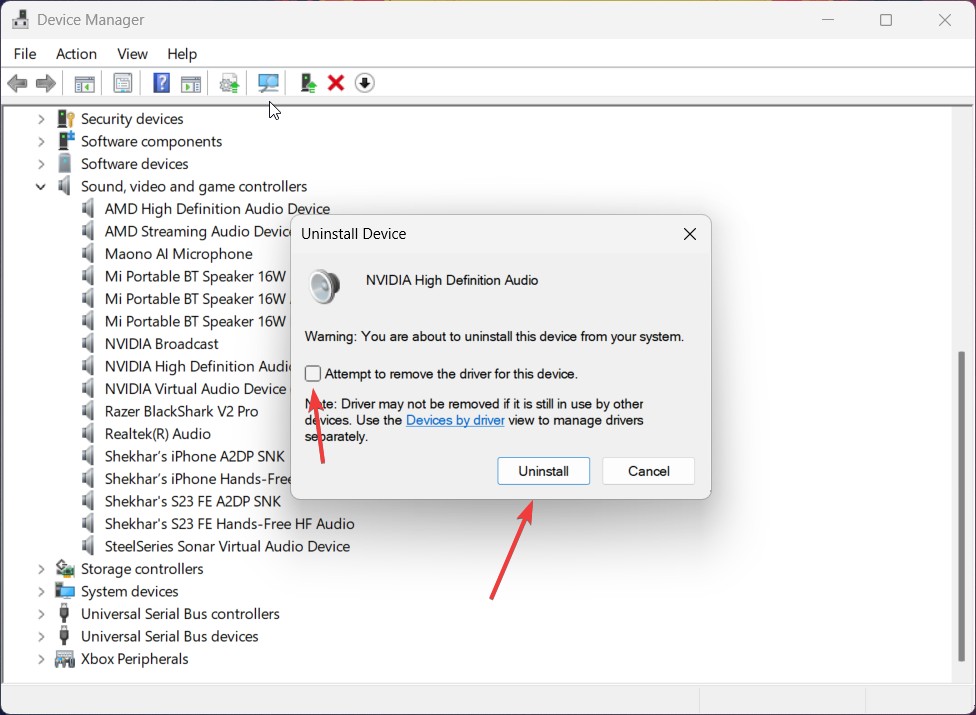
- Restart your PC. Windows might automatically reinstall the relevant drivers.
Fix 3: Run Audio Troubleshooter
When you face common audio service not running problems, using the built-in troubleshooting tools included with the Windows operating system can be very beneficial.
These tools do a sweep of your computer to check that all the associated settings are correctly configured and execute particular troubleshooting steps.
Using the audio troubleshooter is as simple as doing the following:
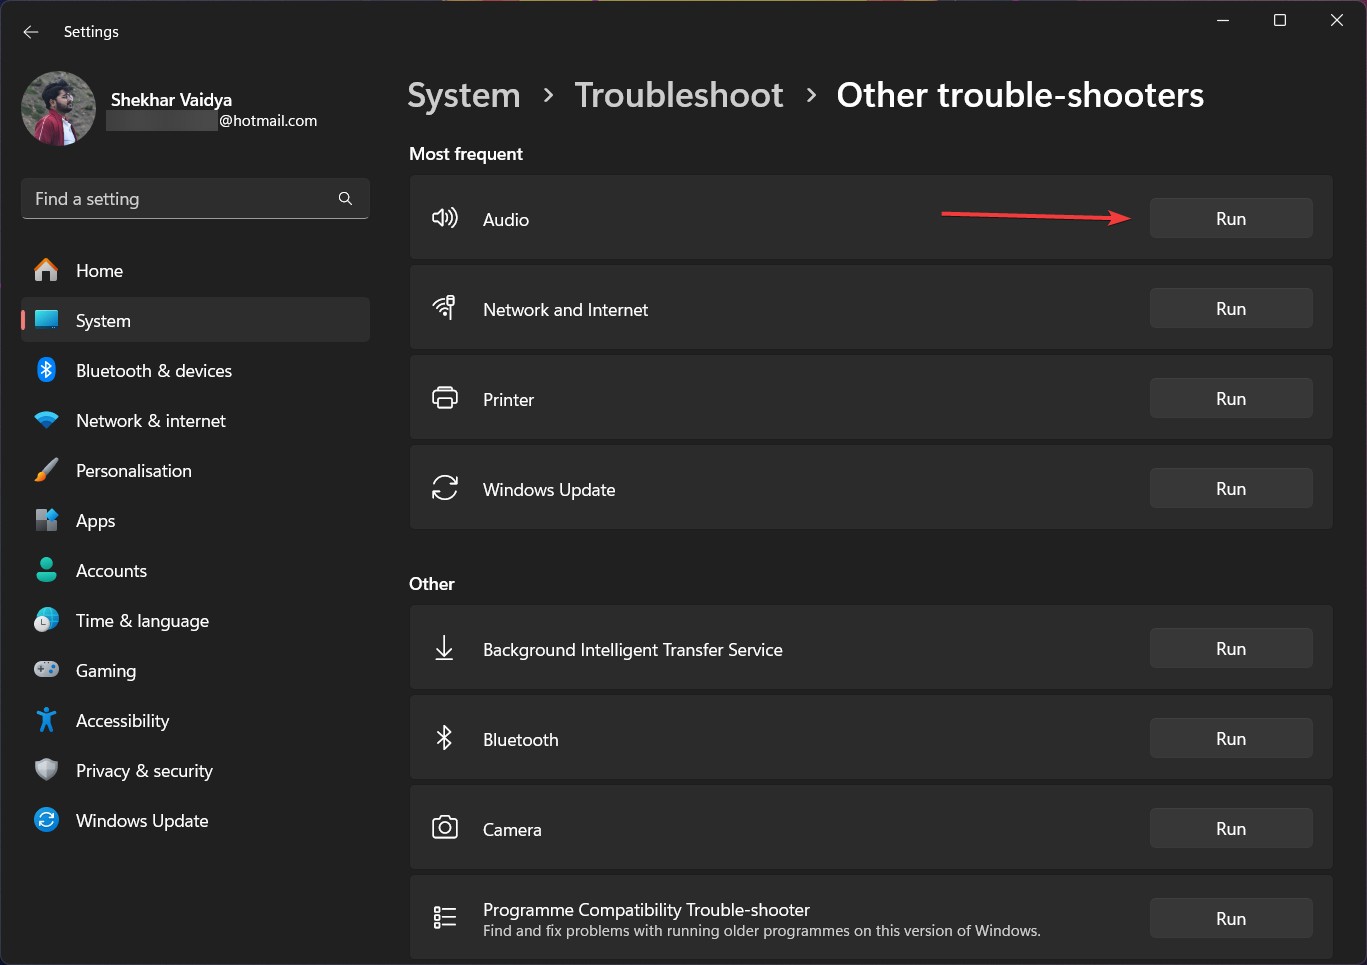
- Open the Troubleshooters Settings using the Windows Search bar.
- After that, hit the Other trouble-shooters.
- Now, locate the Audio option.
- Hit the Run button next to it. This will start the troubleshooting process.
- Finally, follow the instructions you are getting on your computer screen, and once done, reboot your device.
- Then, check if the audio services not responding error gets resolved.
Fix 4: Add Local and Network Services Using the Command Prompt
To troubleshoot this issue further, you can also try registering local and network services on your Windows PC using the command prompt. These are the steps for the same.
- Open the Power User menu from the Start icon’s right-click or with the Win + X keyboard shortcut.
- From that list, choose Terminal (Admin).
- When prompted by User Account Control (UAC), select Yes.
- To register network services, execute the following in the console and press enter:
net localgroup Administrators /add networkservice- Then execute the following command to register local services:
net localgroup Administrators /add localservice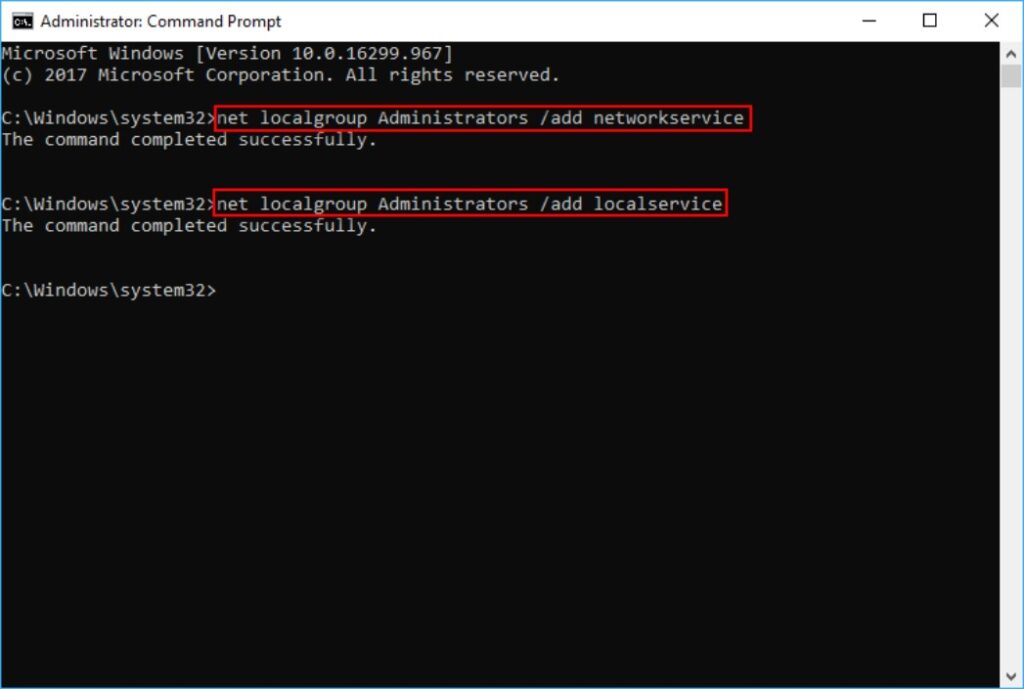
- Finally, close the Command Prompt window and restart your PC now.
Fix 5: Modify Registry Settings
Incorrectly configured registry entries can be a hindrance to Windows Audio Services.
- Open the Run dialog box.
- Enter regedit in the textbox.
- Thereafter, press the OK button to launch the Registry Editor.
- Expand the following registry paths one by one HKEY_LOCAL_MACHINE\SYSTEM\CurrentControlSet\Services\AudioEndPointBuilder
- Select Parameters.
- From the right pane, locate ServiceDll and verify the information from the Data column.
- Suppose the value data is not following; please change it.
%SystemRoot%\System32\AudioEndPointBuilder. dll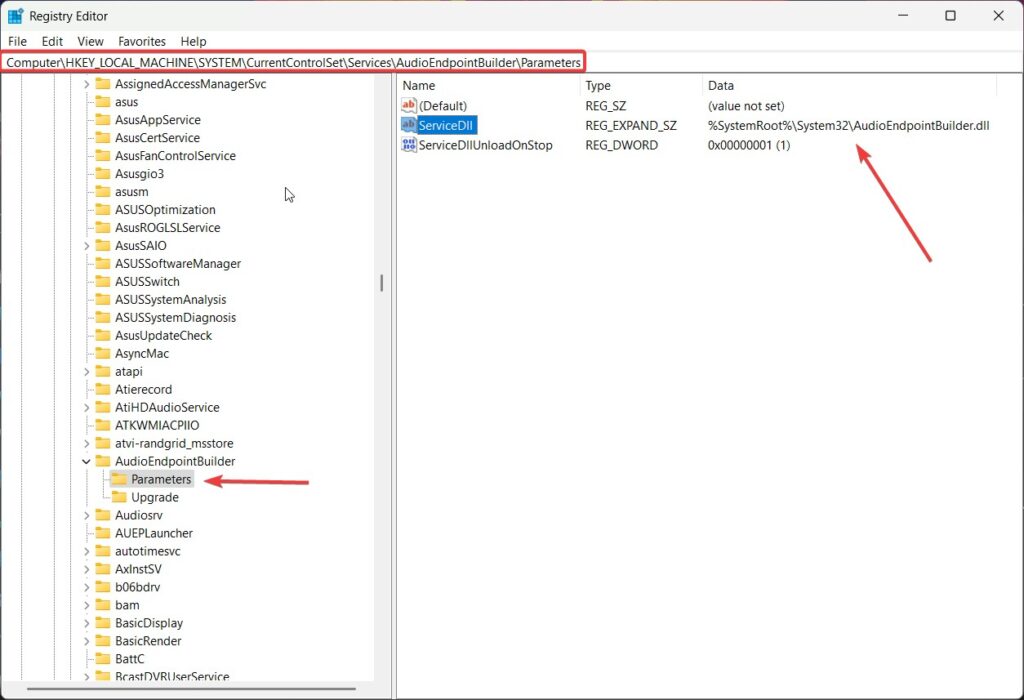
- You can now close Registry Editor and reboot your PC.
Fix 6: Disable Audio Enhancements
Audio modifications may occasionally disrupt sound playback. These are designed to enhance the sound quality under certain conditions, but they can cause some issues in combination with some audio drivers.
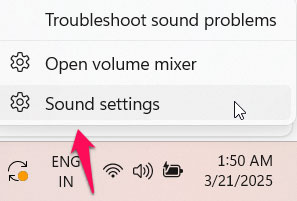
- At first, right-click the speaker icon at the bottom of the screen and choose Sound Settings.
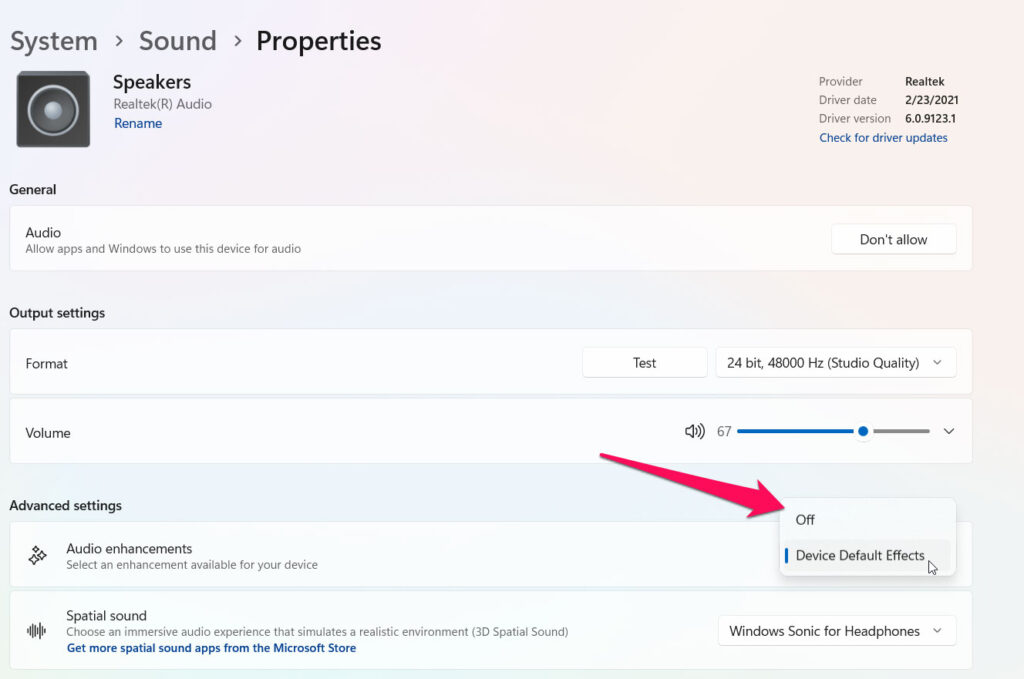
- Then, right-click on the audio device you are using once, and choose the Properties option from the Playback tab.
- Go to the Audio Enhancements tab and select Off.
Fix 7: Modify the Audio-Related Service Settings
This issue is most likely caused by the legacy audio device in Windows, and one or more of its dependent services are in the wrong state.
Your issue can be resolved by correcting the status. So, here are the steps for updating the audio-related service settings:
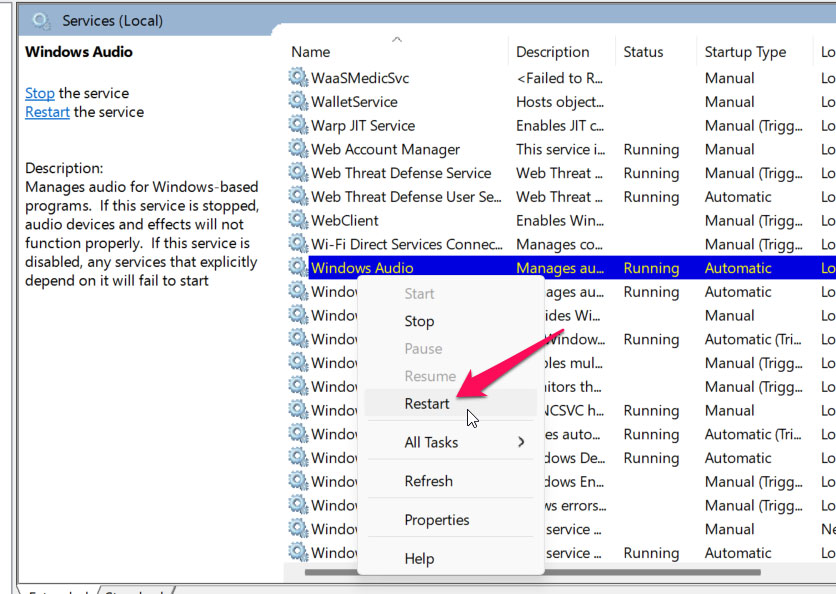
- At first, press the Windows logo key and R on your keyboard at the same time to bring up the Run box.
- Then, type services and hit Enter to open the Services windows.
- Select the Windows Audio service, and click Restart.
- Select Properties by right-clicking Windows Audio.
- Set the Startup to Automatic. Then click Apply > OK.
- Restart and set these two services to Automatic:
- Windows Audio Endpoint Builder
- Multimedia Class Scheduler.
- See if they work by playing music or a video.
Fix 8: Switch to the Default Sound Drivers
If the issue is not resolved by updating your audio drivers, then Windows has default sound drivers that you can use as an alternative. Changing to these default drivers could restore your computer’s ability to play sound again. To accomplish that, follow these steps:
- At first, use the search icon on the taskbar or press Win + S to bring up the search menu.
- In the text box, type the control panel and then select the first result.
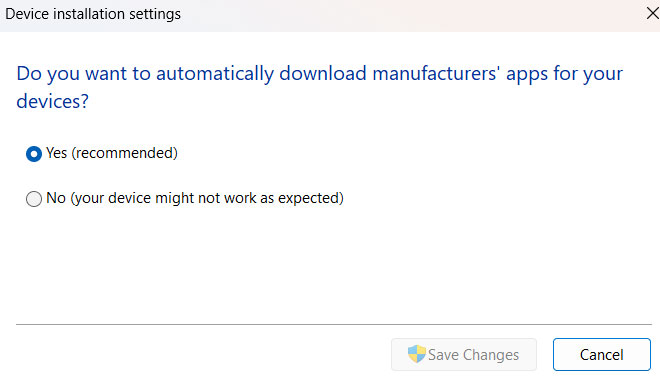
- Then, head over to System > Advanced System Settings.
- In System Properties, go to the Hardware tab and click Device Installation Settings.
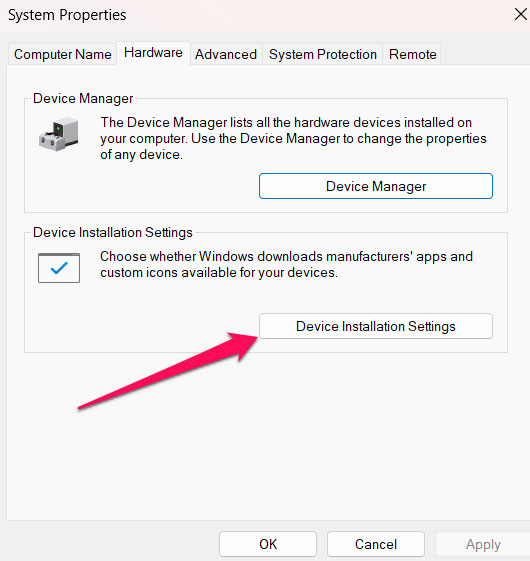
- Choose the No (your device will get strange behaviour) option, then click Save Changes.
- Then, when the User Account Control (UAC) prompt appears, select Yes.
- Now open Device Manager in one of its many ways.
- Expand Sound, video and game controllers.
- Thereafter, right-click your sound driver and choose Uninstall device.
- Select Uninstall to confirm the operation.
- Finally, in the Device Manager window, select the Action menu.
- Then, choose Scan for hardware changes.
Fix 9: Check The Supporting Audio Components
The Windows Audio service depends on a number of system components to work on your particular PC. If any of these components are not operating, audio services may cease functioning.
Here’s how to see if the necessary services are running.
- At first, open the Run dialog box with Win + R.
- Type services.msc open field and hit Enter.
- Find the RPC Endpoint Mapper service in the list, double-click it, and go to its properties.
- Then, select Automatic from the drop-down menu next to Startup type.
- Click Apply, followed by OK.
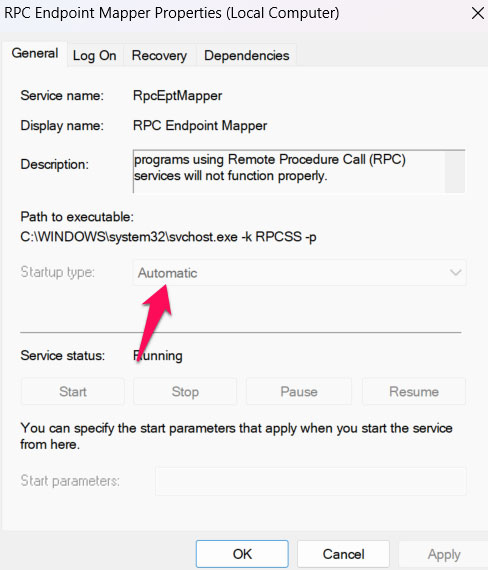
- Likewise, do the same for the startup type for Remote Procedure Call and DCOM Server Process Launcher services.
Fix 10: Perform a System Restore
In Windows, System Restore is an important feature, and it regularly backs up your system, which helps in reverting the system to the last good known state.
It can fix many problems by reverting recent system changes without affecting your personal files. It helps to restore your system to a working order before the issues occur. So, here are the steps that you need to perform:
- Press Win + R to open Run.
- Type sysdm.cpl and press Enter.
- Switch to the System Protection tab in the System Properties window.
- Click on System Restore.
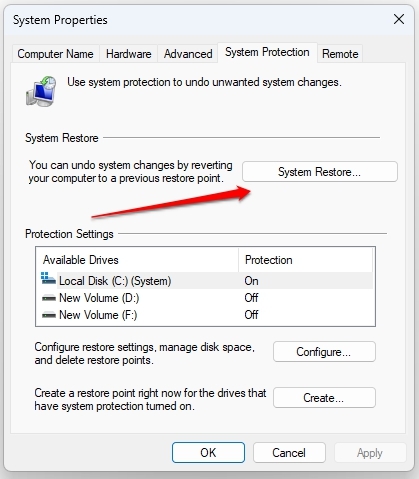
- Click Next.
- Choose a restore point before the problem appears, and click Next.
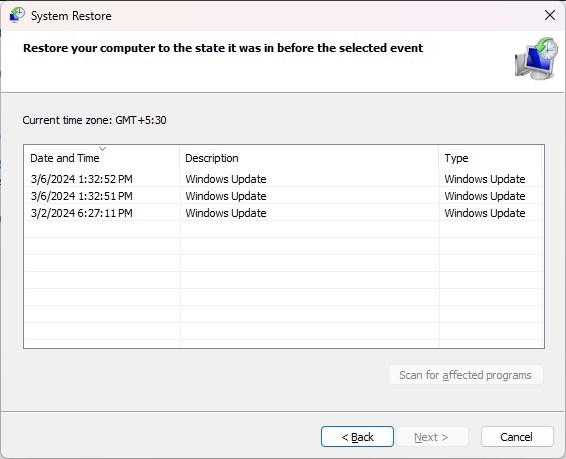
- Confirm all the details, and hit Finish.
Now, try restarting Windows and go back to the specified restore point. And then the audio services will work normally.
Conclusion
So, that’s how you can easily fix the “Audio Services Not Responding” error. But, in case you are still facing the same error even after performing all the mentioned fixes, you must connect to the Windows help center and ask for help.
Enjoyed this article?
If TechLatest has helped you, consider supporting us with a one-time tip on Ko-fi. Every contribution keeps our work free and independent.
Support on Ko-fiDirectly in Your Inbox


