Highlights
- 0X800f081f error mostly occurs on Windows 10 when you either upgrade the OS or when there are corrupted files in OS.
- You can install the updates manually to avoid this error.
- Follow the quick solutions in this article that worked for many other users.

Are you frustrated by the 0x800f081f error code that frequently keeps popping up when repairing your system files or after your Windows update? This error is common when there are corrupted files on your system.
In this article, we have provided detailed methods (some of them are almost instant fixes)
that can help you fix this error.
What are the Causes of 0x800f081f Error?
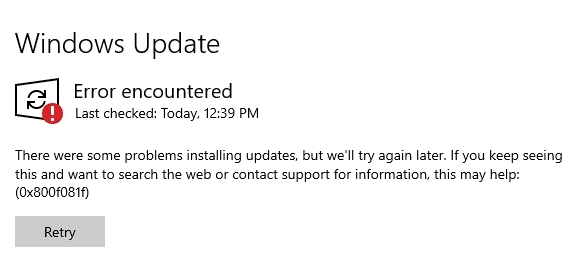
Here are the possible reasons that cause the DISM 0x800f081f error:
.NET Framework 3.5 incompatibility: If you enable the .NET framework using the installation wizard, with the DISM (Deployment Image Servicing and Management) tool, or through the PowerShell commands, then the 0x800f081f error might occur.
Windows Update core Agent: This update in Windows 10 can impact the other update components on the system. To fix this issue, you need to reset the other Windows update components using the command prompt.
Ways to Fix the 0x800f081f error
Method 1: Use the .NET Framework installer from Offline
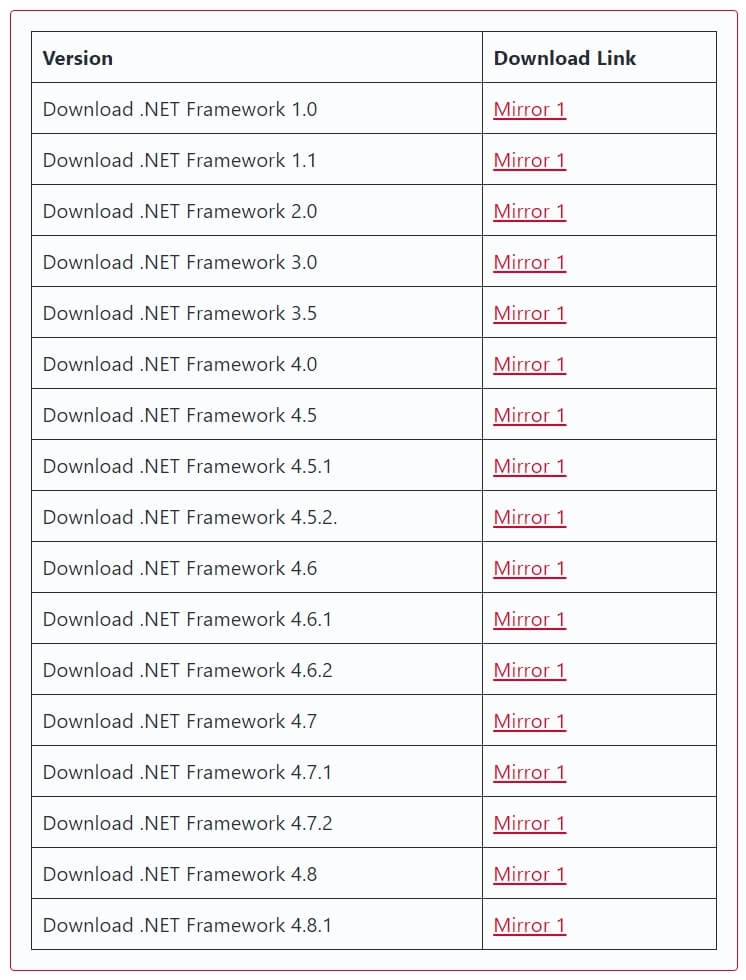
- Firstly, check for the latest .NET framework available in our dedicated guide.
- Now, click the Download (Mirror 1) option and let the download begin.
- After the file is downloaded, install it on your system.
- During the installation process, follow the on-screen installation process and complete the installation.
- Now, restart the system and see if the issue is fixed.
If not, move on to the next solution.
Method 2: Fix the Error with the help of the Troubleshooter
Microsoft upgrades usually come with a lot of bugs. That is the reason why some users hesitate to upgrade their OS. However, there is a troubleshooting feature that helps you fix this issue.
Here is how you can make use of the Troubleshooter option to fix the issue:
- Firstly, press Windows + I shortcut key to open the Windows Settings.
- Now, Click on the option Update and Security.
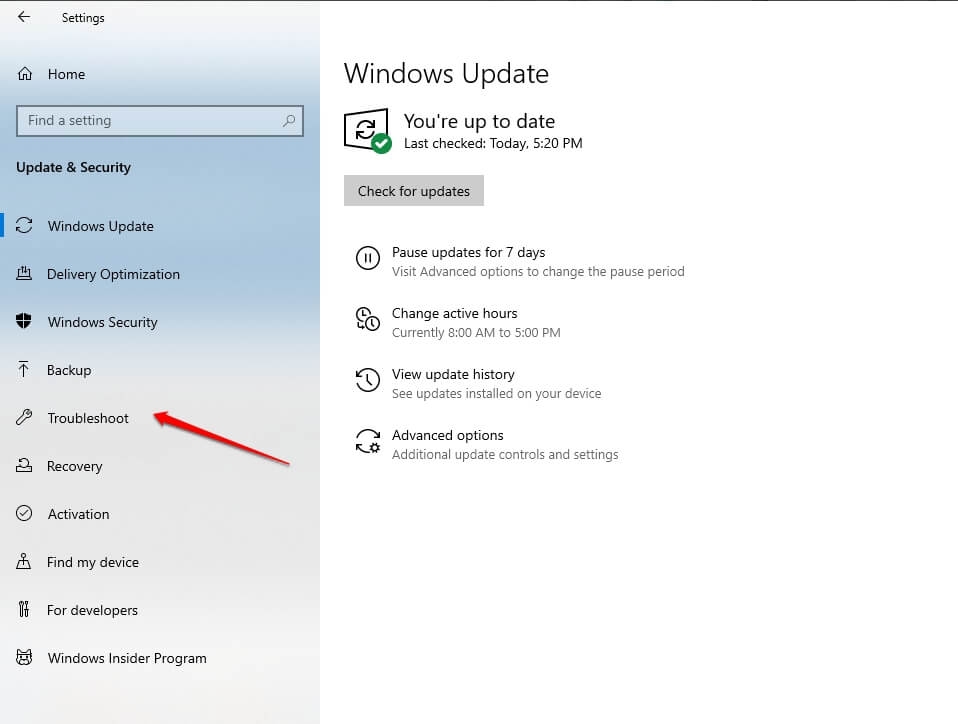
- From the left side menu, click on Troubleshoot option.
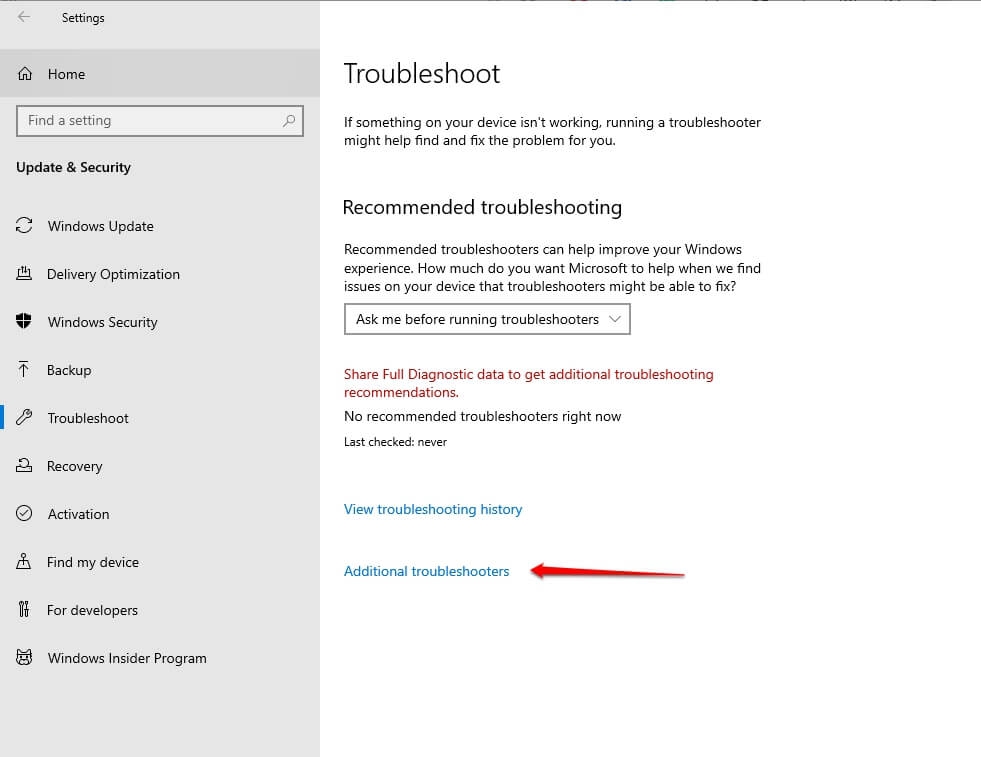
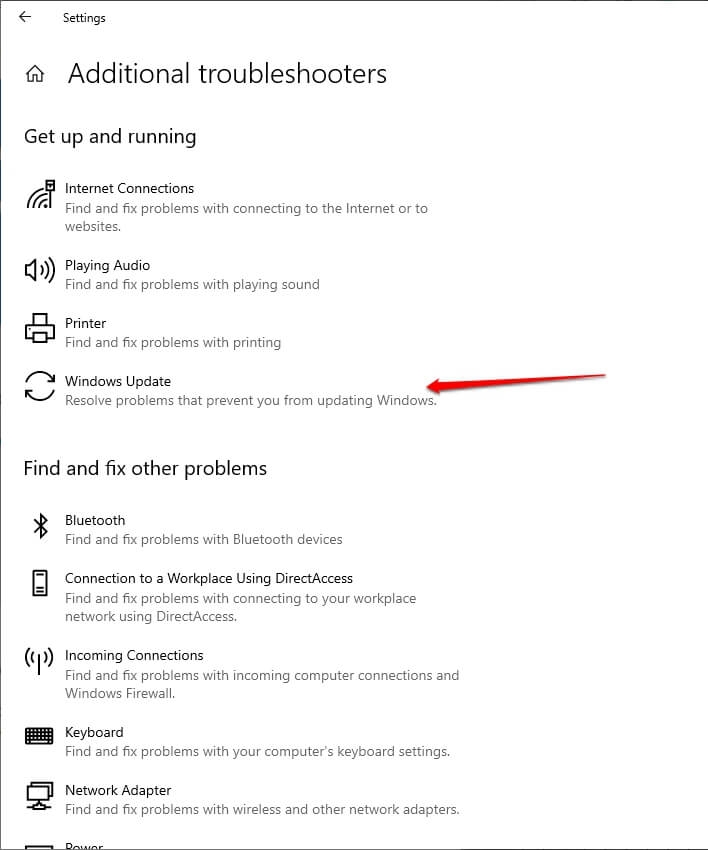
- Now, click on Additional Troubleshooters, select Windows Update, and click Run the Troubleshooter.
Method 2: Configure the Group Policy
In some cases, the Windows group policy might interfere with the installation. Though the group policy is only available for Windows 10 Education, Pro, and Enterprise version, you can still try to access the Group Policy option on Windows 10 Home.
Here is how you can do that:
- Firstly, open the run window by pressing Windows + R shortcut keys.
- Now, enter the command: gpedit.msc and hit Enter key to launch the editor.

Now, here is how you can enable the Group Policy Editor in Windows 10 Home:
This should solve the issue.
How to Configure the Group Policy Editor?
As mentioned above, open the run dialogue by pressing Win + R shortcut. Now, type gpedit.msc and hit enter to open the Group Policy Editor Window.
- On the left panel of the Group Policy Editor, you can see Computer Configuration. Click on it and open Administrative Templates and then select the System folder.

- Now, on the right-hand panel, you can find the option “Specify settings for optional component installation and component repair” click on it.
- Double-click on this option to open Settings. On the top-left corner, you can find the option Enabled. Click on it and select OK.

Method 3: Enable the .NET Framework Using DISM Command
You can fix the 0x800f081f error with the help of the DISM command. However, to go ahead with this process, you need to have Windows 10 ISO file.
If you don’t have Windows 10 ISO file, here is how you can download it:
Read: Download the Latest Windows 10 ISO File
Now, to fix the error code, follow the process below:
- Firstly, you need to mount the ISO image. For that, open File Explorer and double-click on the ISO file.
- Mounting will begin automatically.
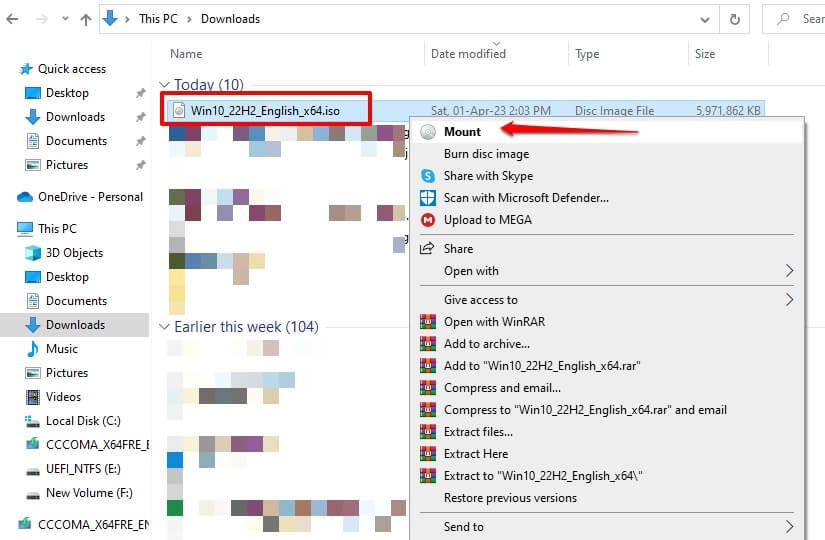
- After the image is mounted, go to the Start menu and type cmd to open Command Prompt.
- Run the Command Prompt as an Administrator.
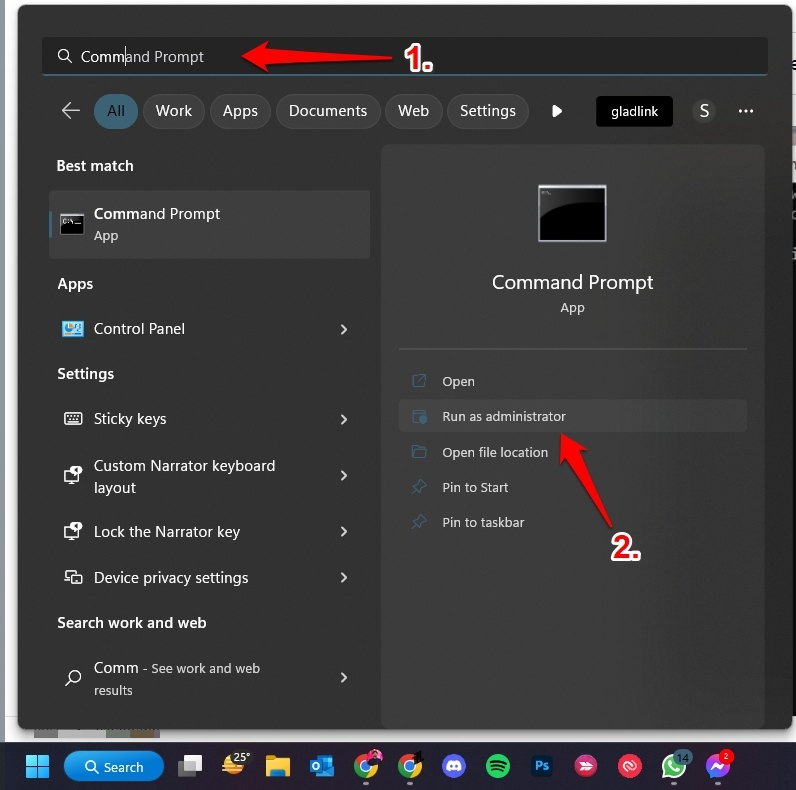
- Type the following command in the command prompt:
DISM /online /enable-feature /featurename:NetFx3 /All /Source:WIM:[drive_name]:\sources\install.wim:IndexNumber /LimitAccess
Change [drive_name] with your own drive name’s assigned letter.
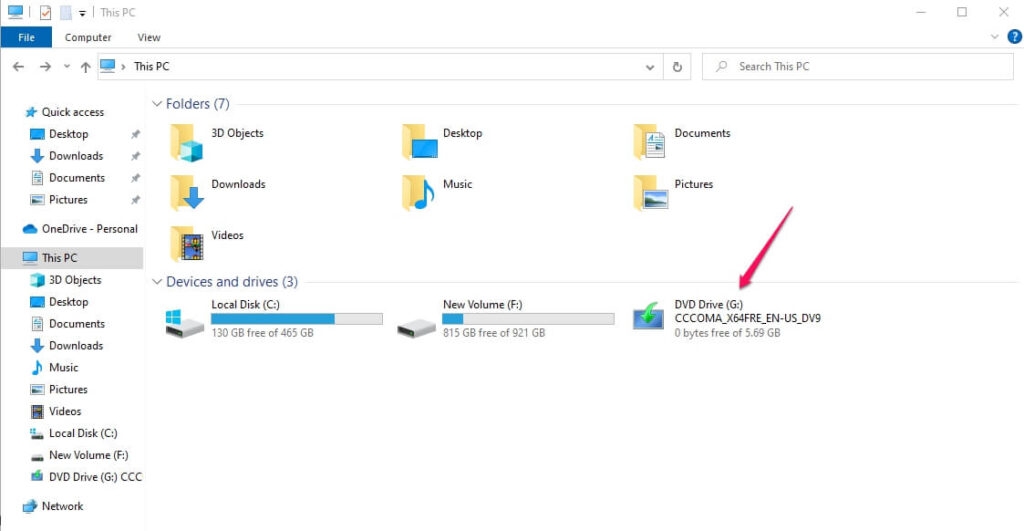
- After DISM successfully completes the repair, start the System File Checker in the same Command Prompt window:
sfc /scannowMethod 4: Reinstall .NET FRAMEWORK 3.5
This is another quick and effective solution to fix the 0x800f081f error. Here is how you can reinstall the .NET Framework 3.5:
- Firstly, press Windows + I to open Settings.
- Now, click on Apps and navigate to Apps and Features.
- On the top-right, you can find the option Programs and Features. Click on it.
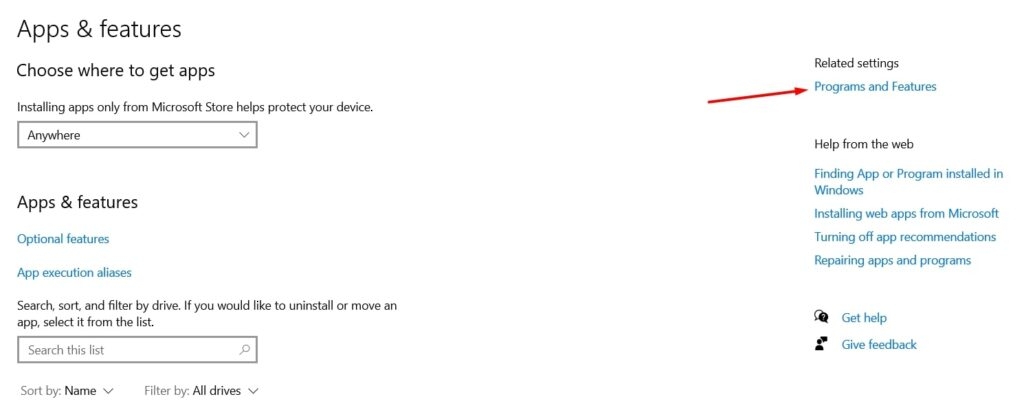
Now, you can find Turn Windows Features On or Off on the left panel.

Enable the option .NET Framework 3.5 (includes .NET 2.0 and 3.0) and click OK.

Method 5: Restart Windows Update components
- Firstly, open the Command Prompt as an Administrator.
- Now, enter the following commands and hit enter after each command to execute them:
Net Stop bits
Net Stop wuauserv
Net Stop appidsvc
Net Stop cryptsvc
Ren %systemroot%SoftwareDistribution SoftwareDistribution.bak
Ren %systemroot%system32catroot2 catroot2.bak
Net Start bits
Net Start wuauserv
Net Start appidsvc
Net Start cryptsvc
After running the following commands, your issue might be fixed.
Conclusion
Most users have faced the 0x800f081f issue after upgrading their Windows version. If you have recently updated Windows or tried enabling the .NET framework through the DISM tool, follow any of the above-mentioned solutions to fix the error.
Further Reading:
Directly in Your Inbox

![[Solved] Windows Update Error Code 0xc1900223 Windows 10 Update Featured](https://tech-latest.com/wp-content/uploads/2021/12/Windows-10-Update-Featured-300x225.jpeg)
